BDMPro user guide. Alientech srl electronic performance 1
|
|
|
- Giuseppa Bosco
- 7 anni fa
- Visualizzazioni
Transcript
1 1
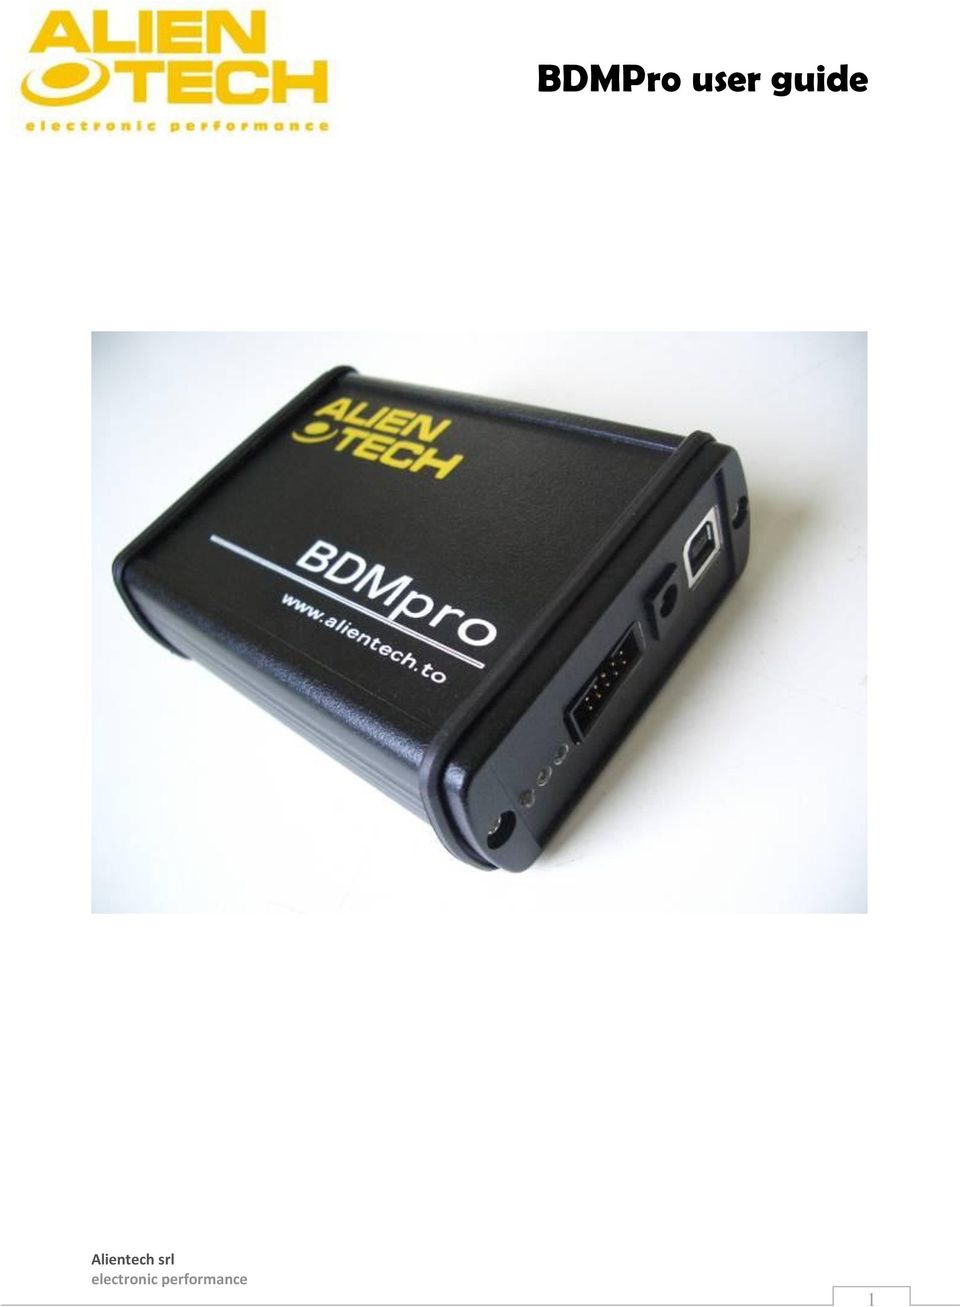
2 Requisiti Minimi di Sistema Windows 98 SE con 32 Mb di RAM. Windows NT/2000/XP con 64 Mb di RAM. Risoluzione minima dello schermo 800x600 a (16 bit). Porta USB 10 Mb di spazio libero sul disco fisso Componenti Nella confezione di BDM PRO è contenuto: Interfaccia Hardware BDM PRO Cavetto Flat BDM PRO Alimentatore Interfaccia Hardware Cavo USB Schedino convertitore 01 SIEMENS Schedino convertitore 02 MARELLI MJD Schedino convertitore 03 DELPHI M. Strip passo 1.27 Strip Passo 2.56 Manuali istruzioni 2

3 Installazione Installazione Software Installare il software, prima di collegare la BDM al connettore USB. Cliccare due volte sul file di installazione. Leggere con attenzione le regole riguardanti il contratto di licenza, e una volta presa visione ed accettati tutti i punti, procedere continuare, altrimenti annullare l installazione. Il programma, installerà automaticamente il software, in una directory predefinita (c:\programmi\alientech\bdm2005), creando le relative icone sul desktop e nel menu start di windows. 3

4 Driver USB Una volta completata l installazione software BDMpro è necessario collegare l hardware al connettore USB, attendere il riconoscimento della periferica da parte di Windows e procedere all installazione guidata del driver, scegliendo l operazione manuale ed indicando come posizione del driver, la cartella del software appena installato (c:\programmi\alientech\bdm2005\driver FTD2XX). Installazione aggiornamenti Durante la prima installazione oppure al rilascio di nuove famiglie è necessario salvare il file di attivazione rilasciato da Alientech (bdmpro.cfg) nella cartella c:\programmi\alientech\bdm2005 4

5 Interfaccia Software Il Software di BDMpro oltre ad essere molto semplice ed intuitivo, ha anche la peculiarità di riportare in un riquadro un confronto visivo con il tipo di centralina che si vuole leggere, aiutando così l utente nei passi significativi con chiari esempi. Una volta aperto il programma sarà necessario, stabilire un collegamento tra programma ed interfaccia hardware. Questo è possibile tramite, il pulsante posto al centro. 5

6 Interfaccia Hardware L interfaccia Hardware è costituita da BDMpro. Sul pannello frontale (vedi figura) sono disposte in ordine: 1) Led Rosso 2) Led Giallo 3) Led Verde 4) presa BDM 10 poli 5) Presa alimentatore 6) Presa USB. Il primo Led (rosso) si accende quando L interfaccia è collegata ed è alimentata dal computer tramite cavo USB e non è ancora stata inizializzata, con il comando Collegamento sulla finestra principale del programma. Il secondo Led (giallo) si accende quando l interfaccia BDM, è riconosciuta ed inizializzata dal computer. Il terzo Led (verde) si accende quando l interfaccia comunica con la centralina. La presa BDM 10 poli, è quella dove è collegato il cavetto Flat dato in dotazione. La presa jack d alimentazione, serve per collegare l alimentatore che fornirà tensione alla centralina. La presa USB, serve per collegare BDMpro al proprio PC. Importante: UTILIZZARE SOLO ED ESCLUSIVAMENTE L ALIMENTATORE FORNITO CON BDMpro, NON UTILIZZARE PER NESSUN MOTIVO ALTRI ALIMENTATORI. ALIENTECH S.r.l non si assume nessuna responsabilità sui danni provocati a persone, e ad apparecchiature causati dall utilizzo di un alimentatore differente da quello fornito in dotazione con BDM Pro. 6
 si accende quando l interfaccia BDM, è riconosciuta ed inizializzata dal computer.")
7 Apertura Centralina Le centraline Bosch EDC16 e le centraline Siemens SID, presentano tutte un sistema di chiusura ermetica molto simile. Esistono vari metodi per aprirle, dallo scaldarle con un convettore ad aria calda, al semplice ed elementare cacciavite. Noi consigliamo di procurarsi o di costruirsi un attrezzino dedicato. Come si vede in figura in pratica è uno scalpellino leggermente piegato a lama larga e sottile quanto basta per potersi infilare nella fessura tra coperchio e scatola. L ideale è possederne due da utilizzare insieme. Guardando la centralina come in figura partite dall angolo alto destro e proseguite verso il basso facendo delicatamente forza tanto quanto basta per sentire il silicone cedere. Proseguire in senso orario sul perimetro della centralina fino ad arrivare all angolo sinistro altro Procedere con cautela per tutto il perimetro senza sforzare troppo. Il rischio di rompere la scheda o i componenti su di essa montati è molto alto. Noterete guardando dal piccolo spiraglio che si è formato, che la scheda interna è incollata al coperchio superiore in prossimità della depressione che questo presenta sulla sinistra. Partendo dall alto dal lato destro dove c è il connettore della centralina, sollevare delicatamente il coperchio e scollando l ultimo lato rimasto fino ad arrivare in prossimità della depressione. Qui sempre partendo dall altro procedete scollando la scheda dal coperchio, agendo molto lentamente sul silicone. Fate molta attenzione a non farvi scappare di mano l attrezzo all interno della centralina, in quanto potrebbe danneggiare irreversibilmente lo stampato. 7

8 Saldare i Pin Stagnare il primo pin come in figura (il primo da sinistra se si tiene il connettore dall altra parte) Piazzare lo strip a cinque pin in modo corretto e cominciare la saldatura partendo dalla piazzola precedentemente stagnata, cercando di lasciare una luce tra i pin e la piazzola come in figura, questo agevolerà la rimozione delle strip. Stagnare e saldare tutti i pin, cercando si rimanere allineati il più possibile alle piazzole. Saldare la seconda strip a fianco utilizzando il medesimo procedimento. Per comodità nella confezione trovate un connettore come quello del cavetto flat che vi permetterà di allineare i pin della seconda strip prima di saldarli. Assicurarsi alla fine del lavoro che non ci siano corto circuiti e che le saldature siano lucide e non opache e che non abbiano la forma di una sferetta o falsi contatti. Per rimuovere le strip è sufficiente rimuovere lo stagno in eccesso con una treccia dissaldante. Se si ha avuto l accortezza di lasciare un po di distanza tra il pin e la piazzola, la strip verrà via rapidamente senza il rischio di danneggiare le isolette, altrimenti dopo aver rimosso tutto lo stagno possibile, muovere delicatamente la strip avanti e indietro, rimuovendola. 8

9 System s Minimum Requirements Windows 98 SE with 32 Mb of RAM. Windows NT/2000/XP with 64 Mb of RAM. Screen minimum resolution 800x600 (16 bit). USB Port 10 Mb of free space on hard disk Components BDM PRO box includes: BDM PRO Hardware interface BDM PRO Flat cable Hardware interface power supplier USB cable 01 SIEMENS Card 02 MARELLI MJD Card 03 DELPHI M. Card Strip line pitch 1.27 Strip line pitch 2.56 Instruction manual Connector to line up pins 9

10 Installation Software Installation IMPORTANT: First install the software, then link BDM to USB connector. Double click on installation file. Carefully read the rules of the license contract, and after you have read and accepted all points, choose whether to continue or annul the installation. After your acceptance, the program will automatically install the software, in a determined directory (c:\programs\alientech\bdm2005), creating the relative icon on the desktop and also in windows start menu. 10

11 USB Driver When the BDMPro software installation is completed it is necessary link the hardware to the USB connector, wait that Windows recognizes the peripheral and proceeds to the driver directed installation, then choose the manual operation and indicate for the driver position the software folder just installed (c:\programs\alientech\bdm2005\driverftd2xx). Upgrades installation During the first installation or at the issue of new families it s necessary to save the activation file given by Alientech (called bdmpro.cfg) in the folder c:\programs\alientech\bdm

12 Software Interface BDMpro software in addition to be very simple and intuitive has also the peculiarity to reproduce in a panel a visual comparison with the type of Ecu you want read, helping user step by step with clear examples. When the program is open it will be necessary establish a link between program and hardware interface. This is possible by pressing the button in the middle. 12

13 Hardware Interface Hardware interface is formed from BDMpro. On the frontal panel (see example) there are in order: 1) Red Led 2) Yellow Led 3) Green Led 4) BDM port 10 pins 5) Power supply port 6) USB Port. First Led (red) it lights when interface it s connected and receive energy from PC by USB cable but it hasn t been yet initialized by clicking the button Connection on program windows. Second Led (yellow) it lights when BDM interface, it s recognized and initialized by PC. Third Led (green) it lights when the interface communicate with the ECU. BDM port 10 pins, needs to connect the flat cable contained in the pack. Jack socket for power, needs to connect the power supplier that will provide tension to the Ecu. USB port is needed to connect BDMpro to the PC. Important: USE ONLY THE POWER SUPPLIER FURNISHED WITH BDMpro, DO NOT USE FOR ANY REASON OTHERS POWER SUPPLIER. ALIENTECH S.r.l will not assume ANY responsibility on damages caused to persons and on tools caused by using a power supplier different from the one contained in the BDMpro pack. 13
 it lights when BDM interface, it s recognized and initialized by PC. Third Led (green) it lights when the interface communicate with the ECU.")
14 Open the ECU Bosch EDC16 ECU and Siemens SID ECU have a similar hermetic fastener. There are several ways to open these Ecus from heating with a hot air convector to a simple screwdriver. We recommend you to get or build a dedicated tool. As shown in the picture this tool is chisel slightly bowed, with a wide blade thin enough to slip into the chink between the lid and the box. It would be better having two tools to be used together. Looking at the unit as in the picture, begin from the right top corner and then go towards the bottom gently forcing enough to perceive the silicon yield. Continue clockwise along the perimeter of the ECU until you arrive at the other left corner. Proceed with caution for the entire perimeter avoiding to overwork too much, as there is a high risk of breaking the ECU or the components on it. Looking through the chink created, you will notice that the internal ECU is glued on the top cover, near a depression on the left side of the same. Starting from the right side, where the ECU connector is placed, gently lift the cover and detach the last side until you arrive near the depression. Now, always starting from the top detach the ECU from the cover, acting slowly on the silicone. Take care not to slip from your fingers the tool into the ECU, it could irreversibly damage the printed circuit. 14

15 Weld the Pin Soft-solder the first pin as shown in the picture (The first from the left if you keep the connector on the other side). Place properly the five strip pin and begin to weld from the pad previously soldered, trying to leave a small opening between the pins and the pad as in the picture, so the removal of the strip will be easier Soft-solder and weld every pin, trying to stay aligned to the pads. Weld the second strip at the side using the same procedure. In BDMpro box you will find a connector (similar to the one for the flat cable) that will help you to align the pins of the second strip before welding. At the end of your work take care that there are no short-circuit, welds are shiny and not rounded, and there are no fake-contact. Remove the strip by removing the excess tin with an unsoldering tool. If there is a little distance between the pin and the pad, the strip can be quickly removed without any risk of damaging the ECU otherwise after removing the tin as much as you can, gently move the strip back and forth and then remove it. 15
 that will help you to align the pins of the second strip before welding.")
16 Alientech s.r.l. Sede Operativa Trino (VC) - Italy Via Dei Cordari, 1 tel: (+39) fax: (+39) Per maggiori informazioni infoservice@alientech.to 16

BDM Motorola MC32xxx User Manual
 BDM Motorola MC32xxx User Manual FG Technology 1/14 BDM Motorola MC32xxx Indice Index Premessa / Premise..................................................................... 3 Il modulo EOBD2 / The EOBD2
Adattatori Morsa BDMpro
 1 Cosa sono I Nuovi Adattatori per la Morsa BDMpro consentono di utilizzare la morsa per centraline Bosch anche per le centraline Marelli, Siemens e Delphi. Perché utilizzarli I Nuovi Adattatori per la
Installazione interfaccia e software di controllo mediante PC Installing the PC communication interface and control software
 Windows 7 Installazione interfaccia e software di controllo mediante PC Installing the PC communication interface and control software Contenuto del kit cod. 20046946: - Interfaccia PC-scheda (comprensiva
Downloading and Installing Software Socio TIS
 Object: Downloading and Installing Software Socio TIS compiler: L.D. Date Revision Note April 17 th 2013 --- For SO XP; Win 7 / Vista step Operation: Image A1 Open RUN by clicking the Start button, and
LEGEND UPDATE GUIDE INSTALLING LEGEND UPDATE. viscount. Legend Update Guide
 LEGEND UPDATE GUIDE INSTALLING LEGEND UPDATE The Legend series firmware is upgradable via PC. You must first download the Legend Update application from http://www.instruments.com. NB Legend Update is
How to connect SL Controllers to your computer
 How to connect SL Controllers to your computer Follow these instructions to enable the best connection between the SL Controller and your computer. 1 3 2 1. Connect the instrument to an electrical outlet
User Guide Guglielmo SmartClient
 User Guide Guglielmo SmartClient User Guide - Guglielmo SmartClient Version: 1.0 Guglielmo All rights reserved. All trademarks and logos referenced herein belong to their respective companies. -2- 1. Introduction
Quando mi collego ad alcuni servizi hosting ricevo un messaggio relativo al certificato di protezione del sito SSL, come mai?
 IT FAQ-SSL Quando mi collego ad alcuni servizi hosting ricevo un messaggio relativo al certificato di protezione del sito SSL, come mai? Il certificato SSL relativo ai servizi hosting è stato rinnovato
BDMPro Positioning Frame
 1 2 Di cosa si tratta La Morsa per BDMpro è uno strumento studiato per agevolare la lettura e la programmazione delle centraline con BDMpro. Vantaggi Grazie alla Morsa per BDMpro è possibile effettuare
Esempio con Google Play tore Example with Google Play tore
 Guida all installazione ed uso dell App VR Tour Camerata Picena Per installare l App occorre aprire lo Store del vostro smartphone (Play Store o App Store) e cercare l App con parola chiave Camerata Picena.
Dimensioni 101mm x 71mm x 28mm (H) Alimentazione 12..24 Vac/Vcc Morsettiera o alimentatore plug, o da porta USB Connessioni lato RS232 e USB
 Alimentazione 12..24 Vac/Vcc Morsettiera o alimentatore plug, o da porta USB Connessioni lato RS232 e USB") Sommario 1 Introduzione... 3 2 Dati tecnici... 3 2.1 Note generali di utilizzo... 3 3 DIMENSIONE E INSTALLAZIONE... 4 4 COLLEGAMENTI ELETTRICI... 5 4.1 Alternativa di collegamento lato PC... 5 4.2 Collegamento
Sommario 1 Introduzione... 3 2 Dati tecnici... 3 2.1 Note generali di utilizzo... 3 3 DIMENSIONE E INSTALLAZIONE... 4 4 COLLEGAMENTI ELETTRICI... 5 4.1 Alternativa di collegamento lato PC... 5 4.2 Collegamento
Manuale Handbook. Via Torino 16-15020 Piagera di Gabiano (AL) - ITALIA Tel.+ 39 0142 xxxxxx - fax +39 xxxxx. E-mail: support.race@dimsport.
 - ITALIA Tel.+ 39 0142 xxxxxx - fax +39 xxxxx. E-mail: support.race@dimsport.") DIMA 555PRO Manuale Handbook Via Torino 16-15020 Piagera di Gabiano (AL) - ITALIA Tel.+ 39 0142 xxxxxx - fax +39 xxxxx E-mail: supporto.race@dimsport.it E-mail: support.race@dimsport.it http://www.dimsport.it
DIMA 555PRO Manuale Handbook Via Torino 16-15020 Piagera di Gabiano (AL) - ITALIA Tel.+ 39 0142 xxxxxx - fax +39 xxxxx E-mail: supporto.race@dimsport.it E-mail: support.race@dimsport.it http://www.dimsport.it
CCTV DIVISION. Guida Alla Lettura del Numero Seriale, Codice Prodotto, Versione Firmware, Versione Software, Codice Libretto
 CCTV DIVISION Guida Alla Lettura del Numero Seriale, Codice Prodotto, Versione Firmware, Versione Software, Codice Libretto How to Get Serial Number, Firmware Version, Product Code, Software Version, User
BOSCH EDC16/EDC16+/ME9
 pag. 16 di 49 BOSCH EDC16/EDC16+/ME9 BOSCH EDC16/EDC16+/ME9 Identificare la zona dove sono poste le piazzole dove andremo a saldare il connettore. Le piazzole sono situate in tutte le centraline Bosch
ISTRUZIONI PER IL MONTAGGIO DEL KIT SSD INSTRUCTIONS TO INSTALL THE KIT SSD
 Audya Series ISTRUZIONI PER IL MONTAGGIO DEL KIT SSD INSTRUCTIONS TO INSTALL THE KIT SSD ISTRUZIONI PER L APERTURA DI AUDYA (FIG. 1) 1. Svitare le 4 viti poste sul fondo 2. Svitare le 2 viti poste
LA SACRA BIBBIA: OSSIA L'ANTICO E IL NUOVO TESTAMENTO VERSIONE RIVEDUTA BY GIOVANNI LUZZI
 Read Online and Download Ebook LA SACRA BIBBIA: OSSIA L'ANTICO E IL NUOVO TESTAMENTO VERSIONE RIVEDUTA BY GIOVANNI LUZZI DOWNLOAD EBOOK : LA SACRA BIBBIA: OSSIA L'ANTICO E IL NUOVO Click link bellow and
Aggiornamento dispositivo di firma digitale
 Aggiornamento dispositivo di firma digitale Updating digital signature device Questo documento ha il compito di descrivere, passo per passo, il processo di aggiornamento manuale del dispositivo di firma
TLR05S-350. Extender in corrente costante, 3 x 350mA per TLR04M_
 TLR05S-350 Extender in corrente costante, 3 x 350mA per TLR04M_350-500 IT DATI TECNICI Alimentazione Uscita Tipo di carico Sistema di collegamento master/slave/slave Distanza massima delle connessioni
Istruzioni per l installazione Installation guide
 & Istruzioni per l installazione Installation guide KETRON SD5 & SD8 Istruzioni per l apertura dello strumento Instructions to open the instrument Eseguire le operazioni adagiando lo strumento sopra un
I CAMBIAMENTI PROTOTESTO-METATESTO, UN MODELLO CON ESEMPI BASATI SULLA TRADUZIONE DELLA BIBBIA (ITALIAN EDITION) BY BRUNO OSIMO
 BY BRUNO OSIMO") I CAMBIAMENTI PROTOTESTO-METATESTO, UN MODELLO CON ESEMPI BASATI SULLA TRADUZIONE DELLA BIBBIA (ITALIAN EDITION) BY BRUNO OSIMO READ ONLINE AND DOWNLOAD EBOOK : I CAMBIAMENTI PROTOTESTO-METATESTO, UN MODELLO
I CAMBIAMENTI PROTOTESTO-METATESTO, UN MODELLO CON ESEMPI BASATI SULLA TRADUZIONE DELLA BIBBIA (ITALIAN EDITION) BY BRUNO OSIMO READ ONLINE AND DOWNLOAD EBOOK : I CAMBIAMENTI PROTOTESTO-METATESTO, UN MODELLO
INSTALLARE PALLADIO USB DATA CABLE IN WINDOWS XP/ME/2000/98
 rev. 1.0-02/2002 Palladio USB Data Cable INSTALLARE PALLADIO USB DATA CABLE IN WINDOWS XP/ME/2000/98 (tutti i KIT, escluso KIT MOTOROLA V6x-T280) La procedura di installazione del Palladio USB Data Cable
Enel App Store - Installation Manual - Mobile
 Model Design Digital Revolution Enel App Store - Installation Manual - Mobile V 1.1 Manual Questo documento contiene informazioni di proprietà di Enel SpA e deve essere utilizzato esclusivamente dal destinatario
Acer Aspire TimelineU M5-481TG Audio Drive
 Acer Aspire TimelineU M5-481TG Audio Drive Replacement Replace your speaker if they are faulty or damaged. Scritto Da: Margaret Bruetsch INTRODUZIONE Before performing any repairs, make sure the laptop
EVOMINI+ SET Guida all installazione
 EVOMINI+ SET Guida all installazione per Windows XP, Windows Vista e Windows 7 Prima di connettere l interfaccia USB al PC è necessario installare i driver ed il software applicativo. Se è necessario aggiornare
STARTER, LO SWITCHES PANEL, IL FULE SELECTOR ED IL PARKING BRAKE
 STARTER, LO SWITCHES PANEL, IL FULE SELECTOR ED IL PARKING BRAKE 1) Scarica e installa l IDE arduino da questo link: https://www.arduino.cc/en/main/software; 2) Scarica da www.simvim.com/ardsimx.html sia
Aggiornamento del firmware della connessione elettrica con Bus di campo. connection with Fieldbus
 Aggiornamento del firmware della connessione elettrica con Bus di campo I Firmware update of connection with Fieldbus electrical GB . AGGIORNAMENTO DEL MODULO BUS DI CAMPO Per aggiornare il firmware della
 RedbearLabs Nano Una delle più piccola board di sviluppo esistenti esistente Caratteristiche Piccolissimo: solo 18.5mm x 21.0mm supporta Bluetooth low energy: 2.4GHz ultra low-power wireless applications
ECCO LE ISTRUZIONI PER INSERIRE IL MATERIALE RICHIESTO DAL BANDO TEATRO SENZA FILO CONTEST:
 ECCO LE ISTRUZIONI PER INSERIRE IL MATERIALE RICHIESTO DAL BANDO TEATRO SENZA FILO CONTEST: 1) Registrati su www.circyouity.com e creati un profilo personale o del gruppo* (non con il nome del progetto!)
Guida all immatricolazione online
 Dottorati di Ricerca Guida all immatricolazione online (English version at the end) 1. Effettuare il login inserendo nome utente e password, quindi fare click a sinistra sulla voce Immatricolazione. A
RETROFIT KIT KONE - KRM - KCEAPM - KONEXION
 RETROFIT KIT KONE - KRM - KCEAPM - KONEXION 7IS-80416 30/01/2019 COMPONENTI / COMPONENTS Helpy 2W-V 12V MK (5HL-006) Cavo per kit retrofit Kone / Cable retrofit kit Kone (5KT-120) INSTALLAZIONE KRM / KRM
LA SACRA BIBBIA: OSSIA L'ANTICO E IL NUOVO TESTAMENTO VERSIONE RIVEDUTA BY GIOVANNI LUZZI
 Read Online and Download Ebook LA SACRA BIBBIA: OSSIA L'ANTICO E IL NUOVO TESTAMENTO VERSIONE RIVEDUTA BY GIOVANNI LUZZI DOWNLOAD EBOOK : LA SACRA BIBBIA: OSSIA L'ANTICO E IL NUOVO Click link bellow and
AVERE 30 ANNI E VIVERE CON LA MAMMA BIBLIOTECA BIETTI ITALIAN EDITION
 AVERE 30 ANNI E VIVERE CON LA MAMMA BIBLIOTECA BIETTI ITALIAN EDITION READ ONLINE AND DOWNLOAD EBOOK : AVERE 30 ANNI E VIVERE CON LA MAMMA BIBLIOTECA BIETTI ITALIAN EDITION PDF Click button to download
ELCART. Manuale di istruzioni/scheda tecnica. Alimentatore Switching 60W UPS 13/26500 (Mod. VIC-60-12UPS)
") PAGINA 1 DI 6 Alimentatore Switching 60W UPS 13/26500 (Mod. VIC-60-12UPS) NOTA! LEGGETE ATTENTAMENTE QUESTO MANUALE DI ISTRUZIONI PRIMA DI INSTALLARE QUESTO ALIMENTATORE. Prima della prova e messa in servizio
PAGINA 1 DI 6 Alimentatore Switching 60W UPS 13/26500 (Mod. VIC-60-12UPS) NOTA! LEGGETE ATTENTAMENTE QUESTO MANUALE DI ISTRUZIONI PRIMA DI INSTALLARE QUESTO ALIMENTATORE. Prima della prova e messa in servizio
Compatibilità del Portale Piaggio con Internet Explorer 10 e 11. Internet Explorer 10
 Italiano: Explorer 10 pagina 1, Explorer 11 pagina 2 English: Explorer 10 page 3 and 4, Explorer 11 page 5. Compatibilità del Portale Piaggio con Internet Explorer 10 e 11 Internet Explorer 10 Con l introduzione
EVOSER-SET Sensore Digitale con uscita RS485 Modbus RTU Kit di configurazione Guida all installazione (S.O. Windows XP, VISTA, 7)
") EVOSER-SET Sensore Digitale con uscita RS485 Modbus RTU Kit di configurazione Guida all installazione (S.O. Windows XP, VISTA, 7) 1 Prima di connettere il convertitore USB/485 al PC è necessario installare
EVOSER-SET Sensore Digitale con uscita RS485 Modbus RTU Kit di configurazione Guida all installazione (S.O. Windows XP, VISTA, 7) 1 Prima di connettere il convertitore USB/485 al PC è necessario installare
Guida all installazione del prodotto 4600 in configurazione plip
 Guida all installazione del prodotto 4600 in configurazione plip Premessa Questo prodotto è stato pensato e progettato, per poter essere installato, sia sulle vetture provviste di piattaforma CAN che su
ITALIANO - WINDOWS XP
 ITALIANO - WINDOWS XP Inserire il cavo AP160UIR nella porta USB del computer. Verrà rilevato il nuovo hardware Seguire i passi dell installazione guidata di Windows, selezionando: Installa da un elenco
DMX. Wireless DMX 512 TRANSMITTER MANUALE DI INSTALLAZIONE ED USO
 Wi DMX R Wireless DMX 512 TRANSMTTER MANUALE D NSTALLAZONE ED USO DESCRZONE PANNELL 4 1 2 5 1 Connettore antenna SMA 2 ngresso alimentatore 5 Vdc 650 ma (fornito) Led blu : Lampeggio lento : Trasmettitore
100 consigli per vivere bene (Italian Edition)
") 100 consigli per vivere bene (Italian Edition) Raffaele Morelli Click here if your download doesn"t start automatically 100 consigli per vivere bene (Italian Edition) Raffaele Morelli 100 consigli per
100 consigli per vivere bene (Italian Edition) Raffaele Morelli Click here if your download doesn"t start automatically 100 consigli per vivere bene (Italian Edition) Raffaele Morelli 100 consigli per
Istruzioni per l installazione Installation guide
 & Istruzioni per l installazione Installation guide KETRON X1 & XD9 Istruzioni per l apertura dello strumento Instructions to open the instrument Eseguire le operazioni adagiando lo strumento sopra un
UNIVERSITÀ DEGLI STUDI DI TORINO
 How to register online for exams (Appelli) Version updated on 18/11/2016 The academic programs and the career plan Incoming students can take exams related to the courses offered by the Department where
WELCOME. Go to the link of the official University of Palermo web site www.unipa.it; Click on the box on the right side Login unico
 WELCOME This is a Step by Step Guide that will help you to register as an Exchange for study student to the University of Palermo. Please, read carefully this guide and prepare all required data and documents.
WELCOME UNIPA REGISTRATION:
 WELCOME This is a Step by Step Guide that will help you to register as an Exchange for study student to the University of Palermo. Please, read carefully this guide and prepare all required data and documents.
Heat cost allocators Mounting manual
 - heat cost allocators ripartitori di calore Mounting Manual Manuale di montaggio Heat cost allocators Mounting manual Ripartitori dei costi di calore - Manuale di montaggio pag. 1 Mounting the allocator
USER MANUAL MANUALE D USO BE Additional 12-zone. keyboard for BM 2006 paging microphone. - - Tastiera addizionale per base microfonica BM 2006
 USER MANUAL MANUALE D USO -- Additional 12-zone BE 2012 keyboard for BM 2006 paging microphone - - Tastiera addizionale per base microfonica BM 2006 INDEX INDICE ENGLISH SAFETY PRECAUTIONS DESCRIPTION
Manuale per il collegamento e l uso Installation and operation manual
 Manuale per il collegamento e l uso Installation and operation manual Ripetitore per extender kit HD-SDI HD-SDI repeater for extender kit 1. Introduzione Il prodotto è un dispositivo per il segnale HD-SDI
dbtechnologies INSTALLATION GUIDE Software version 2.0 Document version 2.0
 INSTALLATION GUIDE Software version 2.0 Document version 2.0 Indice Installazione del Software DVA Network... 3 Requisiti del sistema... 3 Installazione DVA Network... 3 Disinstallazione del software DVA
599CD/A I EN ISTRUZIONI PER L USO INSTRUCTIONS FOR USE
 599CD/A I EN ISTRUZIONI PER L USO INSTRUCTIONS FOR USE ISTRUZIONI PER L USO I Installazione del software Inserire il CD di installazione nel CD-ROM. Nella directory principale del CD cliccare setup.exe
Mounting the allocator on the heater. Montaggio del ripartitore sul radiatore
 Mounting the allocator on the heater Montaggio del ripartitore sul radiatore Allocator must be mounted at 66% (or 75% for HCA version 2 only or later versions) of the Height of the radiator and half of
IL GIOVANE HOLDEN FRANNY E ZOOEY NOVE RACCONTI ALZATE LARCHITRAVE CARPENTIERI E SEYMOUR INTRODUZIONE BY JD SALINGER
 IL GIOVANE HOLDEN FRANNY E ZOOEY NOVE RACCONTI ALZATE LARCHITRAVE CARPENTIERI E SEYMOUR INTRODUZIONE BY JD SALINGER READ ONLINE AND DOWNLOAD EBOOK : IL GIOVANE HOLDEN FRANNY E ZOOEY NOVE RACCONTI ALZATE
dbtechnologies INSTALLATION GUIDE COD _Section_A_REV.1.0
 VER. 3.0 INSTALLATION GUIDE COD. 420120251_Section_A_REV.1.0 Indice Installazione del Software Network... 3 Requisiti del sistema... 3 Installazione dbtechnolologies Network... 3 Disinstallazione del software
Fiori di campo. Conoscere, riconoscere e osservare tutte le specie di fiori selvatici più note
 Fiori di campo. Conoscere, riconoscere e osservare tutte le specie di fiori selvatici più note M. Teresa Della Beffa Click here if your download doesn"t start automatically Fiori di campo. Conoscere, riconoscere
CEDMEGA Rev 1.2 CONNECTION TUTORIAL
 CEDMEGA Rev 1.2 CONNECTION TUTORIAL rev. 1.0 19/11/2015 1 www.cedelettronica.com Indice Power supply [Alimentazione]... 3 Programming [Programmazione]... 5 SD card insertion [Inserimento SD card]... 7
KESS Slave user guide
 1 Di cosa si tratta KESS Slave è un programmatore seriale in linea K e linea CAN, che consente la lettura e la riprogrammazione di un elevato numero di autovetture. Vantaggi Con KESS Slave è possibile
ATTENZIONE! / WARNING! Scollegare le batterie prima di qualsiasi operazione! Disconnect batteries before servicing! Kit caricabatteria :
 Page 1 / 8 Release INSTALLATION INSTRUCTIONS PROCEDURA D INSTALLAZIONE 1 3 ATTENZIONE! / WARNING! Scollegare le batterie prima di qualsiasi operazione! Disconnect batteries before servicing! Kit caricabatteria
Interface A25 (+90 ) Interfaccia A25 (+90 ) O-RING #109 O-RING #109 O-RING #010 O-RING #109
 Interfaccia A25 (+90 ) O-RING #109 O-RING #109 O-RING #010 O-RING #109") Accessori Gimapick Gimapick Accessories A25 Interfaccia A25 (+90 ) L interfaccia A25 è necessaria quando l asse di rotazione e/o di presa debba essere posto a 90 rispetto all asse di traslazione o rispetto
Accessori Gimapick Gimapick Accessories A25 Interfaccia A25 (+90 ) L interfaccia A25 è necessaria quando l asse di rotazione e/o di presa debba essere posto a 90 rispetto all asse di traslazione o rispetto
Succhi di frutta e verdura con la centrifuga (Italian Edition)
") Succhi di frutta e verdura con la centrifuga (Italian Edition) Click here if your download doesn"t start automatically Succhi di frutta e verdura con la centrifuga (Italian Edition) Succhi di frutta e
Succhi di frutta e verdura con la centrifuga (Italian Edition) Click here if your download doesn"t start automatically Succhi di frutta e verdura con la centrifuga (Italian Edition) Succhi di frutta e
How to register online for exams (Appelli) Version updated on 23/10/2017
 Version updated on 23/10/2017") How to register online for exams (Appelli) Version updated on 23/10/2017 The academic programs and the career plan Incoming students can take exams related to the courses offered by the Department where
How to register online for exams (Appelli) Version updated on 23/10/2017 The academic programs and the career plan Incoming students can take exams related to the courses offered by the Department where
REGISTRATION GUIDE TO RESHELL SOFTWARE
 REGISTRATION GUIDE TO RESHELL SOFTWARE INDEX: 1. GENERAL INFORMATION 2. REGISTRATION GUIDE 1. GENERAL INFORMATION This guide contains the correct procedure for entering the software page http://software.roenest.com/
INSTALLAZIONE INSTALLATION
 INSTALLAZIONE INSTALLATION KIT SOFFIONI MySlim A CONTROSOFFITTO KIT MySlim SHOWER HEADS FOR FALSE CEILING Art. KIT00006 AVVERTENZE: L impianto deve essere effettuato da personale autorizzato, certificato
Mod. 1067 INTERFACCIA USB/KEY USB/KEY INTERFACE. Sch./Ref.1067/003
 Mod. 1067 DS1067-019 LBT8388 INTERFACCIA USB/KEY USB/KEY INTERFACE Sch./Ref.1067/003 ITALIANO DESCRIZIONE GENERALE L interfaccia 1067/003 consente di collegare alla Centrale 1067/032 o 1067/042 (ver. 2.00
Canti Popolari delle Isole Eolie e di Altri Luoghi di Sicilia (Italian Edition)
") Canti Popolari delle Isole Eolie e di Altri Luoghi di Sicilia (Italian Edition) L. Lizio-Bruno Click here if your download doesn"t start automatically Canti Popolari delle Isole Eolie e di Altri Luoghi
Canti Popolari delle Isole Eolie e di Altri Luoghi di Sicilia (Italian Edition) L. Lizio-Bruno Click here if your download doesn"t start automatically Canti Popolari delle Isole Eolie e di Altri Luoghi
1) Collegarsi al sito FTP Scuola cliccando qui: ftp://ftp-scuola2000.local Connect to the follwig web site: ftp://ftp-scuola2000.
 Collegarsi al sito FTP Scuola cliccando qui: ftp://ftp-scuola2000.local Connect to the follwig web site: ftp://ftp-scuola2000.") Istruzioni per il download di CRSP 1925 US Stock Database utenti istituzionali - Download instructions for CRSP 1925 US Stock Database institutional users Le seguenti istruzioni di installazione del client
Istruzioni per il download di CRSP 1925 US Stock Database utenti istituzionali - Download instructions for CRSP 1925 US Stock Database institutional users Le seguenti istruzioni di installazione del client
LA SACRA BIBBIA: OSSIA L'ANTICO E IL NUOVO TESTAMENTO VERSIONE RIVEDUTA BY GIOVANNI LUZZI
 Read Online and Download Ebook LA SACRA BIBBIA: OSSIA L'ANTICO E IL NUOVO TESTAMENTO VERSIONE RIVEDUTA BY GIOVANNI LUZZI DOWNLOAD EBOOK : LA SACRA BIBBIA: OSSIA L'ANTICO E IL NUOVO Click link bellow and
dbtechnologies INSTALLATION GUIDE Document version 2.1
 INSTALLATION GUIDE Document version 2.1 INDICE Installazione del Software DVA Network... 3 Requisiti del sistema... 3 Installazione DVA Network... 3 Disinstallazione del software DVA Network... 8 Note
SISTEMA DI ILLUMINAZIONE PER VERRICELLI WINDLASS LIGHTING SYSTEM
 Istruzioni per l uso Instructions for use SISTEMA DI ILLUMINAZIONE PER VERRICELLI WINDLASS LIGHTING SYSTEM WLS WINDLASS LIGHTING SYSTEM - 1 - Rev.01-2013 Italiano SISTEMA DI ILLUMINAZIONE PER VERRICELLI
ART. 1254AL155SS CERNIERE PER PORTE A SPINGERE MANO SINISTRA / HINGES FOR LEFT-HAND DOORS
 SCHEDA INSTALLAZIONE / INSTALLATION SHEET ART. 1254AL155DS CERNIERE PER PORTE A SPINGERE MANO DESTRA / HINGES FOR RIGHT-HAND DOORS UPPER HINGE BODY SACCHETTO GRUPPO MOLLA / PLASTIC BAG WITH THE SPRING
CREAZIONE DI UNA LISTA PER SCANSIONE RPT ANALOGICI E TG DMR. HOW CREATE A SCAN LIST WITH BOTH DIGITAL & ANALOG RPT.
 CREAZIONE DI UNA LISTA PER SCANSIONE RPT ANALOGICI E TG DMR. HOW CREATE A SCAN LIST WITH BOTH DIGITAL & ANALOG RPT. 2017 - IW2BSF Rodolfo Vediamo come procedere: Aprire il programma nel computer per programmare
Mod. 1067 INTERFACCIA ETHERNET ETHERNET INTERFACE. Sch./Ref. 1067/007
 DS1067-018A Mod. 1067 LBT8387 INTERFACCIA ETHERNET ETHERNET INTERFACE Sch./Ref. 1067/007 Fig. 1 Fig. 2 1067/032 Fig. 3 1067/042 Fig. 4 Fig. 5 2 DS1067-018A ITALIANO DESCRIZIONE GENERALE L interfaccia Ethernet
ISTRUZIONI DI MONTAGGIO / OPERATION INSTRUCTION
 ISTRUZIOI DI MOTAGGIO / OPERATIO ISTRUCTIO BOIE e CYDE lampada a sospensione / hanging lamp B01; C01; B11; C11; B21; C21 A) installazione e la manutenzione va eseguita ad apparecchio spento. Tutte le operazioni
ISTRUZIONI DI MONTAGGIO / OPERATION INSTRUCTION
 ISTRUZIOI DI MOTAGGIO / OPERATIO ISTRUCTIO ROMEO e GIUIETTA lampada a sospensione / hanging lamp RM01; G01; RM11; G11; RM21; G21 A) installazione e la manutenzione va eseguita ad apparecchio spento. Tutte
User Manual. Rev Date: 31/05/2018
 Size / Misure 8 50 500 60 150 POWER IN DMX IN DMX OUT 9 4. POWER+DMX out cable + M8 Female Connector 16,80 Connection kit included with the Startline cable / Kit di connessione compreso alla startline
Italia. Engli. XUM1541 setup for Windows 7 (32/64bit) Windows 8/8.1 (32/64 bit) Windows 10 (32/64 bit)
 Windows 8/8.1 (32/64 bit) Windows 10 (32/64 bit)") Engli glish XUM1541 setup for Windows 7 (32/64bit) Windows 8/8.1 (32/64 bit) Windows 10 (32/64 bit) Italia liano Installazione XUM1541 per Windows 7 (32/64bit) Windows 8/8.1 (32/64 bit) Windows 10 (32/64
Engli glish XUM1541 setup for Windows 7 (32/64bit) Windows 8/8.1 (32/64 bit) Windows 10 (32/64 bit) Italia liano Installazione XUM1541 per Windows 7 (32/64bit) Windows 8/8.1 (32/64 bit) Windows 10 (32/64
LA SACRA BIBBIA: OSSIA L'ANTICO E IL NUOVO TESTAMENTO VERSIONE RIVEDUTA BY GIOVANNI LUZZI
 Read Online and Download Ebook LA SACRA BIBBIA: OSSIA L'ANTICO E IL NUOVO TESTAMENTO VERSIONE RIVEDUTA BY GIOVANNI LUZZI DOWNLOAD EBOOK : LA SACRA BIBBIA: OSSIA L'ANTICO E IL NUOVO Click link bellow and
SRT064 BTH SRT051 BTH SRT052 BTH
 KIT FOR TRUCK BRAKE TESTERS SRT051 BTH SRT052 BTH OPERATOR S MANUAL SRT064BTH SRT051BTH SRT052BTH CONTENTS 1. INTRODUCTION...1 2. Description of SRT064BTH Kit...2 3. Description of SRT051BTH Kit...2 4.
Istruzioni Montaggio Mounting Instructions
 Istruzioni Montaggio Mounting Instructions FURIOUS Easy con Connettori per FAZUA (Pinarello NYTRO) Rimuovere il gruppo MOTORE-BATTERIA dall E-BIKE Remove the ENGINE-BATTERY group from the E-BIKE Alcuni
i-on Flashloader Guida all Installazione e all Uso
 Guida all Installazione e all Uso Introduzione Il software i-on Flashloader consente di aggiornare il software operativo principale della centralina del sistema di allarme i- on40. Il software gira su
POWERGATE SL USER GUIDE
 1 Introduzione Powergate SL Powergate SL è la soluzione per la lettura e la programmazione tramite presa diagnosi di vetture dotate di protocollo OBDII, CAN e J1850. Powergate SL può anche essere utilizzato
Portale Materiali Grafiche Tamburini. Grafiche Tamburini Materials Portal
 Portale Materiali Grafiche Tamburini Documentazione utente italiano pag. 2 Grafiche Tamburini Materials Portal English user guide page 6 pag. 1 Introduzione Il Portale Materiali è il Sistema Web di Grafiche
SINGLE THROTTLE ENGINE
 SINGLE THROTTLE ENGINE www.simmax.it 1 Connettere il Single Engine Throttle con FSX e P3D 1) Collegare il cavo USB in dotazione alla presa del Single Engine Throttle ed alla presa USB del PC; 2) Accedere
Istruzioni per l installazione Installation guide
 & Istruzioni per l installazione Installation guide AVVERTENZE WARNINGS Prima di qualsiasi altra operazione verificare quale sistema operativo è installato nello strumento. Le diverse versioni sono le
WIRELESS MBUS RFM-RX2 RECEIVER - Device Manual RICEVITORE WIRELESS MBUS RFM-RX2 Manuale del prodotto
 WIRELESS MBUS RFM-RX2 RECEIVER - Device Manual RICEVITORE WIRELESS MBUS RFM-RX2 Manuale del prodotto Table of Contents Indice 1. Introduction - Introduzione... 3 2. System requirements Requisiti di sistema...
Installazione di ATOMIC esterno
 Installazione di ATOMIC esterno 0. Requisiti del PC CPU 286 o superiore 3 MB liberi sul disco rigido (100MB con Banca Dati Immagini) RAM TOTALE 1MB o superiore RAM BASE libera: 620KB o superiore SVGA 512Kb
Pagina 2 di 9 A - OGGETTO A - OBJECT B - SCOPO B - SCOPE. Instruction Sheet Rev. A
 COMPARTMENT A - OBJECT Wired fuse and relay box for engine compartment (P/N 1745062). Base box supply with sealing and spacer rings assembled whereas cover is in kit into same packaging. Base box have
sdforexcontest2009 Tool
 sdforexcontest2009 Tool Guida all istallazione e rimozione. Per scaricare il tool del campionato occorre visitare il sito dell organizzatore http://www.sdstudiodainesi.com e selezionare il link ForexContest
College Algebra. Logarithms: Denitions and Domains. Dr. Nguyen November 9, Department of Mathematics UK
 College Algebra Logarithms: Denitions and Domains Dr. Nguyen nicholas.nguyen@uky.edu Department of Mathematics UK November 9, 2018 Agenda Logarithms and exponents Domains of logarithm functions Operations
POWERGATE M USER GUIDE
 1 Introduzione Powergate M Powergate M è la soluzione Alientech per la lettura e la programmazione tramite presa diagnosi di vetture dotate di protocollo OBDII, CAN e J1850. Powergate M può anche essere
Manuale BDM - CAR - FG Technology 1/43 EOBD2
 Manuale BDM - CAR - FG Technology 1/43 EOBD2 Indice Index Premessa / Premise............................................. 3 Il modulo EOBD2 / The EOBD2 module........................... 4 Pin dell interfaccia
Filling in the online career plan Version updated on 25/10/2017
 Filling in the online career plan Version updated on 25/10/2017 Go to www.unito.it and click on Login. 1 Insert your Unito credentials. 2 Click on English to consult the English version. 3 Click on Career
Installazione di DraftSight Enterprise
 PROCEDURA PER L INSTALLAZIONE DELLE LICENZE DI RETE DRAFTSIGHT DraftSight è un software di disegno 2D, che nella versione Enterprise prevede delle installazioni Client sui computer dei disegnatori, i quali
1. Choose a suitable location for the Gateway, e.g. living room.
 Quick Guide Gateway Installation 1. Choose a suitable location for the Gateway, e.g. living room. 2. Connect internet cable from your router to one of the ports on the Gateway, as shown below. 3. Plug
BUDVR4PLUS - BUDVR16PLUS
 BUDVR4PLUS - BUDVR16PLUS 1. GUIDA RAPIDA ALL INSTALLAZIONE Installazione degli HARDDISK Questi due modelli di DVR non vengono forniti con l Hard Disk installato. La dimensione massima dello spazio del
MODALITA DI IMPIEGO PD
 MODALITA DI IMPIEGO PD MISURA CONCORDANZA/ 1. Accendere il dispositivo tramite interruttore a slitta situato sul lato destro; 2. All atto dell accensione il dispositivo esegue un test di funzionamento
How to register for exam sessions ( Appelli ) Version updated on 17/10/2018
 Version updated on 17/10/2018") How to register for exam sessions ( Appelli ) Version updated on 17/10/2018 Course catalogue and Piano Carriera (Career Plan) At the beginning of your exchange period in Torino you will need to register
How to register for exam sessions ( Appelli ) Version updated on 17/10/2018 Course catalogue and Piano Carriera (Career Plan) At the beginning of your exchange period in Torino you will need to register
MANUALE DI ISTRUZIONI
 Cantatooth ONE000004 - ONE000006 MANUALE DI ISTRUZIONI INSTRUCTIONS MANUAL 2 cantatooth 1. DESCRIZIONE PRODOTTO Parti Microfono Controllo Volume Controllo Riverbero Power On/Off 8.35in Cassa 2.83in Accessori