Salon05-14-ISTRUZIONI-Trx_Layout 23/05/14 09:42 Pagina 1 Cometa
|
|
|
- Achille Donato
- 5 anni fa
- Visualizzazioni
Transcript
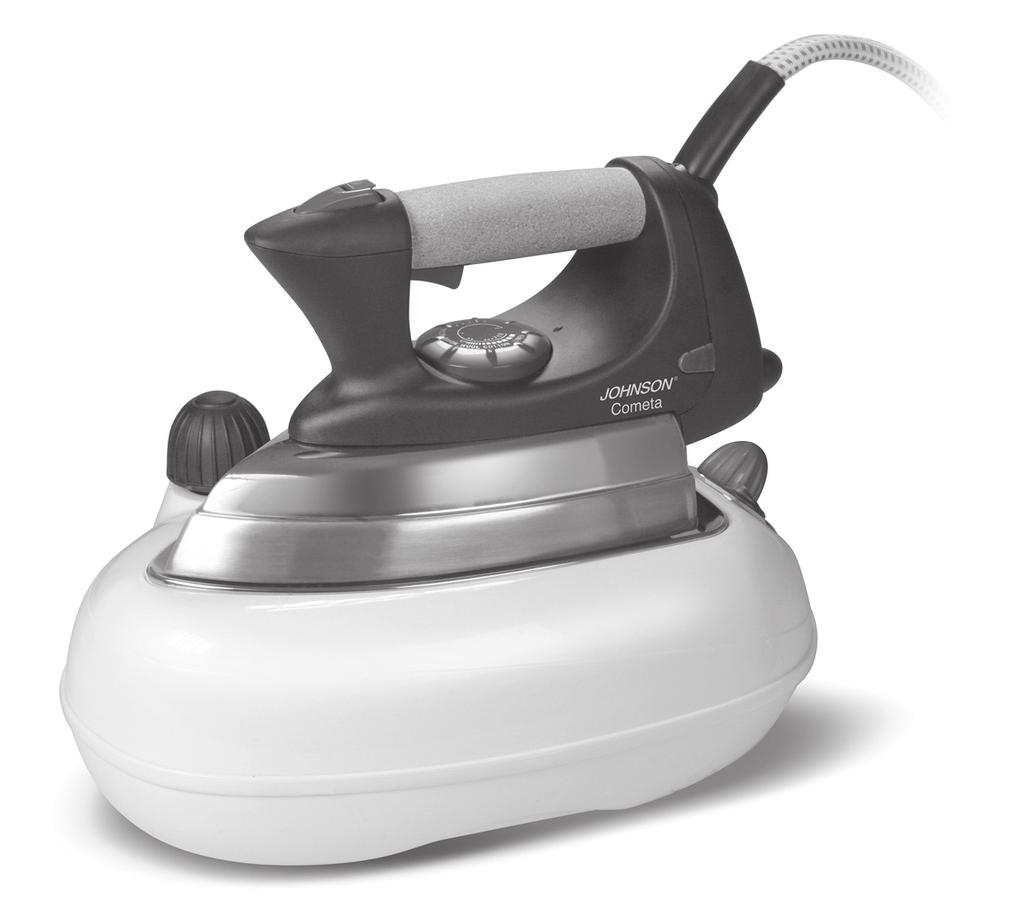
1 Cometa


2
3 3
4 AVVERTENZE GENERALI I Conservate con cura il presente manuale e leggetene attentamente le avvertenze; esse forniscono importanti indicazioni riguardanti la sicurezza, l uso immediato e futuro dell apparecchio. Questo apparecchio può essere utilizzato da bambini di età superiore agli 8 anni e da persone inesperte o con ridotte capacità fisiche, sensoriali o mentali, a condizione che sia fornita loro la necessaria assistenza e che conoscano le istruzioni sull uso in sicurezza dell apparecchio e i rischi correlati. I bambini non devono giocare con l apparecchio. Le operazioni ordinarie di pulizia e manutenzione non devono essere effettuate da bambini senza adeguata supervisione. Quando è acceso o in fase di raffreddamento, tenere il ferro e il relativo cavo fuori dalla portata dei bambini di età inferiore agli 8 anni. Il ferro deve essere usato solo con il supporto fornito (ove presente). Il ferro deve essere usato e riposto su una superficie stabile e piana. Quando si ripone il ferro sul suo supporto, assicurarsi che la superficie su cui è collocato il supporto, sia stabile. Il ferro non deve essere usato se è caduto, se vi sono visibili segni di danneggiamento o se per- 4
5 de acqua. Mantenere il ferro e il suo cavo di alimentazione fuori dalla portata dei bambini con meno di 8 anni quando è alimento e quando si sta ra ffreddando. Per evitare situazioni pericolose, ogni eventuale riparazione o intervento richiesto dall apparecchio, ad es. sostituzione del cavo di collegamento difettoso, può essere eseguito solo dal personale specializzato di un centro di assistenza tecnica autorizzato. Quest apparecchio deve collegarsi ad una presa provvista di messa a terra. Non lasciare l apparecchio incustodito quando è alimentato. Prima di riempire l apparecchio con acqua e prima di eliminare l acqua rimanente dopo l uso, scollegare la spina dalla presa elettrica. Quando si riempie il serbatoio di acqua, scollegare sempre il cavo di alimentazione elettrica. Non aprire il tappo del serbatoio quando il prodotto è in funzione. Non utilizzate l apparecchio se presenta danni al cavo di alimentazione o alla spina. In caso di cavo di alimentazione danneggiato, provvedere alla sostituzione che deve essere effettuata da personale qualificato di un centro di assistenza tecnica autorizzato. Per evitare situazioni pericolose, ogni eventuale riparazione o intervento richiesto dall appa- 5
6 recchio, ad es. sostituzione del cavo di collegamento difettoso, può essere eseguito solo dal personale specializzato di un centro di assistenza tecnica autorizzato. I ferri da stiro da viaggio non sono costruiti per essere utilizzati regolarmente. Prima di utilizzare il ferro da stiro per la prima volta, assicuratevi di aver tolto ogni etichetta o foglio di protezione dalla piastra. Pulite la piastra utilizzando un panno morbido. Alcune parti del ferro da stiro, sono leggermente lubrificate e quindi l apparecchio, al momento della prima accensione, potrebbe emettere un leggero fumo. Questo fumo cesserà dopo breve tempo. Mantenete la piastra stirante sempre liscia; non fatela scorrere su oggetti di metallo (es.: griglia di supporto del ferro da stiro, bottoni in metallo, zip, ecc.). Al riempimento dell acqua nella caldaia oppure quando la macchina non viene utilizzata, estrarre la spina dalla presa.. Non impedite l uscita del getto di vapore dal ferro. Non dirigete il getto di vapore verso persone, animali o fonti elettriche quali: prese, apparecchi elettrici in funzione, lampadari, ecc. 6
7 Non lavorate con le mani bagnate. Accertatevi sempre che i materiali o le superfici da stirare siano adatti ad essere stirati a vapore e selezionate sempre la giusta temperatura. Osservate le istruzioni del produttore relativamente alla stiratura dei materiali. In mancanza di informazioni fate sempre una piccola prova su un punto meno visibile del materiale. Se durante la prova si notano danni, evitate l uso del ferro da stiro su quel materiale. Non introdurre alcun detergente o sostanza chimica nella caldaia. Durante l utilizzo non sovrapporre mai la piastra del ferro sul cavo di alimentazione. Durante il funzionamento non capovolgete per nessun motivo l apparecchio. Non svitate il tappo della caldaia né aggiungete acqua durante il funzionamento. Non lasciare l apparecchio incustodito o inutilmente acceso, soprattutto a serbatoio vuoto, ciò potrebbe danneggiarlo. Avvitare sempre con forza il tappo della caldaia per evitare perdite di vapore. Non lasciare acqua nell apparecchio quando la temperatura della stanza è 0 o sotto 0. Non riempire l apparecchio sotto il rubinetto. Non permettere al cavo di alimentazione di entrare in contatto con la piastra. Non sovra riempire il serbatoio dell acqua e 7
8 non aggiungere additivi all acqua. Al termine di ogni utilizzazione, attendere il completo raffreddamento dell apparecchio e vuotare sempre il serbatoio dall acqua residua. ATTENZIONE: La pulizia anticalcare effettuata dai centri assistenza non è coperta da garanzia ed è quindi a carico del cliente. ATTENZIONE: Introdurre nel serbatoio solo acqua distillata o demineralizzata. ATTENZIONE: NON USARE MAI ACQUA DEL RUBINETTO L uso dell acqua del rubinetto con impurità e calcare, provoca l ostruzione dei fori della piastra. ATTENZIONE: Qualora si rendesse necessaria una pulizia dai depositi calcarei, (non coperta da garanzia e a carico del Cliente), si raccomanda l uso di prodotti anticalcarei specifici per i ferri da stiro. Per le modalità di utilizzo attenersi alle indicazioni del prodotto stesso. ATTENZIONE: In caso di utilizzo con alte temperature ambientali, impostando al massimo sia la temperatura del ferro sia l erogazione del vapore, l 8
9 apparecchio erogherà vapore secco non visibile. Se si desiderasse un vapore più umido e visibile bisogna diminuire la potenza del vapore. Gli elementi dell imballaggio (sacchetti in plastica,polistirolo espanso, ecc.) non devono essere lasciati alla portata di bambini o incapaci in quanto rappresentano potenziali fonti di pericolo. Questo apparecchio, adatto solo per uso non professionale, dovrà essere destinato solo all uso per il quale è stato espressamente concepito, Ogni altro uso è da considerarsi improprio e pericoloso. Il costruttore non può essere considerato responsabile per eventuali danni derivanti da usi impropri, errati ed irragionevoli. L installazione dovrà essere effettuata secondo le prescrizioni del costruttore. Una errata installazione può causare danni a persone, animali, cose, il costruttore non può esserne ritenuto responsabile. La sicurezza delle apparecchiature elettriche è garantita solo se queste sono collegate ad un impianto elettrico provvisto di idonea messa a terra secondo quanto stabilito dagli attuali standard vigenti in materia di sicurezza elettrica. Prima di collegare l apparecchio accertarsi che i dati di targa siano rispondenti a quelli della rete di distribuzione elettrica. In caso di incompatibilità tra la presa e la spina rivolgersi a personale qualificato per le necessarie operazioni di adeguamento. Non utilizzare adattatori, prese multiple e/o prolunghe. Qualora il loro uso si rendesse indispensabile utilizzare esclusivamente materiale conforme alle vigenti norme di sicurezza ed aventi requisiti di compatibilità con apparecchio e rete di distribuzione elettrica. Utilizzando l apparecchio per la prima volta, assicurarsi di aver tolto ogni etichetta o foglio di protezione. L uso di qualsiasi apparecchio elettrico comporta l osservanza di alcune regole fondamentali ed in particolare ATTENZIONE: Non immergere o bagnare l apparecchio; non usarlo vicino ad acqua, in vasca, nel lavello o in prossimità di altro recipiente con liquidi. Nel caso l apparecchio dovesse cadere accidentalmente in acqua NON cercare di recuperarlo ma innanzitutto togliere immediatamente la spina dalla presa di corrente. Successivamente portarlo in un centro assistenza qualificato per i necessari controlli. Durante l uso, l apparecchio deve essere lontano da qualsiasi oggetto o sostanza infiammabile od esplosiva. Non toccare l apparecchio con mani bagnate o umide. Non usare l apparecchio a piedi nudi. Non tirare l apparecchio o il cavo per staccare la spina dalla presa. Non lasciare l apparecchio esposto ad agenti atmosferici (pioggia, sole). Scollegare la spina dalla presa di corrente quando l apparecchio non viene utilizzato e prima di effettuare qualsiasi operazione di pulizia o manutenzione. Il cavo di alimentazione deve essere srotolato per tutta la sua lunghezza al fine di evitarne il surriscaldamento. Il cavo di alimentazione non deve essere avvicinato a fonti di calore e/o superfici taglienti. In caso di guasto e/o cattivo funzionamento spegnere l apparecchio e rivolgersi a personale qualificato. Eventuali manomissioni o interventi effettuati da personale non qualificato fanno decadere i diritti di garanzia. Per pulire l apparecchio usare solo un panno morbido e non abrasivo. Quando l apparecchio, risulta inutilizzabile e si desidera eliminarlo, asportarne i 9
10 cavi e smaltirlo presso un ente qualificato al fine di non contaminare l ambiente. La pulizia e la manutenzione non deve essere fatta dai bambini senza la supervisione di un adulto. Verificare periodicamente il buono stato dell apparecchio e dei componenti; in caso di dubbio rivolgersi ad un centro assistenza autorizzato. Non tirare il cavo di alimentazione per spostare l apparecchio. Non lasciare il cavo pendente dal bordo del piano di lavoro o i prossimità di superfici calde - L utilizzatore non deve lasciare l apparecchio senza sorveglianza quando è collegato alla alimentazione. - Non utilizzare l apparecchio se non funziona regolarmente o se appare danneggiato; in caso di dubbio contattare l assistenza tecnica o rivolgersi a personale qualificato. - E assolutamente vietato smontare o riparare l apparecchio per pericolo di shock elettrico; se necessario rivolgersi al rivenditore o centro assistenza. - L apparecchio non deve essere fatto funzionare con dei temporizzatori esterni o altri dispositivi separati di controllo remoto. - La spina del cavo di alimentazione, in quanto utilizzata come dispositivo di disconnessione, deve essere sempre facilmente raggiungibile. Se nel prodotto vi sono parti in vetro, queste non sono coperte da garanzia. ATTENZIONE: Le parti in plastica del prodotto non sono coperte da garanzia. ATTENZIONE: I danni del cavo di alimentazione, derivanti dall usura non sono coperti da garanzia; l eventuale riparazione sarà pertanto a carico del proprietario. ATTENZIONE: Se si rendesse necessario portare o spedire l apparecchio al centro assistenza autorizzato, si raccomanda di pulirlo accuratamente in tutte le sue parti. Se l apparecchio risultasse anche minimamente sporco o incrostato o presentasse depositi calcarei, depositi di polvere o altro; esternamente o internamente: per motivi igienico-sanitari, il centro assistenza respingerà l apparecchio stesso senza visionarlo. Il simbolo sul prodotto o sulla confezione indica che il prodotto non deve essere considerato come un normale rifiuto domestico, ma deve essere portato nel punto di raccolta appropriato per il riciclaggio di apparecchiature elettriche ed elettroniche. Provvedendo a smaltire questo prodotto in modo appropriato, si contribuisce a evitare potenziali conseguenze negative per l ambiente e per la salute, che potrebbero derivare da uno smaltimento inadeguato del prodotto. Per informazioni più dettagliate sul riciclaggio di questo prodotto, contattare l ufficio comunale, il servizio locale di smaltimento rifiuti o il negozio in cui è stato acquistato il prodotto. 10
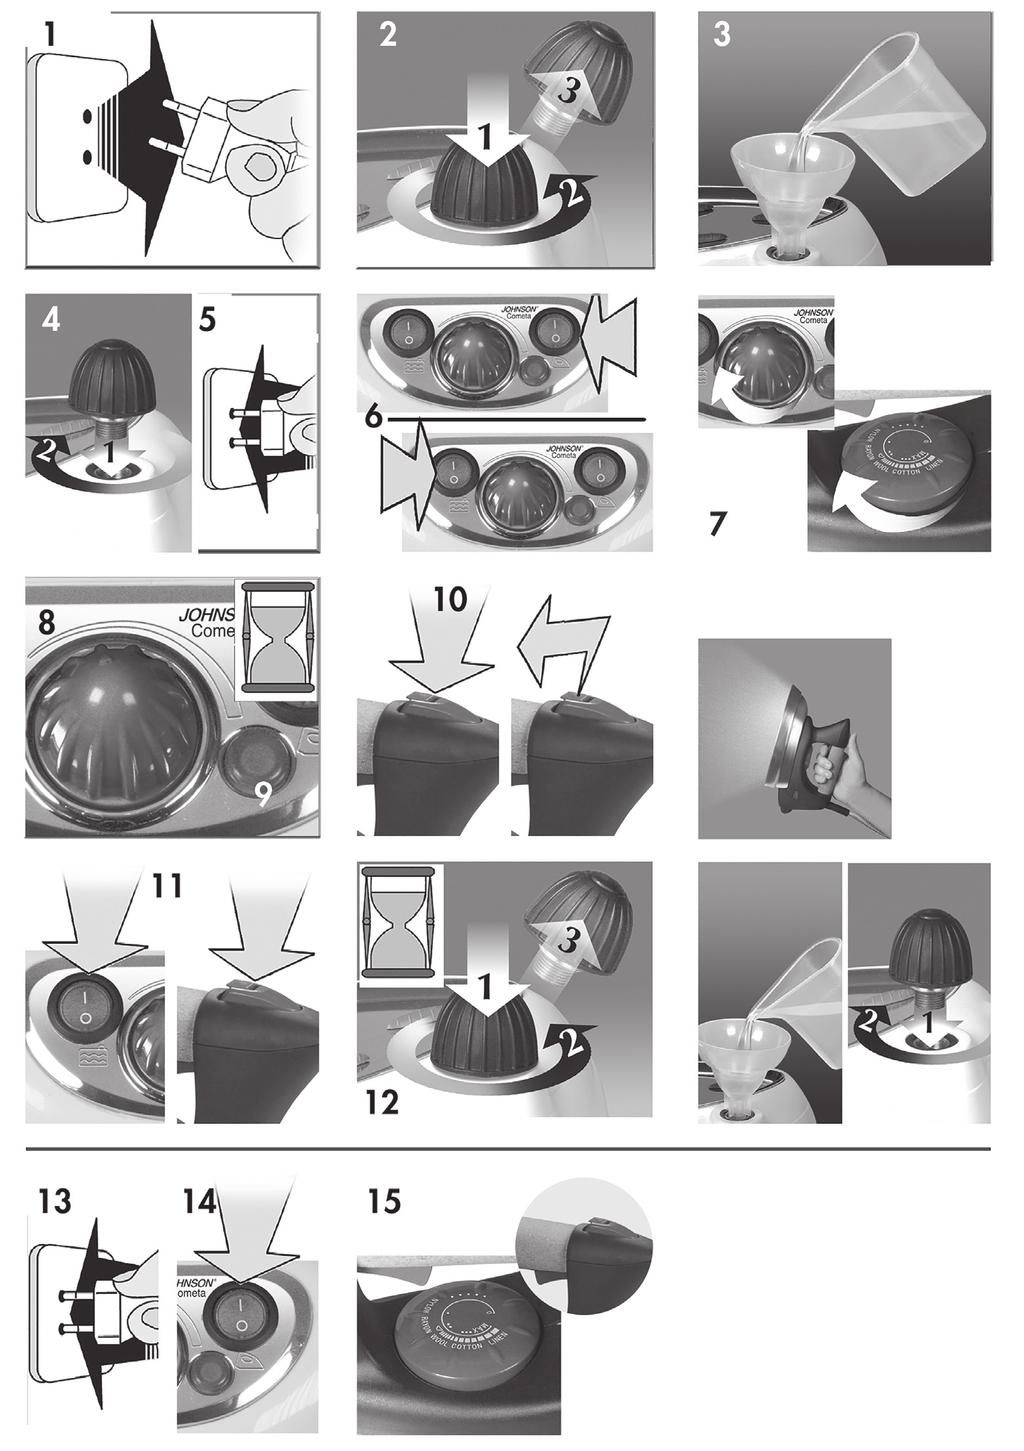
11 DESCRIZIONE L) Caldaia M) Tubo singolo (cavo alimentazione + tubo vapore) N) Cavo alimentazione con spina B) Interruttore ON/OFF caldaia con luce spia A) Interruttore ON/OFF ferro con luce spia D) Luce spia vapore pronto G) Tappo caldaia P) Appoggia ferro C) Manopola termostato E) Tasto vapore H) Luce spia termostato F) Blocco per vapore continuo O) Regolatore quantità vapore ISTRUZIONI D USO Per evitare sovraccarichi alla rete elettrica, evitate di utilizzare contemporaneamente altri apparecchi ad alto voltaggio sullo stesso circuito. Stiratura a vapore Prima di iniziare a stirare, verificare che l indumento sia adatto ad essere stirato con il vapore. L apparecchio richiede l uso di acqua distillata. 1) Sempre togliere la spina dalla presa di corrente prima di riempire la caldaia (serbatoio). 2) Svitare il tappo (G) 3) Riempire con max 0,5 L d acqua distillata. 4) Richiudere il tappo 5) Collegare l apparecchio alla rete elettrica. 6) Premere gli interruttori (A) (B). La spia degli interruttori si accenderà per indicare che la caldaia ed il ferro sono accesi. 7) Impostare la quantità di vapore desiderata, ruotando la manopola (O). Selezionare la temperatura richiesta ruotando la manopola termostato (C). 8) Attendere qualche minuto finchè la caldaia raggiunge pressione e temperatura ottimale. 9) Quando l apparecchio è pronto per l utilizzo, la spia vapore (D) si accenderà. Quando utilizzate il ferro per la prima 11 volta, passarlo prima su uno straccio. 10) Per emettere il vapore premere il pulsante vapore (E). Le prime emissioni di vapore saranno miste a gocce d acqua fino a quando anche il tubo vapore (M) non avrà raggiunto la temperatura ottimale di esercizio. Rilasciare il pulsante vapore quando il vapore non è più necessario. Questo apparecchio può emettere vapore anche nella posizione verticale può quindi essere utilizzato per rinfrescare facilmente i tessuti con un getto di vapore. Se servisse emissione di vapore in continuo, premere il pulsante vapore e bloccarlo facendo scorrere indietro il fermo (F) 11) Se la produzione di vapore cessa mentre state stirando, questo significa che non c è più acqua nella caldaia. Per continuare a stirare seguire le indicazioni seguenti: - spegnere la caldaia (B). - fare rilasciare la pressione rimasta nella caldaia, tenendo il pulsante vapore (E) premuto finché non esce più vapore dalla piastra. 12) Togliere l apparecchio dalla rete elettrica. - svitare il tappo e aspettare alcuni minuti. - versare lentamente 0,5 L d acqua attraverso l apertura utilizzando sempre l imbuto. - chiudere la caldaia e chiudere bene il tappo. - premere l interruttore caldaia (B). - aspettare che la spia vapore (D) si accenda prima di continuare a stirare. AVVERTENZE: mai cercare di aprire il tappo mentre la caldaia è sotto pressione. Stiratura senza vapore 13) Collegare l apparecchio alla rete elettrica, 14) Premere l interruttore (A). 15) Selezionare la temperatura richiesta ruotando la manopola termostato (C). 16) Aspettare finché la spia (H) si spenga, questo indica che la temperatura richiesta è stata raggiunta. Per stirare senza vapore non è necessa-
12 rio premere il pulsante vapore (E). Consigli - dividere i capi secondo la temperatura di stiro. Iniziare a stirare i capi che richiedono una temperatura più bassa. Per ulteriori dettagli fare riferimento alla tabella. - tessuti come velluto e lana, accessori come guanti, borse ecc. ritroveranno il loro look e consistenza di come quando nuovi solo passando il ferro vicino alla superficie del tessuto e premendo il pulsante vapore. - le impronte lasciate sui tappeti dai mobili possono essere tolte fornendo vapore sulle parti schiacciate e poi spazzolando leggermente,se il tappeto è fatto con materiale sintetico, non selezionare una temperatura alta Al termine di ogni utilizzazione, attendere il completo raffreddamento dell apparecchio e vuotare sempre il serbatoio dall acqua residua. - tenere sempre la superficie della pia - stra pulita. Pulire la superficie fredda con un panno umido. L apparecchio non deve essere pulito con prodotti per togliere il calcare. - non passare il ferro su cerniere, ganci, anelli ecc. potrebbero rigare la piastra. - al termine della stiratura, mettere il ferro sull appoggio. Verificare che non ci siano tracce d acqua sotto la piastra, queste potrebbero macchiarla. - riporre l apparecchio in un luogo asciutto. Come ottenere una stiratura da professionista Un ferro da stiro normale genera solo una piccola quantità di vapore. In questo caso è necessario produrre vapore costantemente in modo da eliminare le pieghe nei tessuti che vengono stirati. Un sistema di stiratura professionale funziona in modo diverso. Il tessuto viene prima inumidito dal vapore e poi, in una seconda fase, stirato senza vapore nel modo normale. Questo significa che tutte le pieghe vengono tolte e il vostro 12 indumento è stirato alla perfezione. Nella prima fase (inumidire con vapore il tessuto), tenere il ferro circa 20 cm sopra il tessuto e premere il pulsante vapore. Passare il ferro al di sopra dell indumento con un movimento circolare in modo che il getto di vapore possa inumidire il tessuto. Indumenti che non sono troppo stropicciati richiedono solo alcuni istanti di vapore, mentre tessuti molto stropicciati o indumenti con pieghe particolarmente difficili devono essere inumiditi, perciò bisogna passare il vapore per più tempo. Durante la seconda fase (stiratura senza vapo- re) verificare che la manopola termostato sia nella posizione corretta per il tipo di tessuto, rilasciare il pulsante vapore e stirare l indumento senza vapore. La piastra speciale evi- terà che il tessuto diventi lucido. Utilizzando questa tecnica e seguendo i consigli nella tabella di cui sotto sarà facile per voi dare al vostro indumento una stiratura con finitura professionale. ATTENZIONE: prima del primo utilizzo del ferro da stiro in posizione vapore sui tessuti, si raccomanda di farlo funzionare per un ciclo completo in posizione orizzontale senza appoggiarlo sui capi. Nelle stesse condizioni, azionate parecchie volte il comando vapore. Al primo utilizzo è possibile riscontrare fuoriuscite di minuscole particelle dalla piastra, ciò è dovuto al processo di fabbricazione e non è dannoso ne per l utilizzatore ne per gli abiti. Dopo qualche utilizzo il fenomeno scompare.
13 GENERAL WARNINGS GB Carefully keep this manual and read the warnings; it provides important instructions on safety, immediate and future use of the appliance. This appliance can be used by children over 8 years of age, people with no experience or know-how or people with reduced physical, sensory or mental abilities provided they are ensured adequate supervision or have received instructions on safe use of the appliance and have understood the related dangers. Children cannot play with the appliance. Ordinary cleaning and maintenance operations must not be carried out by children without adequate supervision. When on or cooling, keep the iron and the relevant cable out of reach of children under 8 years of age. The iron must only be used with the supplied support (where present). The iron must be used and rested on a stable and flat support. When placing the iron back on its support, ensure the surface the support is on is stable. The iron must not be used if it fell, if there are visible signs of damage or it is leaking water. Keep the iron and its power cable out of reach of children under 8 years of age if powered and when cooling. To avoid dange- 13
14 rous situations, any repairs or intervention on the appliance, e.g. replacing the faulty connection cable, can only be carried out by specialist staff in an authorised technical support centre. This appliance must be connected to an earthed socket. Do not leave the appliance unguarded when on. Before filling the appliance with water and before eliminating the remaining water after use, disconnect the plug from the electric socket. When you fill the water tank, always disconnect the electrical power cable. Do not open the plug of the tank when the product is on. Do not use the appliance if the power cable or plug are damaged. If the power cable is damaged, have qualified staff replace it in an authorised technical support centre. To avoid dangerous situations, any repairs or intervention on the appliance, e.g. replacing the faulty connection cable, can only be carried out by specialist staff in an authorised technical support centre. Travel irons are not built for regular use. Before using the iron for the first time, ensure you have removed every label or protective 14
15 sheet from the plate. Clean the plate using a soft cloth. Some parts of the iron are slightly lubricated and therefore the appliance, when switched on, could release some smoke. This smoke will quickly stop. Always keep the ironing plate smooth; do not slide it along metal objects (e.g.: support grid of the ironing board, metal buttons, zips, etc.). On filling the water in the boiler or when the machine is not used, remove the plug from the socket. Do not block use of the iron steam jet. Do not direct the steam jet at people, animals or electrical sources such as: sockets, electrical appliances that are on, chandeliers, etc. Do not work with wet hands. Always ensure the materials or surfaces to iron are suitable for steam ironing and always select the right temperature. Comply with the manufacturer s instructions relating to ironing the materials. In the event of insufficient information, always do a small test on the least visible point of the material. If during the test you see damage, avo id using the iron on that material. Do not place any detergent or chemical substances in the boiler. During use, never place 15
16 the iron plate on the power cable. During use, do not turn the appliance upside down for any reason. Do not unscrew the plug from the boiler or add water during use. Do not leave the appliance unguarded or on for no reason, especially with the tank empty, as it could damage it. Firmly screw the plug on the boiler to avoid steam leakage. Never leave water in the appliance when the temperature of the room is 0 or under 0. Do not fill the appliance under a tap. Do not let the power cord come in contact with the plate. Do not overfill the water tank and do not place additives in the water. After each use, wait for the appliance to cool completely and always empty the tank of residual water. ATTENTION: Anti-limescale cleaning carried out by support centres is not covered by warranty and is therefore charged to the client. ATTENTION: Only use distilled or purified water in the tank. ATTENTION: 16
17 DO NOT USE TAP WATER. Use of water in the tank with impurities and limescale can clog the holes in the plate. ATTENTION: If cleaning is necessary of limescale deposits (not covered by warranty and charged to the client), you are advised to use anti-limescale products specifically for irons. For the use methods, comply with the instructions for the product. ATTENTION: If used with high environmental temperatures, setting both the temperature of the iron and the steam supply to the max, the appliance will supply dry and invisible steam. If you want more humid and visible steam you need to decrease the steam power. Packaging (plastic bags, expanded polystyrene, etc.) must not be left within reach of children or incapable people since they are a potential source of danger. This appliance, which is only suitable for non-professional use, should only be used for its intended use. Any other use is considered improper and dangerous. The manufacturer cannot be considered in any way liable for damage due to improper, wrong and unreasonable use. Installation should be carried out according to the manufacturer s instructions. Wrong installation could cause damage to people, animals and property and the manufacturer cannot be held liable. Electrical safety of appliances is only guaranteed when they are connected to an electrical system with suitable earthing, according to the standards in force on electrical safety. Before connecting the appliance, ensure the plate data corresponds to those of the electrical mains. If the plug and socket are incompatible, contact qualified staff for the necessary adaptation operations. Do not use adapters, multiple sockets and/or extensions. When their use is indispensable only use material complying with safety standards in force and having compatibility requirements with the appliance and the electricity mains. When using the appliance for the first time, ensure you have removed the labels and protective sheet. Use of any electrical appliance involves complying with certain fundamental rules, 17
18 in particular: ATTENTION: Do not immerge or wet the appliance; do not use it near water, in the bath, in the sink or near another container of liquids. If the appliance accidentally falls in water do NOT attempt to take it out, but instead immediately disconnect the plug from the socket. Then bring it to a qualified support centre for the necessary controls. During use, the appliance must be kept far from any inflammable or explosive object or substance. Do not touch the appliance with wet or damp hands. Do not use the appliance in bare feet. Do not pull the appliance or cable to remove the plug from the socket. Do not leave the appliance exposed to atmospheric agents (rain, sun). Disconnect from the power socket when the appliance is not in use and before any cleaning or maintenance. The power cable must be entirely unrolled to avoid overheating. The power cable must not be placed near heat sources and/or sharp surfaces. In the event of a fault and/or malfunctioning, switch off the appliance and contact qualified staff. Any tampering or intervention carried out by unqualified staff will cause the warranty to expire. To clean the appliance only use a soft and non-abrasive cloth. When the appliance can no longer be used and you want to dispose of it, remove the cables and dispose of them via a qualified body to avoid contaminating the environment. Cleaning and maintenance must not be carried out by children without the supervision of an adult. Periodically check the appliance and its parts are working properly; if in doubt contact an authorised support centre. Do not pull the power cable to move the appliance. Do not leave the cable hanging on the side of the work surface or near hot surfaces. - The user must not leave the appliance unsupervised when connected to power. - Do not use the appliance if not working properly or it appears to be damaged; if in doubt contact technical support or qualified staff. - It is strictly forbidden to dismantle or repair the appliance due to danger of electric shock; if necessary, contact your retailer or support centre. - The appliance must not be used with external timers or other, separate devices with remote control. The power cable plug, since it is used as a disconnection device, must always be within easy reach. Warranty does not cover any glass parts of the product. ATTENTION: Warranty does not cover any plastic parts of the product. ATTENTION: The damages of the power supply cord, originate by the wear aren t covered by guarantee; the repair will be in charge to the owner. ATTENTION: If the need should arise to take or send the appliance to an authorised service centre, make sure to clean all its parts thoroughly. If the appliance is only slightly dirty or encrusted or should present food deposits, 18
19 scale deposits, dust or the like, externally or internally: for health reasons, the service centre shall reject the appliance without making any controls or repairs. When the appliance is unserviceable and must be eliminated, remove its cords and dispose of it at an authorised disposal centre in order to protect the environment. The symbol on the product or on its packaging indicates that this product may not be treated as household waste. Instead it shall be handed over to the applicable collection point for the recycling of electrical and electronic equipment. By ensuring this product is disposed of correctly, you will help prevent potential negative consequences for the environment and human health, which could otherwise be caused by inappropriate waste handling of this product. For more detailed information about re- cycling of this product, please contact your local city office, your household waste di- sposal service or the shop where you purchased the product. Do not insert cleanser or chemical substances in the tank. 19
20 DESCRIPTION L) Boiler M) Single hose (supply cable + steam hose) N) Supply cable with plug B) Boiler on/off switch with pilot lamp A) Iron on/off switch with pilot lamp D) Steam ready pilot lamp G) Boiler cap P) Iron stand C) Thermostat knob E) Steam button H) Thermostat pilot lamp F) Blocking for continuous steam O) Steam quantity regulator INSTRUCTIONS FOR USE Steam ironing Before ironing, check that the garment to be ironed is suitable for steam ironing. The appliance requests the use of distilled water 1) Always remove the plug from the power socket before filling the boller. 2) Unscrew the cap (G) 3) Pour in about 0,5 litres of distilled water. 4) Closing the cap 5) Connect the appliance to the power supply. 6) Press the switches (A) (B). The pilot lamps in the switches light up to indicate that the boiler and the iron are switched on. 7) Set the quantity of steam wanted, by tur- ning the knob (O). Select the desired tempera- ture by turning the thermostat knobs (C). 8) Wait a few minutes until the boiler reaches pressure and optimal tempera ture. 9) When the appliance is ready for use, the steam pilot lamp (D) lights up. When using the iron for the first time, iron a plain cloth first. 10) To obtain steam, press the steam button (E). The first emission of steam will be mi xed with water drops until the steam tube (M) will not have reached the opti mal functioning temperature. Release the steam button when steam is no longer required. This appliance is also able to generate steam in a vertical position and can therefore be used to refresh fabrics easily with a jet of steam. If continuous steam is needed, press the steam button and block it by sliding (F) backwards. 11) If the production of steam ceases while you are ironing, this means that there is no water left n the boiler. To continue ironing, top up as follows: -Switch off the boiler (B). -Release the pressure left in the boiler, keeping the steam button (E) pressed down until no more steam comes out of the plate. 12) Disconnect the appliance from the mains. -unscrew the cap and wait a few minutes. -slowly pour 0,5 litres of water into the opening always using the funnel. -close the boiler and fully tighten the cap. -press the boiler switch (B). -wait for steam pilot lamp (D) to light up before continuing ironing. CAUTION! Never attempt to open the cap while the boiler is under pressure. Dry ironing 13) Connect the appliance to the mains supply 14) Press the switch (A) 15) Select the desired temperature by turning the thermostat knob (C). 16) Wait until the pilot lamp (H) goes off, indicating that the desired temperature has been reached. For dry ironing it is not necessary to press the syeam button (E). 20
21 Suggestions - Divide the washing according to the correct ironing temperatures. Start by ironing those garments that require a lower temperature. For fuller details, refer to the chart at the end of this booklet. - Fabrics such as velvet and wool, and acces- sories such as gloves, handbags, etc. will regain their brand-new look and texture by simply passing the iron near the surface of the fabric and pressing the steam button. - Imprints left in carpets by furniture can be removed by applying steam on the parts where the pile is crushed and then brushing lightly. If the carpet is made of synthetic material, do not select a high temperature.. After each use, wait until the iron is comple- tely cold and always empty the reservoir from remaining water. - Always heep the surface of the ironing plate perfectly clean. To clean it, just wipe the cold surface with a damp cloth. The appliance must not be cleaned with descaling agents. - Do not iron over zippers, hooks, rings, etc. as these may scratch the plate. When you have finished ironing, place the iron correctly on its stand. Ensure that there are no traces of water under the plate, as these may cause stains. Store the appliance in a dry place. HOW TO GET A PROFESSIONAL IRONING FINISH A normal iron generates only a small quantity of steam. In this case it is necessary to produce steam constantly in order to eliminate creases in the fabric being ironed. A professional ironing system works rather differently. The fabric is first made damp by the steam and then, in a second phase, dryironed in the normal way. This means that every tiniest crease is removed and your garments are ironed to perfection. In the first phase (steam-damping of the fabric), hold the ironabout 20 cm. above the fabric and press the steam button. Pass the iron over the garment in a circular movement so that the powerful jet of steam damps the fabric. Lightly creased garments require only a few moments of steaming, while very heavy fabrics or garments with particularly difficult creases must be damper, so steam must be applied for a few seconds more. During the second phase (dry ironing), check that the thermostat knob is in the correct position for the type of fabric; release the steam button and dry-iron the garment. The special ironing plate will prevent the fabrics from becoming shiny. Using this ironing technique, and following the suggestions in the chart below, you will find it easy to give your garments a really professional ironing finish. CAUTION: before the first use of the clothes, it is recommended to run it for a complete cycle in a horizontal position without laying on the garments. In the same conditions, operate the steam control several times. At first use it is possible to detect spills of tiny particles from the plate, this is due to the manufacturing process and is not harmful to the user and to the clothes. After some use the problem disappears. 21
22 Note 22
23 23
24 Mod. COMETA Mod. COMETA COM I 24
de acqua. Mantenere il ferro e il suo cavo di alimentazione fuori dalla portata dei bambini con meno di 8 anni quando è alimento e quando si sta ra
 3 AVVERTENZE GENERALI I Conservate con cura il presente manuale e leggetene attentamente le avvertenze; esse forniscono importanti indicazioni riguardanti la sicurezza, l uso immediato e futuro dell apparecchio.
ISTRUZIONI DI MONTAGGIO / OPERATION INSTRUCTION
 ISTRUZIOI DI MOTAGGIO / OPERATIO ISTRUCTIO BOIE e CYDE lampada a sospensione / hanging lamp B01; C01; B11; C11; B21; C21 A) installazione e la manutenzione va eseguita ad apparecchio spento. Tutte le operazioni
apparecchio erogherà vapore secco non visibile. Se si desiderasse un vapore più umido e visibile bisogna diminuire la potenza del vapore.
 Cometa 1 2 3 AVVERTENZE GENERALI I Conservate con cura il presente manuale e leggetene attentamente le avvertenze; esse forniscono importanti indicazioni riguardanti la sicurezza, l uso immediato e futuro
de acqua. Mantenere il ferro e il suo cavo di alimentazione fuori dalla portata dei bambini con meno di 8 anni quando è alimento e quando si sta ra
 Kontinuo 220-240V 50/60 Hz 2 AVVERTENZE GENERALI I Conservate con cura il presente manuale e leggetene attentamente le avvertenze; esse forniscono importanti indicazioni riguardanti la sicurezza, l uso
Piantana56. Ventilatore a colonna ISTRUZIONI D USO Standing fan INSTRUCTIONS FOR USE
 Piantana56 Ventilatore a colonna ISTRUZIONI D USO Standing fan INSTRUCTIONS FOR USE 220-240V~ 50-60Hz 70W 2 Conservate con cura il presente manuale I e leggetene attentamente le avvertenze; esse forniscono
PRECAUZIONE PER L UTILIZZO E AVVERTENZE PER LA SICUREZZA
 PRECAUZIONE PER L UTILIZZO E AVVERTENZE PER LA SICUREZZA Dopo aver tolto l imballaggio assicurarsi dell integrità dell apparecchio. In caso di dubbio non utilizzare l apparecchio e rivolgersi al centro
Piastra di cottura elettrica
 Piastra di cottura elettrica 997-998 A C B Fig. 1 Fig. 2 Fig. 3 IT AVVERTENZE IMPORTANTI LEGGERE ATTENTAMENTE LE ISTRUZIONI PRIMA DELL USO. USANDO GLI APPARECCHI ELETTRICI È NECESSARIO PRENDERE LE OPPORTUNE
PRECAUZIONE PER L UTILIZZO E AVVERTENZE PER LA SICUREZZA
 PRECAUZIONE PER L UTILIZZO E AVVERTENZE PER LA SICUREZZA Dopo aver tolto l imballaggio assicurarsi dell integrità dell apparecchio. In caso di dubbio non utilizzare l apparecchio e rivolgersi al centro
chio in prossimità di vasche da bagno, docce, lavelli o altri recipienti che contengano acqua.
 Salon05-14-ISTRUZIONI-Trx_Layout 23/05/14 09:42 Pagina 2 AVVERTENZE GENERALI I Conservate con cura il presente manuale e leggetene attentamente le avvertenze; esse forniscono importanti indicazioni riguardanti
X601 X601 iron man a/w 8 16/3/00, 2:55 pm
 X601 8 English Italiano 1 1 2 Iron Model X601 Important Safeguards When using electrical appliances, basic safety precautions should always be followed, including the following. Read all instructions.
AVVERTENZE GENERALI V 50/60Hz
 Ceramik-Vapo 1 2 220-240 V 50/60Hz AVVERTENZE GENERALI I Conservate con cura il presente manuale e leggetene attentamente le avvertenze; esse forniscono importanti indicazioni riguardanti la sicurezza,
Stiro ISTRUZIONI D USO INSTRUCTIONS FOR USE. Ferro da stiro a vapore con piastra inox. Steam iron with inox plate
 Stiro Ferro da stiro a vapore con piastra inox ISTRUZIONI D USO Steam iron with inox plate INSTRUCTIONS FOR USE F... G... E...... D... C...... B G...... H... F... L... A H... M...... E G F 230 50/60 Hz
Incassi Istruzioni di installazione / Installation instruction
 Incassi Istruzioni di installazione / Installation instruction Art. 914016 (2OUT) Art. 034127 (3OUT) Art. 034128 (4OUT) Per installatore: Al fine di garantire la durata del prodotto installare rubinetti
Incassi Istruzioni di installazione / Installation instruction
 Incassi Istruzioni di installazione / Installation instruction Art. 884054 Art. 884053 Art. 654099 Art. 654100 Art. 035212 Per installatore: Al fine di garantire la durata del prodotto installare rubinetti
ERGO. Istruzioni per il cablaggio // Wiring instructions. // Istruzioni per il montaggio // Assembly instructions
 Istruzioni per il cablaggio // Wiring instructions 64W ON/OFF ERGO IP 65 // Istruzioni per il montaggio // Assembly instructions 125W / 252W ON/OFF (Doppia accensione) // ON/OFF (Double switching) DALI
BRIGHT. // Schemi cablaggio // Wiring diagrams. // Istruzioni per il montaggio // Assembly instructions // ON/OFF. // emergenza+dali // emergency+dali
 Schemi cablaggio Wiring diagrams BRIGHT Istruzioni per il montaggio Assembly instructions OOFF emergenza+dali emergency+dali emergenza emergency dali EM EM EM EM DAI DAI D+ D- D+ D- Switch Dim D D D D
Drago. Sistema stirante a vapore ISTRUZIONI D USO. Steam ironing system INSTRUCTIONS FOR USE
 Drago I GB Sistema stirante a vapore ISTRUZIONI D USO Steam ironing system INSTRUCTIONS FOR USE 1 G L D C B F E A H 220-240 V 50/60 Hz 2200W I AVVERTENZE GENERALI I Conservate con cura il presente manuale
ORP250 ISTRUZIONI D USO INSTRUCTIONS FOR USE. Orologio da parete al quarzo. Quarz wall clock
 ORP250 I GB Orologio da parete al quarzo ISTRUZIONI D USO Quarz wall clock INSTRUCTIONS FOR USE 1 2 1,5 V (AA) Batteria non inclusa/battery not included I AVVERTENZE GENERALI Conservate con cura il presente
Fig. 1 Fig. 2. Fig. 3. Fig. 4
 1000 R 1 2 3 4 5 6 7 8 9 Fig. 1 Fig. 2 Fig. 3 Fig. 4 I TA L I A N O 1) Regolazione temperatura ferro 2) Interruttore luminoso caldaia 3) Pulsante luminoso vapore 4) Interruttore luminoso generale ferro
Smoke machine 400W PLFD400EL
 Smoke machine 400W PLFD400EL MANUALE UTENTE USER MANUAL 1 Rev. 01-06/13 Nel caso in cui si noti una scarsa uscita di fumo, o la pompa sia particolarmente rumorosa, o non venga vaporizzato il fumo, scollegare
SEMPLICE LED. // Schemi cablaggio // Wiring diagrams. // Istruzioni per il montaggio // Assembly instructions
 // Schemi cablaggio // Wiring diagrams SEMPICE ED // Istruzioni per il montaggio // Assembly instructions // Avvertenze. a sicurezza dell apparecchio è garantita solamente con l uso appropriato delle presenti
INSTALLAZIONE INSTALLATION
 INSTALLAZIONE INSTALLATION KIT SOFFIONI MySlim A CONTROSOFFITTO KIT MySlim SHOWER HEADS FOR FALSE CEILING Art. KIT00006 AVVERTENZE: L impianto deve essere effettuato da personale autorizzato, certificato
TERMOVENTILATORE TRENDY MANUALE DI ISTRUZIONI
 TERMOVENTILATORE TRENDY MANUALE DI ISTRUZIONI AVVERTENZE GENERALI LEGGERE QUESTE ISTRUZIONI PRIMA DI USARE L APPARECCHIO. Prima e durante l uso dell apparecchio è necessario seguire alcune precauzioni
ELCART. Manuale di istruzioni/scheda tecnica. Alimentatore Switching 60W UPS 13/26500 (Mod. VIC-60-12UPS)
") PAGINA 1 DI 6 Alimentatore Switching 60W UPS 13/26500 (Mod. VIC-60-12UPS) NOTA! LEGGETE ATTENTAMENTE QUESTO MANUALE DI ISTRUZIONI PRIMA DI INSTALLARE QUESTO ALIMENTATORE. Prima della prova e messa in servizio
PAGINA 1 DI 6 Alimentatore Switching 60W UPS 13/26500 (Mod. VIC-60-12UPS) NOTA! LEGGETE ATTENTAMENTE QUESTO MANUALE DI ISTRUZIONI PRIMA DI INSTALLARE QUESTO ALIMENTATORE. Prima della prova e messa in servizio
ERGO ERGO. Istruzioni per il cablaggio Wiring instructions. // Istruzioni per il montaggio // Assembly instructions
 ERGO Istruzioni per il cablaggio Wiring instructions 64W ON/OFF MARRONE / BROWN - Linea / line GIALLO-VERDE / YELLOW-GREEN - Terra / Earth ERGO 65 BLU / BLUE - Neutro / Neutral // Istruzioni per il montaggio
Foglio Integrativo del manuale Serie Trivalente
 Foglio Integrativo del manuale Serie Trivalente AVVERTENZE GENERALI! Questa apparecchiatura deve essere usata utilizzando esclusivamente gas GPL G0/G (butano/propano) alla pressione di 8-0/7 mbar IT COMANDI!
DA1500.
 EN DA15 DE FR NL DA SV FI IT ES PT EL www.rowenta.com AR 1 3 2 4 5 12V 24V 9 6 7 8 PER LA VOSTRA SICUREZZA Leggere attentamente le istruzioni d'uso e conservarle. Non lasciate mai l'apparecchio senza sorveglianza
Classic. 1) Tappo brevettato di sicurezza DATI TECNICI. 2) Interruttore caldaia. Potenza ferro Potenza caldaia. 3) Cavo d alimentazione
 Tappo brevettato di sicurezza DATI TECNICI. 2) Interruttore caldaia. Potenza ferro Potenza caldaia. 3) Cavo d alimentazione") 6 7 8 1 3 9 2 5 4 10 Classic 1) Tappo brevettato di sicurezza 2) Interruttore caldaia 3) Cavo d alimentazione 4) Tappetino poggiaferro 5) Volantino regolazione temperatura ferro 6) Impugnatura 7) Pulsante
6 7 8 1 3 9 2 5 4 10 Classic 1) Tappo brevettato di sicurezza 2) Interruttore caldaia 3) Cavo d alimentazione 4) Tappetino poggiaferro 5) Volantino regolazione temperatura ferro 6) Impugnatura 7) Pulsante
PROFESSIONAL. Stiro Casa Professional
 7 8 11 9 1 2 12 3 4 6 5 10 PROFESSIONAL 1) Tappo brevettato di sicurezza 2) Interruttore caldaia 3) Cavo d alimentazione 4) Tappetino poggiaferro 5) Manopola regolazione temperatura ferro 6) Impugnatura
STUFA ALOGENA 1800 Watt MANUALE D USO
 STUFA ALOGENA 1800 Watt Modello SA1806 MANUALE D USO European Standard Quality MANUALE D USO 1. CORPO DELL APPARECCHIO 2. BASE 3. VITI DI MONTAGGIO 4. DISPOSITIVO PROTEZIONE ANTI-RIBALTAMENTO 5. GUIDA
L U X DATI TECNICI. Potenza elettrica caldaia 1000 W Potenza elettrica ferro Capacità nominale caldaia. Ingombro cm 35 x 24 x 27
 L U X 11 6 5 7 8 9 1 10 4 2 3 L U X 1) Tappo brevettato di sicurezza 2) Interruttore luminoso caldaia 3) Interuttore luminoso generale ferro 4) Cavo alimentazione generale 5) Monotubo (Tubo vapore + cavo)
TAGLIE E LAVAGGI SIZES AND WASHING SYMBOLS
 326 TAGLIE E LAVAGGI SIZES AND WASHING SYMBOLS TABELLA CONVERSIONE TAGLIE / SIZES CONVERSION CHART Donna / Woman XS S M L XL XXL XXXL 4XL 5XL 40 42 42 44 44 46 48 50 52 54 54 56 58 60 62 Uomo / Man S
Sveglia ISTRUZIONI D USO. Alarm Clock INSTRUCTIONS FOR USE
 SVA085 I GB Sveglia ISTRUZIONI D USO Alarm Clock INSTRUCTIONS FOR USE 6 3 2 1 AA 1,5 V 4 Batteria non inclusa/ Battery not included 5 AVVERTENZE GENERALI Conservate con cura il presente manuale e leggetene
Delfino. Sistema stirante a vapore ISTRUZIONI DʼUSO Steam ironing system INSTRUCTIONS FOR USE
 Delfino AR Sistema stirante a vapore ISTRUZIONI DʼUSO Steam ironing system INSTRUCTIONS FOR USE G C D E B A F H I L J 220-240 V 50/60 Hz 2200W 2 COMPONENTI A. Ugello spray B.Ingresso riempimento
Attuatore a relè Manuale di istruzioni
 Attuatore a relè Manuale di istruzioni www.ecodhome.com 1 Sommario 3 Introduzione 4 Descrizione e specifiche prodotto 5 Installazione 6 Funzionamento 6 Garanzia 2 Introduzione SmartDHOME vi ringrazia per
istruzioni di montaggio - manutenzione BASI LUMINOSE - BLE
 IS_029_0_0 istruzioni di montaggio - manutenzione prodotto rispondente ai requisiti previsti dalle Direttive Comunitarie Europee BASI LUMINOSE - BLE NOTA BENE: le presenti istruzioni di montaggio informano
ferro da stiro senza filo wireless steam iron brezžicni likalnik bežicno glacalo MANUALE D USO USER MANUAL UPORABNIŠKI PRIROCNIK KORISNICKI PRIRUCNIK
 MANUALE D USO USER MANUAL UPORABNIŠKI PRIROCNIK KORISNICKI PRIRUCNIK ferro da stiro senza filo wireless steam iron brezžicni likalnik bežicno glacalo Art.:145308.01 220-240V~ 50/60 Hz 2020-2400 W 3 GARANZIA
Salon05-14-ISTRUZIONI-Trx_Layout 23/05/14 09:42 Pagina 1 Gustoso
 Gustoso A B C D L E G F I H 220-240 V~ 50/60 Hz 2000W 2 AVVERTENZE GENERALI I Conservate con cura il presente manuale e leggetene attentamente le avvertenze; esse forniscono importanti indicazioni riguardanti
RIBER FC
 RIBER FC 20 5 2 3 1 8 6 7 9 4 FC 20 1 Tappo brevettato di sicurezza 2 Interruttore luminoso caldaia 3 Interruttore luminoso generale ferro 4 Cavo alimentazione generale 5 Monotubo (tubo vapore + cavo)
Kalima. Asciugacapelli ISTRUZIONI D USO Hair dryer INSTRUCTIONS FOR USE
 Kalima Asciugacapelli ISTRUZIONI D USO Hair dryer INSTRUCTIONS FOR USE H A B C E G 220-240 V~ 50/60 Hz 2200 W 2 Descrizione A. Pulsante colpo d aria fredda B. Selettore 3 temperature C. Interruttore
ISTRUZIONI D USO. Nota bene La spia di temperatura (4) deve essere spenta solo quando si è appena accesa la macchina, dopo è solo indicativa.
 deve essere spenta solo quando si è appena accesa la macchina, dopo è solo indicativa.") ISTRUZIONI D USO Avviamento Accertarsi che la macchina sia conforme alla rete locale di distribuzione elettrica (220 V 50 Hz). Sollevare la copertura del serbatoio (1) e versare acqua potabile nel serbatoio
ISTRUZIONI D USO Avviamento Accertarsi che la macchina sia conforme alla rete locale di distribuzione elettrica (220 V 50 Hz). Sollevare la copertura del serbatoio (1) e versare acqua potabile nel serbatoio
F-UNO I GB. Tagliacapelli elettrico ISTRUZIONI D USO Hair trimmer INSTRUCTIONS FOR USE
 F-UNO I GB Tagliacapelli elettrico ISTRUZIONI D USO Hair trimmer INSTRUCTIONS FOR USE 1 D G E B A O AVVERTENZE GENERALI I Conservate con cura il presente manuale e leggetene attentamente le avvertenze;
Limpia ISTRUZIONI D USO INSTRUCTIONS FOR USE. Scopa elettrica convertibile. Convertible electric broom
 Limpia Scopa elettrica convertibile ISTRUZIONI D USO Convertible electric broom INSTRUCTIONS FOR USE 230 V~ 50/60 Hz 1000 W 2 AVVERTENZE GENERALI Conservate con cura il presente manuale e leggetene attentamente
Sistema stirante con caldaia ISTRUZIONI D USO. Steam ironing system with boiler INSTRUCTIONS FOR USE
 Vaporone Sistema stirante con caldaia ISTRUZIONI D USO Steam ironing system with boiler INSTRUCTIONS FOR USE C/P/Q H G F E H A C Q P 230V~ 50 Hz 2600 W p.max 1400 W 1200 W B O M D 2 Capacità 800 ml Pressione
V~ 50/60Hz 1000W
 220-240V~ 50/60Hz 1000W 2 220-240V~ 50/60Hz 1000W 2 AVVERTENZE GENERALI I Conservate con cura il presente manuale e leggetene attentamente le avvertenze; esse forniscono importanti indicazioni riguardanti
FORNELLETTO Tel Fax
 istruzioni per l uso FORNELLETTO Fornelletto IT pagina Tel. +39.035.688. Fax +39.035.320.49 [A] GUIDA ILLUSTRATIVA Fornelletto singolo (Type G30) Fronte 2 [B] 3 4 [C] Retro 6 5 [D] Fornelletto doppio (Type
Spremino. Spremiagrumi elettrico ISTRUZIONI D USO. Electric juicer INSTRUCTIONS FOR USE
 Spremino I GB Spremiagrumi elettrico ISTRUZIONI D USO Electric juicer INSTRUCTIONS FOR USE 1 C 220-240 V 50/60Hz 25 W A E D B AVVERTENZE GENERALI I Conservate con cura il presente manuale e leggetene attentamente
SB 400. Frullatore ad immersione ISTRUZIONID USO Immersion-mixer INSTRUCTIONS FOR USE
 SB 400 I GB Frullatore ad immersione ISTRUZIONID USO Immersion-mixer INSTRUCTIONS FOR USE 220-240 V~ 50/60 Hz 400W kb30 Demostration movie 2 Questo apparecchio può essere utilizzato da bambini dagli 8
Grigliata. Griglia a piastre ISTRUZIONI DʼUSO. Griller with plates INSTRUCTIONS FOR USE
 Grigliata AR Griglia a piastre ISTRUZIONI DʼUSO Griller with plates INSTRUCTIONS FOR USE 220-240 V~ 50/60 Hz 1850 W 2 AVVERTENZE GENERALI Conservate con cura il presente manuale e leggetene attentamente
ISTRUZIONI PER L INSTALLAZIONE E LA MANUTENZIONE INSTALLATION AND MAINTENANCE INSTRUCTIONS
 ISTRUZIONI PER L INSTALLAZIONE E LA MANUTZIONE INSTALLATION AND MAINTANCE INSTRUCTIONS Miscelatore da incasso a parete per lavabo ARUB036 S e per vasca ARUB076S Built-in mixer for washbasin ARUB036S and
Light intensity regulator for Aim LED. Regolatore d intensità luminosa per Aim LED
 X Light intensity regulator for Aim LED Continuous regulation Light intensity memory Soft start Soft stop Light intensity regulation Min. 30% Max. 100% Runs from 1 to 5 Aim Dimmer that needs to be inserted
MANUALE D ISTRUZIONE
 FERRO DA STIRO A VAPORE CON PUNTA IN ACCIAIO HFX338S MANUALE D ISTRUZIONE EUROPEAN STANDARD QUALITY DESCRIZIONE 1. Termostato regolabile 2. Tasto vapore 3. Tasto spray 4. Beccuccio spray 5. Ingresso Serbatoio
SRT064 BTH SRT051 BTH SRT052 BTH
 KIT FOR TRUCK BRAKE TESTERS SRT051 BTH SRT052 BTH OPERATOR S MANUAL SRT064BTH SRT051BTH SRT052BTH CONTENTS 1. INTRODUCTION...1 2. Description of SRT064BTH Kit...2 3. Description of SRT051BTH Kit...2 4.
European standard quality
 FRULLATORE HFR485 European standard quality AVVERTENZE Controllare le condizioni dell apparecchio dopo aver tolto l imballaggio. Prima di collegare l apparecchio verificare che le caratteristiche elettriche
Straightener. Register your product and get support at HP4668/22. Manuale utente
 Register your product and get support at www.philips.com/welcome Straightener HP4668/22 IT Manuale utente abc h g f e d i j Italiano Congratulazioni per l acquisto e benvenuti in Philips! Per trarre il
SonDa acqua SanitaRia
 SonDa acqua SanitaRia IT avvertenze PrelIMINarI questa istruzione è parte integrante del libretto dell apparecchio sul quale viene installato il Kit. a tale libretto si rimanda per le avvertenze GEnERaLi
IT Istruzioni di montaggio e manutenzione UK Installation and maintenance instructions
 IT Istruzioni di montaggio e manutenzione UK Installation and maintenance instructions Contenuto della confezione / Package contents A B C x x 4 x 4 D x 8 E x 6 Utensili necessari / Tools needed Indossare
Stufa con elementi riscaldanti in fibra di carbonio ISTRUZIONI D USO. Carbon Fibre Heater INSTRUCTIONS FOR USE
 Karbon Stufa con elementi riscaldanti in fibra di carbonio ISTRUZIONI D USO Carbon Fibre Heater INSTRUCTIONS FOR USE B A C E D D X Y F 220-240 50/60 Hz V 600 W - 1200 W 2 AVVERTENZE GENERALI Conservate
TLR02. Dimmer per Led in tensione costante a 4 canali
 TLR02 Dimmer per Led in tensione costante a 4 canali DATI TECNICI Alimentazione Uscita Tipo di carico 12-24 Vdc Carico max 10A: 90 W (12Vdc 3Ch); 120 W (12Vdc 4Ch) 180 W (24Vdc 3Ch); 240 W (24Vdc 4Ch)
Fig. 1. Fig. 2. Fig. 3. Fig. 5. Fig. 4. Fig. 6. Fig. 7
 070 H C D F E K A B G I Fig. 1 Fig. 2 Fig. 3 Fig. 4 Fig. 5 Fig. 6 Fig. 7 Gentile Cliente, desideriamo ringraziarla per aver preferito un prodotto Progresso Casa della linea FINESSE. Funzionalità, compattezza,
20x SSC Solution. For use in in situ hybridization procedures. For Research Use Only. Not for use in diagnostic procedures.
 20x SSC Solution WB-0003-50 14 (50 ml) For use in in situ hybridization procedures For Research Use Only. Not for use in diagnostic procedures. 1. Scope of Application This product is designed for research
ISTRUZIONI DI INSTALLAZIONE SCREENAPP ASSEMBLY & INSTALLATION INSTRUCTIONS
 ISTRUZIONI DI INSTALLAZIONE SCREENAPP ASSEMBLY & INSTALLATION INSTRUCTIONS A APERTURA DELLA CONFEZIONE - UNPACKING x 1 CONTENUTO DELLA CONFEZIONE Nr. 1 ScreenApp (Schermo) Nr. 1 Porta penne Nr. 1 Panno
INSTALLAZIONE KIT DOSATORE DI DETERGENTE DETERGENT DISPENSER KIT INSTALLATION
 INSTALLAZIONE KIT DOSATORE DI DETERGENTE DETERGENT DISPENSER KIT INSTALLATION ATTENZIONE PERICOLO TUTTE LE OPERAZIONI DESCRITTE DI SEGUITO DEVONO ESSERE ESEGUITE DA PERSONALE QUALIFICATO E ADDESTRATO WARNING
Vortex. Frullatore ad immersione ISTRUZIONID ʼUSO. Immersion-mixer INSTRUCTIONS FOR USE
 Vortex Frullatore ad immersione ISTRUZIONID ʼUSO Immersion-mixer INSTRUCTIONS FOR USE A B C 220-240 V~ 50/60 Hz 250W kb20 sec 2 Questo apparecchio può essere utilizzato da bambini dagli 8 anni in su e
STUFA AL CARBONIO CON TIMER 1200 Watt. mod. CH 1204T
 STUFA AL CARBONIO CON TIMER 1200 Watt mod. CH 1204T manuale d istruzioni European Standard Quality Consigliamo di leggere attentamente il presente manuale d istruzioni prima di procedere nell utilizzo
MANUALE DI ISTRUZIONI MOVIMENTO VD51 Cronografo con secondi e minuti
 MANUALE DI ISTRUZIONI MOVIMENTO VD51 Cronografo con secondi e minuti FUNZIONAMENTO VD51 DISPLAY E PULSANTI DELLA CORONA Lancetta minuti Lancetta ore Lancetta secondi Lancetta minuti cronometro Lancetta
STUFA AL CARBONIO 1200 Watt. Mod. CH manuale d uso
 STUFA AL CARBONIO 1200 Watt Mod. CH 1202 manuale d uso European Standard Quality DESCRIZIONE DELLE PARTI 1. Pannello di controllo 2. Corpo della Stufa 3. Griglia di protezione 4. Base ASSEMBLAGGIO Montare
Quadro I GB. Termoventilatore ISTRUZIONI D USO Fan heater INSTRUCTIONS FOR USE
 Quadro I GB Termoventilatore ISTRUZIONI D USO Fan heater INSTRUCTIONS FOR USE 1 A AVVERTENZE GENERALI I Conservate con cura il presente manuale e leggetene attentamente le avvertenze; esse forniscono importanti
STUFA AL CARBONIO 1200 Watt con timer
 STUFA AL CARBONIO 1200 Watt con timer Mod. CH 1205T manuale d uso European Standard Quality DESCRIZIONE DELLE PARTI 1. Pannello di controllo 2. Corpo della Stufa 3. Griglia di protezione 4. Base ASSEMBLAGGIO
Sbattitore I GB. Sbattitore multiuso ad immersione ISTRUZIONI D USO Immersion muli-use beater ISTRUCTIONS FOR USE
 Sbattitore I GB Sbattitore multiuso ad immersione ISTRUZIONI D USO Immersion muli-use beater ISTRUCTIONS FOR USE 2 220-240V~ 200W 50/60Hz 1-5 speed Kb 60sec 2,5l Demostration movie 3 4 5 6 7 8 60 COMPONENTI
Istruzioni per l uso SCALDINO SCALDINO TYPE M2701
 Istruzioni per l uso SCALDINO SCALDINO TYPE M2701 GUIDA ILLUSTRATIVA [A] 6 5 4 3 2 1 [B] [C] [D] DATI TECNICI M2701 220-240 V 50/60 Hz 300-365 W I MANUALE DI ISTRUZIONI PER L USO DELLO SCALDINO Gentile
Manuale di istruzioni - Instruction manual
 MAS020948 Manuale di istruzioni - Instruction manual 2 MANUALE DI ISTRUZIONI ITA DATI TECNICI Alimentazione: AC100-240V 50/60HZ Capacità massima: 100 ml Potenza nominale: DC12V, 600mA 7,2W AVVERTENZE Riempire
CAMBIO OLIO TRIAL LATO SINISTRO TRIAL OIL CHANGE LEFT SIDE
 CAMBIO OLIO TRIAL LATO SINISTRO TRIAL OIL CHANGE LEFT SIDE La tabella sottostante indica gli intervalli di cambio olio consigliati. La sostituzione di olio con intervallo di tempo troppo lungo, portano
Griglia ISTRUZIONI D USO INSTRUCTIONS FOR USE. Barbecue elettrico. Electric Barbecue
 Griglia Barbecue elettrico ISTRUZIONI D USO Electric Barbecue INSTRUCTIONS FOR USE F H H A H G F E C D B 1 2 1 220-240 50/60 Hz V 1600 W 2 AVVERTENZE GENERALI Conservate con cura il presente manuale e
Conservate con cura il presente manuale
 AVVERTENZE GENERALI I Conservate con cura il presente manuale e leggetene attentamente le avvertenze; esse forniscono importanti indicazioni riguardanti la sicurezza, l uso immediato e futuro dell apparecchio.
START-LINE AYCT-202 USER MANUAL MULTI LANGUAGE. Item Version 2.0 Visit for the latest instructions REMOTE CONTROL
 START-LINE AYCT-202 USER MANUAL MULTI LANGUAGE Item 71164 Version 2.0 Visit www.trust.com for the latest instructions REMOTE CONTROL AYCT-202 REMOTE CONTROL 1 Arm Turn bulb ON 2 Channel selection Dim up
VAPORMASTER. Manuale d Uso. User Manual. Sistema Stirante Steam Station Iron
 VAPORMASTER Sistema Stirante Steam Station Iron Manuale d Uso User Manual Prima di utilizzare l apparecchio, leggere attentamente tutte le istruzioni e conservarle per consultazioni future. AVVERTENZE
Curler. Register your product and get support at HP8600/00. Manuale utente
 Register your product and get support at www.philips.com/welcome Curler HP8600/00 IT Manuale utente a b c d e f g h i j Italiano Congratulazioni per l acquisto e benvenuti in Philips! Per trarre il massimo
Outdoor wireless wall switch
 www.trust.com SECURITY PLUS-LINE AGST-8800 USER MANUAL MULTI LANGUAGE Item 71151 Version 1.0 Visit www.trust.com for the latest instructions Outdoor wireless wall switch 1 2 3 OFF OFF OFF OFF ON + ON ON
1CPP PORTAPRESE BASCULANTE BACKFLIP POWER SOCKET HOLDER. Manuale d installazione e uso Installation and use manual
 1CPP PORTAPRESE BASCULANTE BACKFLIP POWER SOCKET HOLDER Manuale d installazione e uso Installation and use manual Complimenti per aver acquistato una apparecchiatura Barazza! Questa è un apparecchiatura
Staightener. Register your product and get support at HP8309/00 HP8310/00. Manuale utente
 Register your product and get support at www.philips.com/welcome Staightener HP8309/00 HP8310/00 IT Manuale utente d e c b a Italiano Congratulazioni per l acquisto e benvenuti in Philips! Per trarre il
Cinderella I GB. Aspira cenere ISTRUZIONI D USO Aspires ash INSTRUCTIONS FOR USE
 Cinderella I GB Aspira cenere ISTRUZIONI D USO Aspires ash INSTRUCTIONS FOR USE 1 A B C L F C M G E D H 220-240 V 50/60 Hz 800W 10L 2 3 I AVVERTENZE GENERALI I Conservate con cura il presente manuale e
STUFA AL QUARZO 1000 Watt SQ 124
 STUFA AL QUARZO 1000 Watt SQ 14 manuale d istruzioni European Standard Quality Consigliamo di leggere attentamente il presente manuale d istruzioni prima di procedere nell utilizzo dell apparecchio e di
Straightener. Register your product and get support at HP4666/22. Manuale utente
 Register your product and get support at www.philips.com/welcome Straightener HP4666/22 IT Manuale utente Italiano Congratulazioni per l acquisto e benvenuti in Philips! Per trarre il massimo vantaggio
Curler. Register your product and get support at HP4684 HP4683. Manuale utente
 Register your product and get support at www.philips.com/welcome Curler HP4684 HP4683 IT Manuale utente a b c d e i h g f Italiano Congratulazioni per l acquisto e benvenuti in Philips! Per trarre il massimo
MANUALE DI ISTRUZIONI
 Cantatooth ONE000004 - ONE000006 MANUALE DI ISTRUZIONI INSTRUCTIONS MANUAL 2 cantatooth 1. DESCRIZIONE PRODOTTO Parti Microfono Controllo Volume Controllo Riverbero Power On/Off 8.35in Cassa 2.83in Accessori
Salon05-14-ISTRUZIONI-Trx_Layout 23/05/14 09:42 Pagina 1 Tosto
 Salon05-14-ISTRUZIONI-Trx_Layout 23/05/14 09:42 Pagina 1 Tosto H I A F B C D 220-240 V~ 50/60 Hz 700 W 2 1 2 3 4 5 6 7 8 9 10 3 AVVERTENZE GENERALI Conservate con cura il presente manuale e leggetene attentamente
D O M E S T I C. Stiro Casa Domestic
 D O M E S T I C H G E A L F D I C B D O M E S T I C A) Tappo di sicurezza B) Interruttore luminoso caldaia C) Interuttore luminoso generale ferro D) Cavo alimentazione generale E) Monotubo (Tubo vapore
ELCART ART. 19/ /13275 PAGINA 1 DI 8. servizio automatico documentazione tecnica
 ART. 19/13270-19/13275 PAGINA 1 DI 8 DISTRIBUTION SPA via Michelangelo Buonarroti, 46-20093 Cologno Monzese (Milano) ITALY ART. 19/13270-19/13275 PAGINA 2 DI 8 DISTRIBUTION SPA via Michelangelo Buonarroti,
 Stretchy category 4 Clou category 6 Fluffy U75 E01 E08 E04 E06 H20 E07 E02 E05 E11 H04 H07 E13 E03 E10 E12 H10 H12 H08 E14 E09 E21 E18 H11 H13 E19 E20 E22 E23 H05 H06 Fluffy category 4 category 4 Felix
Vitamin ISTRUZIONI D USO INSTRUCTIONS FOR USE. Spremiagrumi elettrico. Electric juicer
 Vitamin Spremiagrumi elettrico ISTRUZIONI D USO Electric juicer INSTRUCTIONS FOR USE 230 V~ 50/60 Hz 20 Watt KB 60 sec. 2 AVVERTENZE GENERALI Conservate con cura il presente manuale e leggetene attentamente
SMOOTHIE TO GO. SPACE KETTLE electric folding kettle. Manuale di istruzioni. Art. 862C
 SMOOTHIE TO GO SPACE KETTLE electric folding kettle Manuale di istruzioni 1 Art. 862C Prima di utilizzare questo apparecchio leggere attentamente le istruzioni e conservarle per consultazioni future. Assicurarsi
CAMBIO OLIO TRIAL LATO SINISTRO TRIAL OIL CHANGE LEFT SIDE
 CAMBIO OLIO TRIAL LATO SINISTRO TRIAL OIL CHANGE LEFT SIDE La tabella sottostante indica gli intervalli di cambio olio consigliati. La sostituzione di olio con intervallo di tempo troppo lungo, porta ad
Prefiltri Prefilter ISTRUZIONI PER L USO OPERATING INSTRUCTIONS
 Prefiltri Prefilter PF ISTRUZIONI PER L USO OPERATING INSTRUCTIONS 1.Componenti 1.Components DESCRIZIONE DESCRIPTION 1 Semi guscio inferiore Bottom spherical shell flange 2 Cestello Basket 3 Guarnizione