TKT USER S GUIDE GUIDA OPERATIVA GUIDE D UTILISATION BEDIENUNGSANLEITUNG GUIA OPERATIVA. Commands reference: DOMC-0005E PRINTER READY
|
|
|
- Placido Sarti
- 8 anni fa
- Visualizzazioni
Transcript
1 USER S GUDE GUDA OPERATVA GUDE D UTLSATON BEDENUNGSANLETUNG GUA OPERATVA PRNTER READY 28/04/08 11:03:50 TKT Commands reference: DOMC-0005E

2

3 F D E The CE mark affi xed to the product certify that the product satisfi es the basic safety requirements. l marchio CE applicato al prodotto certifi ca che il prodotto stesso soddisfa i requisiti base di sicurezza. Le label CE appliqué sur le produit certifi e que le produit même satisfait les qualités requises de securité Die sicherheit dieses Produkts werden durch die CE Kennzeichnung bescheinigt,die am Produkt angebracht ist. La marca CE applicada al producto certifi ca que el mismo producto tiene los requisitos de seguridad. F D E Your attention is drawn to the following actions that could compromise the characteristics of the product: Read and retain the instructions which follow; Follow all indications and instructions given on the printer; Make sure that the surface on which the printer rests is stable. f it is not, the printer could fall, seriously damaging it; Make sure that the printer rests on a hard (non-padded) surface and that there is suffi cient ventilation; When positioning the printer, make sure its cables will not be damaged; Use the type of electrical power supply indicated on the printer label. f uncertain, contact your dealer; Make sure the electrical system that supplies power to the printer is equipped with a ground wire and is protected by a differential switch; f power is supplied to the printer using an extension cord, make sure that the total electrical input of the connected devices does not exceed the maximum current permitted by the type of extension in use; Do not block the ventilation openings; Do not insert objects inside the printer as this could cause short-circuiting or damage components that could jeopardize printer functioning; Do not carry out repairs on the machine yourself, except for the normal maintenance operations given in the user manual; Make sure that there is an easily-accessible outlet with a capacity of no less than 15A in the vicinity of where the printer is to be installed; Periodically perform scheduled maintenance on the printer to avoid dirt build-up that could compromise the correct, safe operation of the unit. Using a serial cable it s better to install a ferrite at the end of the same cable. Si richiama l attenzione sulle seguenti azioni che possono compromettere la conformità sopra attestata, oltre, naturalmente, le caratteristiche del prodotto: Leggete e conservate le istruzioni seguenti; Seguite tutti gli avvisi e le istruzioni indicate sulla stampante; Non collocate la stampante su una superfi cie instabile. Essa potrebbe cadere e danneggiarsi seriamente; Non collocate la stampante su superfi ci morbide o in ambienti che non garantiscono la necessaria ventilazione; Collocate la stampante in modo da evitare che i cavi ad essa collegati possano essere danneggiati; Utilizzate il tipo di alimentazione elettrica indicato sull etichetta della stampante; Assicuratevi che l impianto elettrico che alimenta la stampante sia provvisto del conduttore di terra e che sia protetto da interruttore differenziale; Se la stampante è alimentata tramite una prolunga, assicuratevi che l assorbimento totale degli apparecchi collegati non superi la corrente massima ammessa dal tipo di prolunga; Non ostruite le aperture per la ventilazione; Non introducete oggetti all interno della stampante in quanto essi possono cortocircuitare o danneggiare parti che potrebbero compromettere il funzionamento della stampante; Non intervenite personalmente sulla stampante, eccetto che per le operazioni di ordinaria manutenzione, espressamente riportate nel manuale utente; Assicurarsi che nel luogo in cui si vuole installare la stampante, vi sia una presa di corrente facilmente accessibile e di capacità non inferiore ai 15A; Eseguire periodicamente la manutenzione ordinaria della stampante al fi ne di evitare che accumuli di sporcizia possano compromettere il corretto e sicuro funzionamento dell unità. Nel caso di utilizzo di cavo seriale, si consiglia il montaggio di una ferrite sulla parte terminale dello stesso cavo. Nous attirons l attention sur certaines opérations qui pourraient compromettre la conformité attestée ci-dessus et le caractéristiques du produit même: Lire et conserver les instructions suivantes; Suivre tous les avertissements et les instructions indiqués sur l imprimante; Ne pas positionner l imprimante sur une surface instable. Elle pourrait tomber et s endommager sérieusement; Ne pas positionner l imprimante sur des surfaces molles ou dans des atmosphères où la ventilation nécessaire n est pas assurée; Mettre en place l imprimante de manière à éviter que les câbles qui y sont raccordés puissent être endommagés; Utiliser le type d alimentation électrique indiqué sur l étiquette de l imprimante; Vérifi er que le circuit électrique qui alimente l imprimante est muni d un câble de terre et qu il est protégé par un interrupteur différentiel; Si l imprimante est alimentée par une rallonge, vérifi er que l absorption totale des appareils raccordés ne dépasse pas le courant maximal admis pour ce type de rallonge; Ne pas obstruer les ouvertures servant à la ventilation; Ne pas introduire d objets à l intérieur de l imprimante car ils peuvent court-circuiter ou endommager des pièces qui pourraient compromettre le fonctionnement de l imrpimante; Ne pas intervenir personnellement sur l imprimante, excepté pour les opérations d entretien ordinaire expressément indiquées dans le manuel utilisateur; Vérifi er que le lieu d installation de l imprimante est équipé d une prise de courant facilement accessible et d une capacité non inférieure à 15A; Procéder régulièrement à l entretien ordinaire de l imprimante afi n d éviter qu un excès de saleté ne compromette le bon fonctionnement et la sécurité de l appareil. On utilisé un câble sériel il vaut mieux monter une ferrite sur le côte terminal du même cable. Wir möchten Sie darauf hinweisen, daß folgende Aktionen die oben bescheinigte Konformität und die Eigenschaften des Produkts beeinträchtigen können: Lesen Sie die nachstehenden Anleitungen und bewahren Sie diese gut auf; Beachten Sie alle am Drucker angebrachten Hinweise und Anleitungen; Den Drucker nicht auf eine wenig stabile Unterlage stellen, denn er könnte herunterfallen und stark beschädigt werden; Den Drucker nicht auf weiche Unterlagen stellen und nicht in Räumen aufstellen, in denen die erforderliche Belüftung nicht gewährleistet ist; Den Drucker derart aufstellen, dass die verschiedenen Kabel desselben nicht beschädigt werden; Den Drucker an eine Stromleitung mit den auf dem Druckeretikette angegebenen Eigenschaften anschließen; Es ist sicherzustellen, dass die den Drucker speisende Stromleitung über einen Erdleiter verfügt und durch einen Differenzialschalter abgesichert ist; Wenn ein Verlängerungskabel verwendet wird ist sicherzustellen, dass die Gesamtaufnahme der angeschlossenen Geräte nicht den zulässigen Höchststrom der Verlängerung; Die Belüftungsschlitze nicht abdecken; Keine Gegenstände in den Drucker einführen, da diese einen Kurzschluss auslösen oder zu Beschädigungen führen können, die den einwandfreien Druckerbetrieb beeinträchtigen; Keine eigenmächtigen Eingriffe am Drucker vornehmen, ausgenommen die ausdrücklich im Anwenderhandbuch aufgeführten Wartungseingriffe; Sicherstellen, dass am Aufstellort des Druckers eine leicht zugängliche Steckdose vorhanden ist, deren Leistung nicht unter 15 Ampere liegen darf; Den Drucker regelmäßig warten und reinigen, damit keine Schmutzablagerungen den einwandfreien und sicheren Betrieb der Einheit beeinträchtigen. m falle daß jebrauch von seriel kable, zusammenbau wird empfhlen von das ferrite über die endesite der dasselbe kable. Le rogamos que preste mucha atención a las siguientes acciones que pueden comprometer la conformidad arriba certifi cada, y obviamente las caraterísticas del producto: Lea y conserve las siguientes instrucciones; Respete los avisos e instrucciones indicadas en la impresora; No coloque la impresora sobre una superfi cie inestable; podría caerse o averiarse seriamente; No coloque la impresora sobre superfi cies blandas o ambientes que no garanticen la ventilación necesaria; Coloque la impresora de manera tal que los cables a ella conectados no se averíen; Utilice el tipo de alimentación eléctrica indicada en la etiqueta de la impresora; Asegurarse que la instalación eléctrica que alimenta la impresora posea un conductor de tierra y que esté protegida por un interruptor diferencial; Si para la alimentación de la impresora se utiliza una extensión, asegurarse que la absorción total de los aparatos conectados no sea mayor a la corriente máxima admitida por el tipo de extensión y que; No obstruya las aberturas de ventilación; No introduzca objetos dentro de la impresora, pueden causar cortocircuitos o dañar partes que podrían comprometer el buen funcionamiento de la impresora; No efectúe personalmente operaciones de reparación a la impresora, excepto aquellas de mantenimiento ordinario indicadas expresamente en el manual del usuario; Asegurarse que en el sitio de trabajo en el cual se quiere instalar la impresora exista una toma de corriente de fácil acceso y de capacidad no inferior a los 15A; Efectuar periódicamente el mantenimiento ordinario de la impresora con el propósito de evitar acumulaciones de suciedad que puedan comprometer el correcto y seguro funcionamiento. Si se utiliza lo serial cable, se necesita el montaje de una ferrite sobre la parte terminal del mismo cable.

4

5 TK300 Table of contents ndice Table des matières nhaltsverzeichnics PRNTER READY 28/04/08 11:03:50 ndice PRNTER READY 28/04/08 11:03:50 PRNTER SETUP SETUP PRNTER TYPE...KPM 300 PRNTNG HEAD TYPE...KPA80 NTERFACE...RS232 PROGRAM MEMORY TEST...OK DYNAMC RAM TEST...OK EEPROM TEST...OK CUTTER TEST...OK PRNTER HEAD Rav HEAD VOLTAGE [V] = 24,29 HEAD TEMPERATURE RE [ C] = 26 POWER ON COUNTER = 28 PAPER PRNTED [cm] = 40 CUT COUNTER = 573 Printer Em lation ESC/POS (TM) nstallation for drivers Windows / Linux PRNTER READY 28/04/08 11:03:50 Appendix A.1 Technical specificationscations A.2 Advanced functions PRNTER READY 28/04/08 11:03:50 Appendix PRNTER READY 28/04/08 11:03:50 B.1 Accessories and spare parts B.2 Cleaning <1>
![.624 HEAD VOLTAGE [V] = 24,29 HEAD TEMPERATURE RE [ C] = 26 POWER ON COUNTER = 28 PAPER PRNTED [cm] = 40 CUT COUNTER = 573 Printer Em lation ESC/POS (TM) nstallation for drivers](/docs-images/44/6727988/images/page_5.jpg "Windows / Linux PRNTER READY 28/04/08 11:03:50 Appendix A.1 Technical specificationscations A.")
6 TK300 BLANK PAGE <2>

7 TK300 PRNTER READY 28/04/08 11:03:50 UNPACKNG THE PRNTER 1. nstallation instructions 2. FanFold module 3. Power supply cable 4. Laterals foam packing shell 5. Printer 6. USB cable 7. Bottom foam packing shell 8. Box DSMBALLO DELLA STAMPANTE 1. Fogli avvertenze 2. Modulo FanFold 3. Cavo di alimentazione 4. mballi sagomati di protezione laterale 5. Stampante 6. Cavo USB 7. Vassoio di protezione inferiore 8. Scatola PRNTER READY 28/04/08 11:03: PRNTER READY 28/04/08 11:03:50 8 <3>

8 TK300 Switch printer ON/OFF Accendere/Spegnere la stampante Brancher/Éteindre l imprimante Den Drucker einwieden/ausschlaten Encender/Apagar la impresora PRNTER READY 28/04/08 11:03:50 Switch printer On pressing key On/Off The display turn on; the standby message PRNTER READY and the date/time values will be displayed on the printer The printer is ready. Accendere la stampante premendo il tasto On/Off. l display si accende e visualizza sul display il messaggio di stand by PRNTER READY, la data e l ora. La stampante è pronta per stampare. <4>

9 TK300 Calendar clock regulation Regolazione dell orologio calendario Reglage du montre-calendrier Uhrzeit und kalender einstellung Ajuste del reloj calendario 1. Press the LF LNE FEED key to enter in the clock confi guration. 1. Premere il tasto LF LNE FEED per entrare nella modalità di confi gurazione. LF = ENTER SETUP... FF = EXT SETUP The highlighted digit indicates the digit to be modifi ed. Press LF LNE FEED key to modify the value; every single key pressure increases of 1 his value. Once the max selectionable value is reached the counting starts again from La cifra sottolineata indica la posizione da modifi care. Premere il tasto LF LNE FEED per modificare il valore; ogni pressione del tasto incrementa il valore di 1 unità. Raggiunto il valore massimo selezionabile il valore successivo riparte da Press the LF LNE FEED key to select the Real Time Clock settings. 2. Premere il tasto LF LNE FEED per selezionare la regolazione del Real Time Clock. Set-Up type... Printer Set/Up Clock Setup 28/04/08 11:03:50 3. Press the FF FORM FEED key to confirm the selection. The date/time values will be displayed on the printer. Follow the instructions printed on the paper for the key functionality. 3. Premere il tasto FF FORM FEDED per confermare la scelta. La stampante visualizza sul display la data e l ora impostata ed esegue la stampa con le indicazioni per la funzionalità dei tasti. Set-Up type... Real Time Clock Press FORM FEED key to move the cursor on the next digit; if the cursor position is on the latest digit, press the FF FORM FEED key to exit and save the date/time entered. Then the printer is ready. 5. Premere il tasto FF FORM FEED per spostare la selezione alla cifra successiva; se la selezione è sull ultima cifra, premendo nuovamente il tasto FF FORM FEED si termina la procedura di regolazione e viene impostata l ora e la data immesse. La stampante è quindi pronta a stampare. Clock Setup 28/04/08 11:03:50 <5>

10 TK300 STATUS LED DESCRPTON GREEN ON PRNTER ON : NO ERROR COMMUNCATON STATUS GREEN YELLOW RED X1 X2 X 3 X4 X2 X 3 X 4 X 5 X 6 X 3 X 4 X 5 X 6 DATA RECEVE RECEPTON ERRORS (parity, frame error, overrun error) MSNTERPRET COMMAND COMMAND RECEPTON TME OUT RECOVERNG ERROR HEADNG OVER TEMPERATURE PAPER END PAPER JAM POWER SUPPLY VOLTAGE NCORRECT COVER OPEN UNRECOVERNG ERROR ROR RAM ERROR EEPROM ERROR CUTTER ERROR CUTT TTER OPEN ERROR <6>

11 TK300 MESSAGE DSPLAYED DESCRPTON PRNTER READY 28/04/08 11:03:50 Printer ON: no error RECEVNG DATA SPOOLNG... Data receive RS232 RX ERROR CHECK RS232 SETTNGS Reception errors (parity, frame error, overrun error) COMAND ERROR COMMAND NOT FOUND Misinterpret command COMAND ERROR COMMAND NOT FNSH Command reception time out PRNTHEAD OVERTEMP WAT COOLNG... Heading over temperature END PAPER PLEASE NSERT PAPER Paper end PAPER JAM CLEAR PAPER PATH Paper jam POWER VOLTAGE ERROR CHECK POWER SUPPLER Power supply voltag incorrect COVER ERROR CLOSE COVERS Cover opened RAM ERROR POWER ON AGAN RAM error EEPROM ERROR POWER ON AGAN EEPROM error CUTTER ERROR OPEN COVER AND CLEAR Cutter error CUTTER ERROR CUTTER COVER OPEN! Cutter open error PRNTER READY 28/04/08 11:03:50 PRNT TCKET ERROR! CHECK TCKETS PATH Notch alignment error <7>

12 TK PRNTER READY 28/04/08 11:03:50 KEY STAND BY 1 2 LF LNE FEED FF FORM FEED Advance the paper Advance the paper by a pre-set length and perform the cut 3 S1 - POWER ON (push for a few seconds) Enter SETUP and print SETUP report Perform the font test Start self-calibration of the notch sensor and perform the paper characterization 4 S2 - Enter programming mode TASTO STAND BY 1 2 LF LNE FEED FF FORM FEED Esegue l avanzamento della carta Esegue l allineamento del ticket e il taglio della carta 3 S1 - ACCENSONE (premere il tasto per alcuni secondi) Entra nel SETUP e stampa rapporto SETUP Esegue il font test nizializza il sensore di notch e caratterizza la carta 4 S2 - Entra nella modalità di programmazione <8>
 Entra nel SETUP e stampa rapporto SETUP Esegue il font test nizializza il sensore di notch e caratterizza la carta 4 S2 - Entra nella modalità di")
13 TK300 (1) nsert USB connector (1) nserire il connettore USB (1) ntroduire le connecteur USB (1) Den USB Verbinder in die Buchse stecken (1) ntroducir el conectador USB OR (1) nsert serial interface connector (1) nserire il connettore di interfaccia seriale (1) ntroduire le connecteur d interface en série (1) Den seriellen Schnittstellenverbinder einsetzen (1) ntroducir el conectador de interfaz serial (2) nsert ethernet connector (2) nserire il connettore ethernet (2) ntroduire le connecteur d ethernet (2) Den ethernet verbinder einsetzen (2) ntroducir el conector de ethernet nsert the power supply cable nserire il cavo di alimentazione ntroduire le câble de l alimentateur adéquat Das Kabel in das spezielle Speisegerät stecken Conectar el cable del alimentador N O T E: (1) f serial and USB connectors are inserted, communication port is USB. (2) Only for models with Ethernet interface. N O T A: (1) Se i connettori seriale e USB sono inseriti, la porta di comunicazione è la USB. (2) Solo nei modelli con interfaccia Ethernet <9>
 f serial")
14 TK300 Connector. Connettore. Connecteur. Schnittstellen. Conectador. J5 - USB Connector J9 - RS232 Serial Connector J16 - RJ45 Ethernet Connector only for models with Ethernet interface USB 1.1 PORT USB 2.0 compatible Sx (*) LED 8 1 Dx (*) LED PN SGNAL VBUS (in) D - D + GND DESCRPTON VBUS (in) Data - Data + Ground signal PN SGNAL DTR TX RX N.C. GND DESCRPTON Data terminal ready Data transmission Data reception Not connected Ground signal PN SGNAL ETX+ ETX- ERX+ +24 VT +24 VT DESCRPTON ETX+ ETX- ERX+ Not connected Not connected 6 DTR Data terminal ready 6 ERX- ERX CTS RTS N.C. Clear to send Ready to receive data Ready to send Not connected 7 8 GND GND Not connected Not connected NOTE (*) : The functionality of two leds, Sx and Dx, are specified in the following table: LED HW version 2.00 or later Sx Link (yellow color): the led light on when a connection is active Dx Rx/Tx (green color): the led light on when occurs a data reception or transmission <10>

15 TK300 Paper specification Caratteristiche della carta Caractéristiques du papier Papier spezifikation Caracteristicas del papel L Margin of ticket 35 mm 25mm 20mm direction of paper feed Barcode minimum width NON HEAT SENSTVE SDE Paper axis TCKET WTH BARCODE (only for models with barcode reader) Place the barcode on the heat sensitive side of the ticket, 25mm far from the margin;; L = paper width used (from 54mm to 82.5mm). BGLETTO CON BARCODE (solo per modelli con lettore di barcode) Barcode posizionato sul lato non termico alla distanza di 25mm dal bordo; L = larghezza della carta (variabile da 54mm a 82.5mm). TCKET WTH LABELS L direction of paper feed f the notch position from the margin is negative, the notch is outside the printable ticket (for example on paper with labels); L = paper width used (from 54mm to 82.5mm); W = minimum managed length 25.4mm (1 ). Used for notch alignment with negative distance W Ticket margin BGLETTO CON ETCHETTE Se la distanza della tacca dal bordo è negativa, la tacca non è all interno del biglietto stampabile; L = larghezza della carta (variabile da 54mm a 82.5mm. W = lunghezza minima gestita 25.4mm (1 ). TCKET WTH GAP L H D Ticket margin The printer manages tickets with central or lateral gap; Set the Notch position with Transparent Center or Transparent side value; L = paper width used (from 54mm to 82.5mm); H = minimum height managed (2mm); D = minimum width managed (10mm) BGLETTO CON GAP <11> mpostando il parametro Notch position sul valore Trasparent Center o Trasparent Side, è possibile utilizzare ticket con gap (foro) centrale o laterale; L = larghezza della carta (variabile da 54mm a 82.5mm. H = altezza minima gestita 2mm; D = larghezza minima 10mm
 Barcode posizionato sul lato non termico alla distanza di 25mm dal bordo; L = larghezza della carta (variabile da 54mm a 82.5mm).")
16 TK300 Paper specification Caratteristiche della carta Caractéristiques du papier Papier spezifikation Caracteristicas del papel L TCKET WTH NOTCH Notch Position parameter sets the positions for the notch as follow: notch can be places on heat sensitive side or non sensitive side: mm 33.75mm 22.5mm 33.75mm 22.5mm mm Ticket side Heat sensitive Non heat sensitive Notch position Up Center Low Center Left Side Left Center Right Side Right Center D1 = 25.4mm Dmin Dmin mm mm Dmin Dmin Dmin mm mm mm D1 = 25.4mm L = paper width used (from 54mm to 82.5mm); Dmin = minimum notch dimensions; D1 = minimum notch to notch distance. BGLETTO CON TACCA D ALLNEAMENTO Notch Sensor axis left side Sensor axis right side La tacca sarà posizionata in base al settaggio del parametro Posizione Notch : tacca posizionata sul lato termico o sul lato non termico del biglietto: Sensor axis left center Ticket axis / Central sensor axis NON-THERMAL SDE direction of paper feed Sensor axis right center Lato biglietto Lato termico Lato non termico Posizione Notch Up Center Low Center Left Side Left Center Right Side Right Center L = larghezza della carta (variabile da 54mm a 82.5mm); Dmin = dimensione minima tacca; D1 = distanza minima inter-tacca. L R direction of paper feed <12>

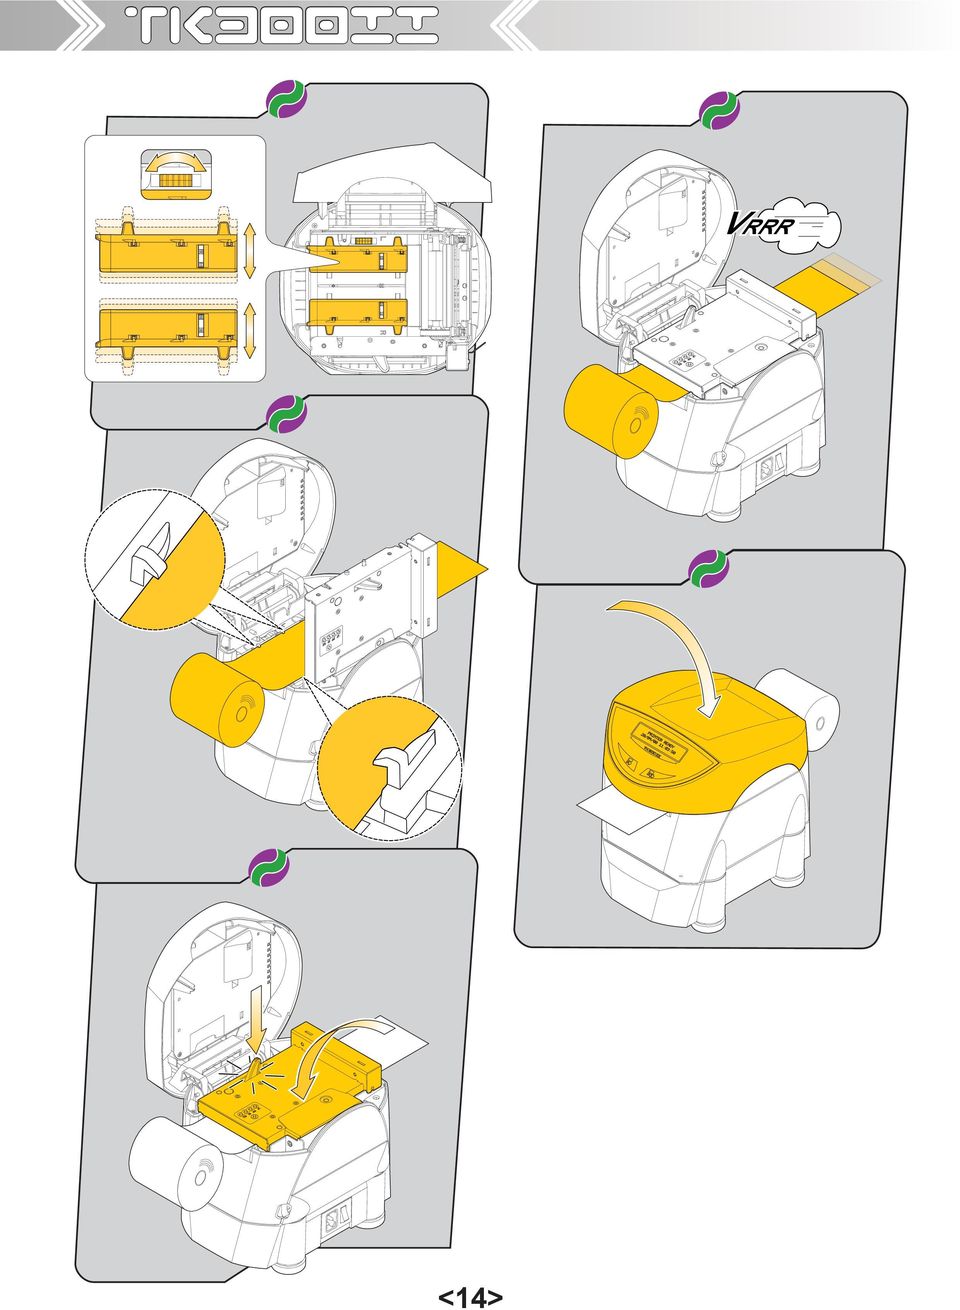
17 TK300 Paper roll insertion nserimento del rotolo carta ntroduire le rouleau de papier Einsetzen der Papierrolle ntroducir el rollo de papel N O T E: nspect inside the printer every paper change, and verify that there aren t paper off-cuts on the cutter compartment; if this event happens remove the paper off-cuts before execute any other operation with tweezers. N O T E: Ad ogni cambio carta ispezionare l interno della stampante e verificare che non vi siano ritagli di carta nel vano cutter; nel caso si verifichi questa condizione rimuoverli, utilizzando una pinzetta, prima di effettuare qualsiasi altra operazione. A T T E N T O N!!! During maintenance operations of paper change pay attention to not work near the cutter blade with the fi nger, (see the enlargement view below) because the rotary cutter blade exposes its sharp part. A T T E N Z O N E!!! Durante l operazione di ordinaria manutenzione del cambio carta fare attenzione a non avvicinare le dita alla lama del cutter esposta e nei pressi della lama stessa in quanto elemento affi lato. <13>

18 TK300 VRRR <14>
19 TK300 Paper jam nceppamento carta Bourrage de papier Papierstau Atasco de papel DSPLAY PAPER JAM CLEAR PAPER PATH F D E B E W A R E: n case of paper jam do not operate over the printer with any kind of instruments, like scissors, screwdriver, cutter, etc. etc., on any account. A T T E N Z O N E: n caso di inceppamento, non agire assolutamente sulla stampante con nessun tipo di strumento, come forbici, cacciaviti, cutter, ecc. ecc. A T T E N T O N: Au cas où le massicot s éntrave, ne pas agir absolument sur l imprimante avec n importe quel type d instrument, comme ciseaux, turnevis, cutter, etc. etc. A C H T U N G: Für den fall, der automatiche schneidemachine klemmt (led rot blinked), nicht handeln völlig, über das drucker mit keine sorte von schere, schraubenzieher, cutter, etc. etc. A T E N C Ó N: En el caso de atranque, no actuar en absoluto sobre la impresora con ningun tipo de herramientas,como tijeras, destornillador, cutter, etc. <15>

20 TK300 B E W A R E: n case of cutter jam: open the printer cover; open the front cover and the cutter cover; remove the damaged paper and replace it with a new one; remove scraps of paper in the printer; close the cutter cover and the front cover; close the print cover. f the problem persists, please contact the customer service. F D E A T T E N Z O N E: n caso di inceppamento della taglierina: aprire la parte superiore della stampante; aprire il coperchio anteriore e il coperchio della taglierina; sostituire la carta danneggiata con carta integra; eliminare eventuali residui di carta lungo il percorso della taglierina; chiudere il coperchio della taglierina e il coperchio anteriore; chiudere la parte superiore della stampante. Se il problema non si risolve contattare il servizio assistenza tecnica. A T T E N T O N: En cas du coincement du massicot: ouvrir le coté supérieur de l imprimante; ouvrir le couvercle antérieur et le couvercle du massicot; remplacer le papier endommagé avec le papier intact; éliminer les residus du papier dans le trajet du massicot; fermer le couvercle du massicot et le couvercle antérieur; fermer le coté supérieur de l imprimante. Si le problème persiste contactez le service assistance technique clients. A C H T U N G: m Falle eines Staus im Schneidwerk: Öffnen Sie den Druckerdeckel; Öffnen Sie dann die Front- und die Cutter-Abdeckung. Entfernen Sie alle eventuell vorhanden Papierschnipsel aus dem Schneidwerk. Entfernen Sie alles zerknitterte Papier und legen Sie glattes Papier neu ein. Schließen Sie die Cutter- und die Front-Abdeckung. Schließen Sie den Druckerdeckel. Sollte das Problem nicht behoben sein, kontaktieren Sie bitte den Kundendienst. A T E N C Ó N: En caso de atascamiento del cùter: Abrir la parte superior de la impresora; abrir la compuerta anterior y la compuerta del cùter; sostituir el papel dañado por uno integro; eliminar eventuales residuos de papel en el carrete del cùter; cerrar la compuerta del cùter y la compuerta anteriore; cerrar la parte superior de la impresora. Si el problema non se resuelve contactar al servicio de asistencia tecnica <16>

21 TK300 <17>
22 TK300 VRRR <18>
23 TK300 STATUS LED FLASHNG COLOUR RED Customer Service Department F D E Contact Customer Service if the LED with the printer on, still blinking on red light. Contattare l Assistenza tecnica se il led (a stampante accesa) lampeggia prolungatamente sul colore rosso. Contacter le Service après-vente si le LED, avec l imprimante allumée, continue à clignoter sur la couleur rouge. Kontaktieren sie den Kundendienst, wenn die Led (mit den drucker ein) immer noch blinkt uber die farbe rot. Llamar al Servicio de Asistencia Técnica si el led, con la impresora encendida, sigue par padeando sobre el color rojo. <19>
24 TK300 BLANK PAGE <20>
25 TK300 Printer setup NOTE: See chapter 1 for FEED key functions. PRNTER READY 28/04/08 11:03:50 PRNTER SETTNGS PRNTER TYPE...KPM300 Barcode Reader...Not Present RFD Module...Not Present Paper Guide Type...6 sensors PRNTNG HEAD TYPE...KPA80 NTERFACE...RS232 PROGRAM MEMORY TEST...OK DYNAMC RAM TEST...OK EEPROM TEST...OK CUTTER TEST...OK PRNTER HEAD Rav HEAD VOLTAGE [ V] = HEAD TEMPERATURE [ C] = 30 POWER ON COUNTER = 1843 PAPER PRNTED [cm] = CUT COUNTER = 5507 Printer Emulation...: ESC/POS (TM) RS232 Baud Rate (1)...: bps RS232 Data Length (1)...: 8 bits/chr RS232 Parity (1)...: None RS232 Handshaking (1)...: Xon/Xoff Busy Condition (2)...: RxFull USB Mass Storage...: Enabled USB Address Number (3)...: 7 Print Mode...: Normal Autofeed (4)...: CR disabled Chars / inch (4)...: A=15 B=20 cpi Speed / Quality...: Normal Paper Width...: 82 mm Paper Threshold...: 60% Notch Position...: Low Side Notch Threshold (5)...: 50% Notch Distance [mm] (5)...: Ticket Locking (5)...: Disabled PaperEnd Buffer Clear...: Disabled Print Density...: 0% [LF] enter Printer Setup [FF] enter Ethernet Setup [S1] enter Clock Setup [S2] skip Setup 1 Go into SETUP mode by pressing the LNE FEED key during printing power up. 2 The printer should print all list of the parameters: Printer Emulation: SVELTA D, ESC/POS TM. RS232 Baud Rate: D, 57600, 38400, 19200, 9600, 4800, 2400, RS232 Data length: 7, 8 D bits/car. RS232 Parity: None D, even, odd. RS232 Handshaking: XON/XOFF D, Hardware. Busy condition: RXFull D,OffLine/RXFull. USB Mass Storage: Disabled D, Enabled. USB Address Number: 0 D, 1, 2, 3, 4, 5, 6, 7, 8, 9. Print mode: Normal D,Reverse. Autofeed: CR disabled D, CR enabled. Chars/nch: 200dpi model: A=11 B=15cpi D, A=15 B=20cpi D. 300dpi model: A=16 B=23cpi D, A=23 B=30cpi D. Speed/Quality: Normal, High quality, High Speed D. Paper width: 54mm, 56mm, 58mm, 60mm, 62mm, 64mm, 66mm D, 68mm, 70mm, 72mm, 74mm, 76mm, 78mm, 80mm, 82mm. (1) Paper Threshold : 30%, 40%, 50%, 60% D, 70%, 80%, 90%. (2) Notch Position : Disabled D, Low Center, Up Center, Left Side, Right Side, Left Center, Right Center. (3) Notch Threshold : 30%, 40% D, 50%, 60%, 70%, 80%, 90%. (4) Notch Distance Sign : + D, - (4)(5) Notch Distance [mm x 10] : 0 D,1,2,3,4,5,6,7,8,9. (4)(5) Notch Distance [mm x 1] : 0 D,1,2,3,4,5,6,7,8,9. Notch Distance [mm x.1] (4)(5) : 0 D,1,2,3,4,5,6,7,8,9. (4) Ticket Locking : Disabled D, Enabled. PaperEnd Buffer Clear: Disabled D, Enabled. Print Density: -50%, -37%, -25%, -12%, 0 D,+12%, +25%, +37%, +50%. General note: D The parameters marked with the symbol are the default values. Settings remain active even after the printer has been turned off. Note (1) : This parameter indicates the threshold value under the sensor detect the paper. Note (2) : This parameter sets which sensor is used as notch sensor. There are two sensor operating mode: refl ection or transparence. Note (3) : This parameter is used to detect the presence of the notch. n order to better identify the optimum threshold for the paper being used, a paper characterization function is also available in the SETUP. Note (4 ) : f the Notch Position parameter is set to Disabled this parameter doesn t appear in the Printer Setup report. Note (5 ) : The Notch distance parameter represents the distance in mm from the upper margin of the ticket to the black mark on the ticket. For example, to set notch distance to 15 mm, modify the following parameters in order to obtain the desired values as indicated: Notch Distance [mm x 10]=1; Notch Distance [mm x 1]=5; Notch Distance [mm x.1]=0. <21>
26 TK300 Printer setup NOTA: Vedere capitolo 1 per le funzioni del tasto FEED. PRNTER READY 28/04/08 11:03:50 PRNTER SETTNGS PRNTER TYPE...KPM300 Barcode Reader...Not Present RFD Module...Not Present Paper Guide Type...6 sensors PRNTNG HEAD TYPE...KPA80 NTERFACE...RS232 PROGRAM MEMORY TEST...OK DYNAMC RAM TEST...OK EEPROM TEST...OK CUTTER TEST...OK PRNTER HEAD Rav HEAD VOLTAGE [ V] = HEAD TEMPERATURE [ C] = 30 POWER ON COUNTER = 1843 PAPER PRNTED [cm] = CUT COUNTER = 5507 Printer Emulation...: ESC/POS (TM) RS232 Baud Rate (1)...: bps RS232 Data Length (1)...: 8 bits/chr RS232 Parity (1)...: None RS232 Handshaking (1)...: Xon/Xoff Busy Condition (2)...: RxFull USB Mass Storage...: Enabled USB Address Number (3)...: 7 Print Mode...: Normal Autofeed (4)...: CR disabled Chars / inch (4)...: A=15 B=20 cpi Speed / Quality...: Normal Paper Width...: 82 mm Paper Threshold...: 60% Notch Position...: Low Side Notch Threshold (5)...: 50% Notch Distance [mm] (5)...: Ticket Locking (5)...: Disabled PaperEnd Buffer Clear...: Disabled Print Density...: 0% [LF] enter Printer Setup [FF] enter Ethernet Setup [S1] enter Clock Setup [S2] skip Setup 1 Entrare nel SETUP tenendo premuto il tasto LNE FEED durante la fase di accensione della stampante 2 La stampante stamperà la lista di tutti parametri: Printer Emulation: SVELTA D, ESC/POS TM. RS232 Baud Rate: D, 57600, 38400, 19200, 9600, 4800, 2400, RS232 Data length: 7, 8 D bits/car. RS232 Parity: None D, even, odd. RS232 Handshaking: XON/XOFF D, Hardware. Busy condition: RXFull D,OffLine/RXFull. USB Mass Storage: Disabled D, Enabled. USB Address Number: 0 D, 1, 2, 3, 4, 5, 6, 7, 8, 9. Print mode: Normal D,Reverse. Autofeed: CR disabled D, CR enabled. Chars/nch: A=11 B=15 cpi, A=15 B=20 cpi D. modello 200dpi: A=11 B=15cpi D, A=15 B=20cpi D. modello 300dpi: A=16 B=23cpi D, A=23 B=30cpi D. Speed/Quality: Normal, High quality, High Speed D. Paper width: 54mm, 56mm, 58mm, 60mm, 62mm, 64mm, 66mm D, 68mm, 70mm, 72mm, 74mm, 76mm, 78mm, 80mm, 82mm. (1) Paper Threshold : 30%, 40%, 50%, 60% D, 70%, 80%, 90%. (2) Notch Position : Disabled D, Low Center, Up Center, Left Side, Right Side, Left Center, Right Center. (3) Notch Threshold : 30%, 40% D, 50%, 60%, 70%, 80%, 90%. (4) Notch Distance Sign : + D, - (4)(5) Notch Distance [mm x 10] : 0 D,1,2,3,4,5,6,7,8,9. (4)(5) Notch Distance [mm x 1] : 0 D,1,2,3,4,5,6,7,8,9. (4)(5) Notch Distance [mm x.1] : 0 D,1,2,3,4,5,6,7,8,9. (4) Ticket Locking : Disabled D, Enabled. PaperEnd Buffer Clear: Disabled D, Enabled. Print Density: -50%, -37%, -25%, -12%, 0 D,+12%, +25%, +37%, +50%. Note generali: D valori indicati con il simbolo sono quelli impostati di defautl. settaggi eseguiti rimangono attivi anche dopo lo spegnimento della stampante. Nota (1) : Questo parametro indica il valore di soglia sotto il quale il sensore riconosce la carta. Nota (2) : Questo parametro permette di impostare il sensore utilizzato come sensore di notch. sensori possono essere utilizzati in modalità a rifl essione o a trasparenza. Nota (3) : Questo parametro è utilizzato per identifi care la presenza del notch. Nel Setup è anche presente una funzione di caratterizzazione carta per meglio identifi care il valore ottimale di soglia da settare per il tipo di carta utilizzata. Nota (4 ) : Se il parametro Notch Position è Disabled, questo parametro non compare nel rapporto di Setup. Nota (5 ) : l parametro Notch distance rappresenta la distanza in mm tra il margine superiore del biglietto e la tacca nera sul biglietto. Per esempio, per impostare una distanza di notch di 15 mm, occorre modifi care i parametri come segue: Notch Dist. [mm x 10]=1; Notch Dist. [mm x 1]=5; Notch Dist. [mm x.1]=0. <22>
27 TK300 Ethernet setup (only for models with Ethernet interface) NOTE: See chapter 1 for FEED key functions. PRNTER READY 28/04/08 11:03:50 1 Go into ETHERNET SETUP mode by pressing the FORM FEED key after printing the Setup report. 2 The printer should print all list of the ethernet parameters: DHCP Client: Disabled D, Enabled. FTP Server: Disabled D, Enabled P Address: printer P network address; the network administrator assigns it. Subnet Mask: this parameter identifi es the local network address. Default gateway: this parameter identifi es the Gateway P address used to send applications to the external network. Mac address: this is the number, provided by the constructor, that identifi es the printer; this number is univocal. This parameter can t be modifi ed by set up. General note: D The parameters marked with the symbol are the default values. Settings remain active even after the printer has been turned off. ATTENTON: Any changes to network parameters will interrupt browser connection!!! f the server not responding you MUST reconnect to the new P address set. Notch Position...: Low Side Notch Threshold...: 50% Notch Distance [mm]...: PaperEnd Bufferfer Clear...: Disabled Print Density...: 0% [LF] enter Printer Setup [FF] enter Ethernet Setup [S1] enter Clock Setup [S2] skip Setup DHCP Client... : Disabled FTP Server... : Enabled P Address... : Subnet Mask... : Default Gateway... : MAC Address... : 00-0E-E For advanced printer setup please connect to the site 1 Entrare nel SETUP ETHERNET premendo il tasto FORM FEED dopo la stampa del rapporto di Setup. 2 La stampante stamperà la lista di tutti i parametri ethernet: DHCP Client: Disabled D,Enabled. FTP Server: Disabled D,Enabled. P Address: ndirizzo P in rete della stampante; questo numero viene assegnato dall amministratore di rete. Subnet Mask: Maschera di sottorete; questo parametro identifica l indirizzo della rete locale. Default gateway: ndirizzo del gateway predefinito; questo parametro indica l indirizzo P del gateway utilizzato per inviare i pacchetti all esterno della rete locale. Mac address: ndirizzo MAC; è il numero identificativo fisico della macchina che viene fornito dal costruttore ed è univoco. Questo parametro non è modificabile da setup. DHCP Client... : Disabled Note generali: D valori indicati con il simbolo sono quelli impostati di defautl. settaggi eseguiti rimangono attivi anche dopo lo spegnimento della stampante. ATTENZONE: Ogni modifica sui parametri di configurazione della rete interrompono la connessione!!! Se il server non risponde è necessario ricollegarsi al nuovo indirizzo P. <23>
28 TK300 BLANK PAGE <24>
29 TK300 1 Download the SW from the web site: 2 Use the following procedure to install the printer SW: From the START menu, press Enter and key-in the path where the SW was saved on your PC, then click OK. Follow the instructions that appear on the screen to install the driver. nstallation for drivers Win 2K Win 2K3 Win XP Win VSTA Linux PRNTER READY 28/04/08 11:03:50 F 1 Prelevare il SW dal sito nternet: 2 nstallare il software della stampante come indicato nella seguente procedura: Nel menù Avvio selezionate Esegui e digitate il percorso del SW, precedentemente salvato sul vostro PC, fate click su OK. Lasciatevi poi guidare dalle istruzioni che compaiono sullo schermo per installare il driver. 1 Télécharger le logiciel à partir du site nternet: 2 nstaller le logiciel de l imprimante selon la procédure suivante : Dans le menu Démarrer, sélectionner Effectuer et taper le parcours du logiciel, précédemment sauvegardé sur votre PC, puis cliquer sur OK. Laissez-vous ensuite guider par les instructions qui apparaissent sur l écran afin d installer le driver. D 1 Die SW von der nternet-seite downloaden: 2 Die Drucker-Software wie nach dem folgenden Verfahren installieren: m START-Menü Ausführen anklicken und den Verlauf der SW eingeben, die zuvor in hrem PC gespeichert wurde. OK anklicken. Nun die auf dem Monitor angezeigten Anleitungen befolgen, um den Driver zu installieren. <25> E 1 Descargar el SW del sito nternet: ww.custom.biz 2 nstalar el software de la impresora siguiendo las indicaciones como sigue: En el menù Start seleccionar Enter y digitar el recorrido del SW, precedentemente almacenado en vuestro PC, hacer clic sobre OK. Seguir las instrucciones que aparecen en pantalla para instalar el driver.
30 TK300 BLANK PAGE <26>
31 TK300 Appendix A.1 TECHNCAL SPECFCATONS A.1.1 Technical specifications for the printer MODEL 200 dpi 300 dpi USB (communication speed: 12 Mbit/sec) AVALABLE NTERFACES RS232 (communication speed: from 1200 to bps) ETHERNET (communication speed: 10 Mbit/sec) (1) Ticket presence, head temperature, cover open, black mark detector in 6 positions SENSORS and translucent gap / hole mark detector (setting by software), ticket presence on output, cover open, cutter compartment open, external near paper end PRNTNG DRVER Windows TM 2K, XP, LNUX RECEVE BUFFER 64 Kbytes FLASH MEMORY 16 Mbytes EMULATON ESC/POS TM, SVELTA PRNTER SPECFCATON Resolution 203 dpi (8 dot/mm) 304 dpi (12 dot/mm) Print method Thermal fi xed head Printing mode Normal, 90, 180, 270 Printing format Height/width from 1 to 8, bold, reverse, underlined, italic Character fonts Graphics memory Memory card SD/MMC (3) Printing speed ESC/POS TM emulation: PC437, PC850, PC860, PC863, PC865, PC858 (euro), 2 TrueType fonts (2) SVELTA emulation: 20 embedded fonts, 2 TrueType fonts (2) Logos dynamic management (max 2 MB graphics memory Capacity = max 2 Gbytes High Quality = Normal = High Speed = 120 mm/sec 200 mm/sec 250 mm/sec High Quality = Normal = High Speed = 120 mm/sec 150 mm/sec 200 mm/sec Head life 100 Km / 100M pulses MCBF cutter number MTBF (3) hours Character set 3 Character density 11 cpi 15 cpi 20 cpi 16 cpi 23 cpi 30 cpi Number of column Character (L x H mm) 2,25 x 3 1,75 x 3 1,25 x 3 1,5 x 2 1,2 x 2 0,8 x 2 PAPER SPECFCATONS Type of paper Thermal paper (heat-sensitive side on outside of roll) Fan-fold thermal paper with notch Recommended types of paper from 70 g/m 2 to 255 g/m 2 Paper width from 54mm to 82.5mm (2mm step) External roll diameter Max 300 mm nternal roll core diameter 25 mm (+1mm) Core thickness 2 mm (+1mm) Paper end Not attached to roll core Core type Cardboard or plastic NOTE: (1) Only for printer models equipped with Ethernet interface. (2) t is possible to install more TrueType fonts. (3) Only for printer models equipped with SD/MMC. (4) Electronic board. NOTA: (1) Solo per i modelli si stampante dotati di interfaccia Ethernet. (2) E possibile installare ulteriori font TrueType. (3) Solo per i modelli dotati di SD/MMC. (4) Scheda elettronica. <27>
32 PRNTER READY 28/04/08 11:03:50 TK300 Appendix MODEL 200 dpi 300 dpi ELECTRC SPECFCATONS Power supply 220 Vac ± 10% Medium consumption Standby consumption ENVROMENTAL SPECFCATONS Operating temperature Operating humidity Storage temperature/humidity (w/o paper) 35 W 51 W (Referred to a standard CUSTOM receipt (L=10cm, Density = 12,5% dots on) 9 W 0-50 C 10-85% Rh -20 C 70 C / 10% - 90% Rh A.1.2 Technical specifications for barcode reader ELECTRC SPECFCATONS Barcode reader model MR008 CX002 ELECTRCAL CHARACTERSTCS Scan rate 270 scans/sec 200 scans/sec OPTCAL CHARACTERSTCS Sensor Linear CCD Sensor Light Source Red Leds, 639 nm Ambient Light (Fluorescent lamp) 1500 LUX MAX 3000 LUX MAX PERFORMANCE Resolution 5 mil. (0.127 mm) Readable Barcode ALL UPC/EAN/JAN, Code 39, Code 39 Full ASC, Code 128,Code 93, nterleave 25, ndustrial 25, Matrix 25, China Postage, CODABAR/NW7, Code 11,MS/PLESSEY, Code 32, PDF417, DATAMATRX A.1.3 Technical specifications (only for printer model with RFD reader/writer) Supported transponders A.1.4 Dimensions SO (icode) SO1443-MFARE (MFARE Ultralight, MFARE 1K, MFARE 4K) <28>
33 TK300 A.2 ADVANCED FUNCTONS Appendix A.2.1 EMBEDDED WEB SERVER (only for models with Ethernet interface) TK300 is equipped with an Embedded Web Server that allows to execute some operations on printers, through a clear web interface, including: monitoring the printer status; setting operating parameters; confi guring network settings; managing the logos; confi guring the service to make diagnostics and maintenance operations easier; download printing drivers. modelli di KPM300H con interfaccia Ethernet, sono dotati di un Web Server interno che permette, tramite una semplice interfaccia Web, di eseguire sulla stampante alcune attività tra cui: monitorare lo stato della stampante; impostare i parametri di funzionamento; confi gurare i parametri di rete; gestire i loghi memorizzati nella stampante; confi gurare il servizio di invio per semplifi care le operazioni di diagnostica e manutenzione; scaricare i drivers di stampa. Connection check Before entering in the Embedded Web Server, check that: the printer is connected and turned on; the printer has a network connection based on the P protocol; the following door are opened (if a Firewall is present on computer): 9100 (or differently set up) , 15001, 15002; have a Web browser on the computer; the printer is connected to the network and its P address and its Subnet Mask are set up in a correct way. To check the setting of this parameters, open a new terminal window and type ping on the command bar followed by the P address of the printer. The picture shows an example of a positive result after the ping command. Otherwise, if connection isn t possible, to its P address, will appear an overdue request mistake. Example: ping Verifica connessione Prima di accedere al Web Server interno accertarsi che: la stampante sia collegata e accesa; la stampante disponga di una connessione in rete basata su protocollo P; siano aperte da Firewall (se presente) le seguenti porte: 9100 (o diversamente impostata) , 15001, 15002; disporre sul computer di un browser Web; la stampante sia collegata alla rete e che l indirizzo P e la Subnet Mask assegnati, siano impostati correttamente. Per eseguire una verifi ca del settaggio di questi parametri lanciare dal sistema operativo la fi nestra del terminale testuale e sulla linea comandi digitare ping seguito dall indirizzo P della stampante. Nella schermata riportata in fi gura, viene mostrato un esempio di esito positivo dopo il lancio del comando ping. Se invece la connessione all indirizzo P specifi cato fallisce, viene riportato un errore di richiesta scaduta. Esempio: ping <29>
34 TK300 Appendix Embedded Web Server access To enter the Embedded Web Server, type the P address (1) assigned to the printer into Web browser. For example, if P address of the printer is , type in the Web browser: On the screen will appear the default page that corresponds to the section Device nfo, shown in picture. Note (1) : To know the P address of the printer, print the Setup report (see the paragraph Setup ) or use Locator (see par.a.2.2). The Embedded Web Server has 3 sections present in every Web page as horizontal command bar in the upper part of the page. These sections are: Device nfo Printer Settings Printer Support To enter reserved pages related to some sections and some confi guration services, it is required the identifi cation of the user and password. To make registration and to obtain the access to the restricted areas, insert the user name and the password as indicated in the following table: Accesso al Web Server interno Per accedere al Web Server interno, digitare l indirizzo P (1) assegnato alla stampante nel browser Web. Se l indirizzo P della stampante è, ad esempio, , immettere nel browser Web: Verrà visualizzata la pagina interna predefi nita che corrisponde alla sezione Device nfo, mostrata in fi gura. Nota (1) : Per conoscere l indirizzo P della stampante, stampare il rapporto di Setup (vedi par. Setup ) o usare Locator (vedi par.a.2.2). l Web Server interno dispone di 3 sezioni riportate in ciascuna pagina web sotto forma di barra comandi orizzontale nella parte superiore della pagina. Tali sezioni sono: Device nfo Printer Settings Printer Support Per accedere alle pagine riservate relative ad alcune sezioni e ad alcuni servizi di confi gurazione della stampante, sarà richiesta l identifi cazione a livello di utente e password. Per eseguire la registrazione ed ottenere l accesso a queste pagine, inserire il nome utente e la password indicate nella seguente tabella: User Name Password Custom AlwaysOn User Name Password Custom AlwaysOn Note: Respect capital and small letters. Nota: Rispettare le lettere minuscole e maiuscole. e KPM300-H - Windows nternet Explorer File Edit View Favorites Tools Help KPM300-H Page Tools DEVCE NFO PRNTER SETTNGS PRNTER SUPPORT Custom Web Site KPM300H Ticket Printer DEVCE NFO RealTime Status Model nformation Printer Parameter Network Settings Advanced Status Cover Open Cover Open Paper End Near Paper End Paper rolling Paper End Ticket Out LF key pressed FF key pressed S1 key pressed S2 key pressed Over temperature Supply Voltage error Cutter error Cutter Open Memories Error 14: Paper Jam Notch Search... Notch Error Done Locale intranet 100 % <30>
35 TK300 Appendix Embedded Web Server sections Le sezioni del Web Server interno Device info n the Device nfo section, it is possible to display in real time the printer operating status using the following tools: RealTime Status (in this page, it is possible to monitor in real time and to confi gure some parameters. The printer picture in the centre of the page and the colour of the lights and the text will signal every change of operating state of the printer). Model nformation. Printer Parameter. Network Settings. Advanced Status. e KPM300-H - Windows nternet Explorer File Edit View Favorites Tools Help Custom Web Site DEVCE NFO RealTime Status Model nformation Printer Parameter Network Settings Advanced Status KPM300-H DEVCE NFO PRNTER SETTNGS PRNTER SUPPORT KPM300H Ticket Printer 14: Page Tools Cover Open Cover Open Paper End Near Paper End Paper rolling Paper End Ticket Out LF key pressed FF key pressed S1 key pressed S2 key pressed Over temperature Supply Voltage error Cutter error Cutter Open Memories Error Paper Jam Notch Search... Notch Error Device info Nella sezione Device nfo è possibile visualizzare lo stato di funzionamento della stampante tramite i seguenti strumenti: RealTime Status (in questa pagina è possibile monitorare e confi gurare in tempo reale alcuni parametri controllati. Le immagini della stampante e il colore delle spie accese segnalano ogni cambiamento dello stato di funzionamento della macchina). Model nformation. Printer Parameter. Network Settings. Advanced Status. Done Locale intranet 100 % Printer settings The confi guration tools of the restricted Printer Setting section, are: Printer Setup. Network Setup. Setup (with this tool, it is possible to confi gure the automatically delivery of service in order to inform the user when a change occurs to operating status of the printer). Log. With these tools, it is possible to set up the same parameters of the printer that are confi gurable in the printer s Set-up mode (see the paragraph Setup ). e KPM300-H - Windows nternet Explorer File Edit View Favorites Tools Help Custom Web Site PRNTER SETTNGS Printer Setup Network Setup Setup Log KPM300-H DEVCE NFO PRNTER SETTNGS PRNTER SUPPORT SMTP Server Address SMTP Server Port To From Subject Message Send event KPM300H Ticket Printer Service Settings smtp.custom.it 25 Utente@custom.it KPM300H@custom.it test Testo libero nclude Printer Status when Paper End is detected when Near Paper End is detected on Printer Power On when Near Paper End is detected on Cut on LF key pressed on FF key pressed on S1 key pressed on S2 key pressed on Cut error on Paper Jam on Notch Align error on Autoload on Head Over Temperature error on Supply Voltage error Reset settings... Save settings Done Locale intranet 100 % Page Tools Printer Settings Gli strumenti di confi gurazione della sezione Printer Settings, sono: Printer Setup. Network Setup. Setup (con questo strumento è possibile confi gurare l invio automatico di di servizio per comunicare all utente il verifi carsi di un nuovo evento interno alla stampante). Log. Con gli strumenti di questa sezione è possibile impostare tutti i parametri della stampante e i parametri Ethernet, confi gurabili anche tramite la modalità Setup (vedi paragrafo Setup ). Printer support The tools of the Printer Support section, are: Download Driver. Advanced Function (in this restricted page, it is possible to test some function for demonstrative and service purpose, as printing a test page, the font/logos test, executing the self-calibration of the notch sensors and the ticket alignment). Pictures settings. Fonts settings. e KPM300-H - Windows nternet Explorer File Edit View Favorites Tools Help Custom Web Site PRNTER SUPPORT Download Driver Advanced Function Picture Settings KPM300-H DEVCE NFO PRNTER SETTNGS PRNTER SUPPORT Advanced Function Print Test Page Logo Description Logo Test Font Description Font Test Notch Autoset Test Page KPM300H Ticket Printer Warning : Use these function only when the printer is in standby! All functions below, if used while the printer is executing a print job from communication port, may corrupt the printout. Logo Test Exec Test Page Print all Logos Font Test Exec Logo Test ESC/POS - 11 CP Exec Font Test Advanced Function Exec Notch Autoset Page Tools Printer support Gli strumenti della sezione Printer Support sono: Download Driver. Advanced Function (in questa pagina riservata è possibile eseguire alcuni test a scopo dimostrativo o manutentivo tra cui la stampa della pagina prova, del test dei font/loghi, l autocalibrazione dei sensori di notch e l allineamento del biglietto). Pictures settings. Fonts settings. Characterize Paper Align icket to print Align ticket to cutter Cut Paper Reset To Factory Default Exec Paper Characterization Exec Align Exec Align to cut Exec Paper Cut Reset To Factory Default Done Locale intranet 100 % <31>
 Paper roll insertion Inserimento del rotolo carta Introduire le rouleau de papier Einsetzen der Papierrolle Introducir el rollo de papel ATTENTION! Remove the adapter guides, as shown, for 82.5 mm paper
CONFIGURATION MANUAL
 RELAY PROTOCOL CONFIGURATION TYPE CONFIGURATION MANUAL Copyright 2010 Data 18.06.2013 Rev. 1 Pag. 1 of 15 1. ENG General connection information for the IEC 61850 board 3 2. ENG Steps to retrieve and connect
Installazione interfaccia e software di controllo mediante PC Installing the PC communication interface and control software
 Windows 7 Installazione interfaccia e software di controllo mediante PC Installing the PC communication interface and control software Contenuto del kit cod. 20046946: - Interfaccia PC-scheda (comprensiva
4-441-095-52 (1) Network Camera
 Network Camera") 4-441-095-52 (1) Network Camera Guida SNC easy IP setup Versione software 1.0 Prima di utilizzare l apparecchio, leggere attentamente le istruzioni e conservarle come riferimento futuro. 2012 Sony Corporation
4-441-095-52 (1) Network Camera Guida SNC easy IP setup Versione software 1.0 Prima di utilizzare l apparecchio, leggere attentamente le istruzioni e conservarle come riferimento futuro. 2012 Sony Corporation
Guida rapida di installazione
 Configurazione 1) Collegare il Router Hamlet HRDSL108 Wireless ADSL2+ come mostrato in figura:. Router ADSL2+ Wireless Super G 108 Mbit Guida rapida di installazione Informiamo che il prodotto è stato
Wireless ADSL VPN Firewall Router
 Wireless ADSL VPN Firewall Router GUIDA RAPIDA DI INSTALLAZIONE www.hamletcom.com NB: Per avere istruzioni dettagliate per configurare e usare il Router, utilizzare il manuale on-line. Prestare attenzione:
Downloading and Installing Software Socio TIS
 Object: Downloading and Installing Software Socio TIS compiler: L.D. Date Revision Note April 17 th 2013 --- For SO XP; Win 7 / Vista step Operation: Image A1 Open RUN by clicking the Start button, and
User Guide Guglielmo SmartClient
 User Guide Guglielmo SmartClient User Guide - Guglielmo SmartClient Version: 1.0 Guglielmo All rights reserved. All trademarks and logos referenced herein belong to their respective companies. -2- 1. Introduction
Router Firewall 802.11g ADSL VPN
 Router Firewall 802.11g ADSL VPN GUIDA RAPIDA DI INSTALLAZIONE www.hamletcom.com 1 NB: Per avere istruzioni dettagliate per configurare e usare il Router, utilizzare il manuale on-line. Prestare attenzione:
SISTEMA COMPLETO DI ILLUMINAZIONE VANO LAMPADA A LED TIPO ILV24 s. COMPARTMENT SYSTEM LIGHTING COMPLETE LED LAMP TYPE ILV24 s
 SISTEMA COMPLETO DI ILLUMINAZIONE VANO LAMPADA A LED TIPO ILV24 s COMPARTMENT SYSTEM LIGHTING COMPLETE LED LAMP TYPE ILV24 s Caratteristiche generali Mean features Lampade a bassa tensione (24Vcc) Lamps
Prima di iniziare la procedura d installazione, verificare che siano disponibili tutte le informazioni e le attrezzature necessarie
 Il presente prodotto può essere configurato con un browser web aggiornato come Internet Explorer 6 o Netscape Navigator 6.2.3. DSL-502T ADSL Router Prima di cominciare Prima di iniziare la procedura d
Mod. 1067 INTERFACCIA USB/KEY USB/KEY INTERFACE. Sch./Ref.1067/003
 Mod. 1067 DS1067-019 LBT8388 INTERFACCIA USB/KEY USB/KEY INTERFACE Sch./Ref.1067/003 ITALIANO DESCRIZIONE GENERALE L interfaccia 1067/003 consente di collegare alla Centrale 1067/032 o 1067/042 (ver. 2.00
Guida utente User Manual made in Italy Rev0
 Guida utente User Manual Rev0 made in Italy Indice/Index Informazioni generali General Info... 3 Guida Rapida per messa in funzione Start Up procedure... 3 Login Login... 3 Significato dei tasti Botton
Portale Materiali Grafiche Tamburini. Grafiche Tamburini Materials Portal
 Portale Materiali Grafiche Tamburini Documentazione utente italiano pag. 2 Grafiche Tamburini Materials Portal English user guide page 6 pag. 1 Introduzione Il Portale Materiali è il Sistema Web di Grafiche
TKT USER S GUIDE GUIDA OPERATIVA GUIDE D UTILISATION BEDIENUNGSANLEITUNG GUIA OPERATIVA. Commands reference: DOMC-ES00175-0001E PRINTER READY
 USER S GUDE GUDA OPERATVA GUDE D UTLSATON BEDENUNGSANLETUNG GUA OPERATVA PRNTER READY 10/05/10 12:00:00 TKT Commands reference: DOMC-ES00175-0001E F D E The CE mark affi xed to the product certify that
MANUALE DISPLAY REMOTO CALDAIE REMOTE DISPLAY MANUAL FOR BOILERS
 MANUALE DISPLAY REMOTO CALDAIE REMOTE DISPLAY MANUAL FOR BOILERS COMPATIBILE CON - COMPATIBLE WITH LP14/20/30 SCHEDA - MOTHERBOARD 512 E SW V5 2 IT COLLEGAMENTO A MURO DELLA CONSOLE LCD - CALDAIA Collegamento
EN IT. Computer Manual. Manuale computer. Console
 Computer Manual Manuale computer EN IT Console www.energetics.eu Table of contents / Indice 1. English....................................... p. 4 2. Italiano....................................... p.
Prima di cominciare verificare la disponibilità di tutti i componenti e le informazioni necessarie. Modem ADSL DSL-300T. CD-ROM (contenente manuale )
") Il presente prodotto può essere configurato con un qualunque browser web aggiornato, per esempio Internet Explorer 6 o Netscape Navigator 6.2.3. DSL-300T Modem ADSL Prima di cominciare Prima di cominciare
Il presente prodotto può essere configurato con un qualunque browser web aggiornato, per esempio Internet Explorer 6 o Netscape Navigator 6.2.3. DSL-300T Modem ADSL Prima di cominciare Prima di cominciare
Installazione o aggiornamento del software di sistema di Fiery
 Installazione o aggiornamento del software di sistema di Fiery Questo documento spiega come installare o aggiornare il software di sistema su Fiery Network Controller per DocuColor 240/250. NOTA: In questo
DICHIARAZIONE DI RESPONSABILITÀ
 - 0MNSWK0082LUA - - ITALIANO - DICHIARAZIONE DI RESPONSABILITÀ Il produttore non accetta responsabilità per la perdita di dati, produttività, dispositivi o qualunque altro danno o costo associato (diretto
Vedi foto 4. See photo 4. Voir photo 4. Ver foto 4
 MARCA MAKE FAIRE - HACER MODELLO MODEL MODÈLE - MODELO REV. 00 TOYOTA RAV 4 2013 Funzione - Function Fonction - Función SCHEDA TECNICA DI INSTALLAZIONE PER SISTEMI DI ALLARME CAN CAN ALARM SYSTEM FITTING
INSTALLARE PALLADIO USB DATA CABLE IN WINDOWS XP/ME/2000/98
 rev. 1.0-02/2002 Palladio USB Data Cable INSTALLARE PALLADIO USB DATA CABLE IN WINDOWS XP/ME/2000/98 (tutti i KIT, escluso KIT MOTOROLA V6x-T280) La procedura di installazione del Palladio USB Data Cable
ATA-172 GUIDA ALLA CONFIGURAZIONE EUTELIAVOIP
 ATA-172 GUIDA ALLA CONFIGURAZIONE EUTELIAVOIP ATA-172 Guida alla Configurazione EUTELIAVOIP Rev1-0 pag.2 INDICE SCOPO...3 SCHEMA DI COLLEGAMENTO...3 ACCESSO ALL APPARATO...4 CONFIGURAZIONE EUTELIAVOIP...7
Compatibilità del Portale Piaggio con Internet Explorer 10 e 11. Internet Explorer 10
 Italiano: Explorer 10 pagina 1, Explorer 11 pagina 2 English: Explorer 10 page 3 and 4, Explorer 11 page 5. Compatibilità del Portale Piaggio con Internet Explorer 10 e 11 Internet Explorer 10 Con l introduzione
Prima di iniziare la procedura d installazione, verificare che siano disponibili tutte le informazioni e le attrezzature necessarie
 Il presente prodotto può essere configurato con un browser web aggiornato come Internet Explorer 6 o Netscape Navigator 6.2.3. DSL-504T ADSL Router Prima di cominciare Prima di iniziare la procedura d
DSL-G604T Wireless ADSL Router
 Il presente prodotto può essere configurato con un browser web aggiornato come Internet Explorer 6 o Netscape Navigator 6.2.3. DSL-G604T Wireless ADSL Router Prima di cominciare 1. Se si intende utilizzare
Istruzioni di configurazione Wi-Fi per inverter Solar River TL-D
 Istruzioni di configurazione Wi-Fi per inverter Solar River TL-D Per consentire la connessione dell inverter è necessario possedere un router WiFi. Non ci sono particolari requisiti sulla tipologia di
Code: GW-IMP-WEB-1. Datalogger web pulses counter. Version 6 inputs with Ethernet. MarCom
 Datalogger web pulses counter Code: GW-IMP-WEB-1 Version 6 inputs with Ethernet Datalogger web pulses counter The web datalogger pulses counter is able to count the pulses on digital inputs (2 by default
Guida Google Cloud Print
 Guida Google Cloud Print Versione 0 ITA Definizioni delle note Nella presente Guida dell utente viene utilizzata la seguente icona: Le note forniscono istruzioni da seguire in determinate situazioni o
GENERALITÀ. Unità: Canali di comunicazione:
 GENERALITÀ L'apparecchiatura CON232E è una unità a microprocessore equipaggiata di un canale ethernet e due canali seriali rs232c. Il dispositivo trasmette i dati ricevuti dal canale Ethernet con protocollo
Printer Driver UP-D898MD UP-X898MD. Prima di usare il driver della stampante, leggere il file Readme. Prima di usare il software 4-528-696-41(1)
") 4-528-696-41(1) Printer Driver Guida per la configurazione Questa guida descrive come impostare il driver della stampante per Windows 8, Windows 7, Windows Vista, Windows XP. Prima di usare il software
4-528-696-41(1) Printer Driver Guida per la configurazione Questa guida descrive come impostare il driver della stampante per Windows 8, Windows 7, Windows Vista, Windows XP. Prima di usare il software
Attuatore a relè Manuale di istruzioni
 Attuatore a relè Manuale di istruzioni www.ecodhome.com 1 Sommario 3 Introduzione 4 Descrizione e specifiche prodotto 5 Installazione 6 Funzionamento 6 Garanzia 2 Introduzione SmartDHOME vi ringrazia per
sdforexcontest2009 Tool
 sdforexcontest2009 Tool Guida all istallazione e rimozione. Per scaricare il tool del campionato occorre visitare il sito dell organizzatore http://www.sdstudiodainesi.com e selezionare il link ForexContest
SRT064 BTH SRT051 BTH SRT052 BTH
 KIT FOR TRUCK BRAKE TESTERS SRT051 BTH SRT052 BTH OPERATOR S MANUAL SRT064BTH SRT051BTH SRT052BTH CONTENTS 1. INTRODUCTION...1 2. Description of SRT064BTH Kit...2 3. Description of SRT051BTH Kit...2 4.
LaCie Ethernet Disk mini Domande frequenti (FAQ)
") LaCie Ethernet Disk mini Domande frequenti (FAQ) Installazione Che cosa occorre fare per installare l unità LaCie Ethernet Disk mini? A. Collegare il cavo Ethernet alla porta LAN sul retro dell unità LaCie
LaCie Ethernet Disk mini Domande frequenti (FAQ) Installazione Che cosa occorre fare per installare l unità LaCie Ethernet Disk mini? A. Collegare il cavo Ethernet alla porta LAN sul retro dell unità LaCie
LINKSYS SPA922 GUIDA ALLA CONFIGURAZIONE EUTELIAVOIP
 LINKSYS SPA922 GUIDA ALLA CONFIGURAZIONE EUTELIAVOIP Linksys SPA922 - Guida alla Configurazione EUTELIAVOIP Rev1-0 pag.2 INDICE SCOPO...3 COLLEGAMENTO FISICO APPARATO...3 ACCESSO ALL ADMINISTRATOR WEB
Nautilus Installazione Aggiornato a versione 2.4.1092
 Nautilus Installazione Aggiornato a versione 2.4.1092 IMPORTANTE: NON INSERIRE LA CHIAVE USB DI LICENZA FINO A QUANDO RICHIESTO NOTA: se sul vostro computer è già installato Nautilus 2.4, è consigliabile
DSL-G604T Wireless ADSL Router
 Il prodotto può essere configurato con un qualunque browser aggiornato come Internet Explorer 6 o Netscape Navigator 6.2.3. DSL-G604T Wireless ADSL Router Prima di cominciare 1. Se si intende utilizzare
 MANUALE UTENTE MODULO ESPANSIONE TASTI MANUALE UTENTE MANUALE UTENTE Descrizione Il modulo fornisce al telefono VOIspeed V-605 flessibilità e adattabilità, mediante l aggiunta di trenta tasti memoria facilmente
ROUTER ADSL2 FIREWALL WIRELESS
 ROUTER ADSL2 FIREWALL WIRELESS GUIDA RAPIDA DI INSTALLAZIONE www.hamletcom.com 1 NB: Per avere istruzioni dettagliate per configurare e usare il Router, utilizzare il manuale on-line. Prestare attenzione:
REGISTRATION GUIDE TO RESHELL SOFTWARE
 REGISTRATION GUIDE TO RESHELL SOFTWARE INDEX: 1. GENERAL INFORMATION 2. REGISTRATION GUIDE 1. GENERAL INFORMATION This guide contains the correct procedure for entering the software page http://software.roenest.com/
Manuale per l utente di Ethernet
 Manuale per l utente di Ethernet Indice 1. Nome della scheda dell interfaccia & stampante disponibile... 2 2. Specifiche... 3 3. Modalità d installazione... 4 4. Configurazione della scheda dell interfaccia
TK300II USER S GUIDE GUIDA OPERATIVA GUIDE D UTILISATION BEDIENUNGSANLEITUNG GUIA OPERATIVA
 TK300 USER S GUDE GUDA OPERATVA GUDE D UTLSATON BEDENUNGSANLETUNG GUA OPERATVA VERPRNT READY 28/04/08 11:03:50 TKT Command reference: DOMC-0019E F D E The CE mark affi xed to the product certify that
Kit trasmissione. data transmission. Ref. 10085
 Kit trasmissione dati WIRELESS Kit for wireles data transmission Ref. 10085 MANUALE UTENTE aspetto componenti A Chiavetta USB per connesione al PC B Strumento rilavazione dati C Adattatore 1 Connettore
FRITZ!Box Fon ata GUIDA ALL INSTALLAZIONE. Fritz!Box Fon ATA Guida all installazione EUTELIAVOIP Rev1-0
 FRITZ!Box Fon ata GUIDA ALL INSTALLAZIONE Fritz!Box Fon ATA Guida all installazione EUTELIAVOIP Rev1-0 pag.2 INDICE BREVE DESCRIZIONE DEL FRITZ!Box Fon ata...3 IL CONTENUTO DELLA SCATOLA DEL FRITZ!Box
Printer Driver. Guida per la configurazione Questa guida descrive come impostare il driver della stampante per Windows 7, Windows Vista e Windows XP.
 4-417-507-71(1) Printer Driver Guida per la configurazione Questa guida descrive come impostare il driver della stampante per Windows 7, Windows Vista e Windows XP. Prima di usare il software Prima di
SIEMENS GIGASET S450 IP GUIDA ALLA CONFIGURAZIONE EUTELIAVOIP
 SIEMENS GIGASET S450 IP GUIDA ALLA CONFIGURAZIONE EUTELIAVOIP Gigaset S450 IP Guida alla configurazione EUTELIAVOIP Rev1-0 pag.2 INDICE SCOPO...3 TELEFONARE CON EUTELIAVOIP...3 CONNESSIONE DEL TELEFONO
Guida Google Cloud Print
 Guida Google Cloud Print Versione 0 ITA Definizioni delle note Nella presente Guida dell utente viene utilizzata la seguente icona: Le note forniscono istruzioni da seguire in determinate situazioni o
Guida al funzionamento del proiettore di rete
 Guida al funzionamento del proiettore di rete Sommario Preparazione...3 Collegamento del proiettore con il computer...3 Connessione cablata... 3 Controllo del proiettore da remoto tramite un browser per
Guida alla configurazione Configuration Guide
 Guida alla configurazione Configuration Guide Configurazione telecamere IP con DVR analogici, compatibili IP IP cameras configuration with analog DVR, IP compatible Menu principale: Fare clic con il pulsante
SOMMARIO GENERALITÀ 3 AGGIORNAMENTO FIRMWARE 4 PROGRAMMAZIONE DEL MICROPROCESSORE 7 AGGIORNAMENTO MULTICOM 302 / 352 4 AGGIORNAMENTO MULTI I/O 5
 MultiCOM - Mult lti I/O - Remote Panel - Istruzioni aggiornamento firmware - - Firmware upgrade instructions - SOMMARIO GENERALITÀ 3 AGGIORNAMENTO FIRMWARE 4 AGGIORNAMENTO MULTICOM 301 / 351 4 AGGIORNAMENTO
FRITZ!Box Fon WLAN 7050 GUIDA ALL INSTALLAZIONE. Fritz!Box Fon WLAN 7050 Guida all installazione EUTELIAVOIP Rev1-0
 FRITZ!Box Fon WLAN 7050 GUIDA ALL INSTALLAZIONE Fritz!Box Fon WLAN 7050 Guida all installazione EUTELIAVOIP Rev1-0 pag.2 INDICE COSA E IL FRITZ!Box Fon WLAN 7050...3 IL CONTENUTO DELLA SCATOLA DEL FRITZ!Box
Attuatore a relè Manuale di istruzioni
 Attuatore a relè Manuale di istruzioni www.ecodhome.com 1 Sommario 3 Introduzione 4 Descrizione e specifiche prodotto 5 Installazione 6 Funzionamento 6 Garanzia 2 Introduzione SmartDHOME vi ringrazia per
Guida applicativa - Print Server. Rev: 2.0.0 1910010857
 Guida applicativa - Print Server Rev: 2.0.0 1910010857 Indice dei contenuti Introduzione... 1 Installazione su Windows 8/7/Vista/XP... 1 Utilizzo su Windows 8/7/Vista/XP... 6 Controller... 6 Stampa...
DI-604 Express EtherNetwork Broadband Router
 Il presente prodotto può essere configurato con un qualunque browser, per esempio, Internet Explorer 5x, Netscape Navigator 4x.` DI-604 Express EtherNetwork Broadband Router Prima di cominciare 1. Se si
Software di gestione della stampante
 Questo argomento include le seguenti sezioni: "Uso del software CentreWare" a pagina 3-11 "Uso delle funzioni di gestione della stampante" a pagina 3-13 Uso del software CentreWare CentreWare Internet
Guida utente di WNDR4500. Guida all'utilizzo del router WNDR4500 ReadySHARE Printer Accesso a ReadySHARE NETGEAR Genie per computer desktop
 Guida utente di WNDR4500 Guida all'utilizzo del router WNDR4500 ReadySHARE Printer Accesso a ReadySHARE NETGEAR Genie per computer desktop 2011 NETGEAR, Inc. Tutti i diritti riservati. Assistenza tecnica
Gateway Bacnet Multichiller series
 Servizio egolazione e Controllo File Pagina 1/11 Gateway Bacnet Multichiller series Servizio egolazione e Controllo File Pagina 2/11 CONTENTS 1. PCOWEB INSTALLATION... 3 2. BACNET MAPPING... 5 3. PCO COMMUNICATION
USER S GUIDE GUIDA OPERATIVA GUIDE D UTILISATION BEDIENUNGSANLEITUNG GUIA OPERATIVA TKT. Commands reference: DOMC-ES00175-0001E
 USER S GUIDE GUIDA OPERATIVA GUIDE D UTILISATION BEDIENUNGSANLEITUNG GUIA OPERATIVA TKT Commands reference: DOMC-ES00175-0001E GB I F D E The CE mark affi xed to the product certify that the product satisfi
ATTENZIONE Prima di collegare l alimentazione inserire la SD CARD che si trova dentro alla scatola (vedi istruzioni all interno)
") ATTENZIONE Prima di collegare l alimentazione inserire la SD CARD che si trova dentro alla scatola (vedi istruzioni all interno) Importante Per una corretta installazione del prodotto è necessario seguire
ATTENZIONE Prima di collegare l alimentazione inserire la SD CARD che si trova dentro alla scatola (vedi istruzioni all interno) Importante Per una corretta installazione del prodotto è necessario seguire
How to use the WPA2 encrypted connection
 How to use the WPA2 encrypted connection At every Alohawifi hotspot you can use the WPA2 Enterprise encrypted connection (the highest security standard for wireless networks nowadays available) simply
DP-301U. Prima di cominciare. Contenuto del pacchetto. Print Server Fast Ethernet D-Link. DP-301U Print Server USB
 Il presente prodotto può essere configurato utilizzando un qualunque browser aggiornato, come Internet Explorer 6 o Netscape Navigator 7.0 DP-301U Print Server Fast Ethernet D-Link Prima di cominciare
IF2E001 Interfaccia Ethernet-RS485
 IF2E001 Interfaccia Ethernet-RS485 Manuale utente File : Ethernet interfaccia-manuale utente.doc 1/4 Interfaccia Ethernet manuale utente Versione 1.1 1 DESCRIZIONE GENERALE Questo dispositivo consente
SIP-Phone 302 GUIDA ALLA CONFIGURAZIONE EUTELIAVOIP
 SIP-Phone 302 GUIDA ALLA CONFIGURAZIONE EUTELIAVOIP SIP-Phone 302 Guida alla Configurazione EUTELIAVOIP Rev1-0 pag.2 INDICE SCOPO...3 COME ACCEDERE ALLA CONFIGURAZIONE...3 Accesso all IP Phone quando il
TELECAMERA IN CMP-NWIPCAM20 CMP-NWIPCAM30
 TELECAMERA IN CMP-NWIPCAM20 CMP-NWIPCAM30 ISTRUZIONI IN ITALIANO Guida di installazione rapida (Si prega di fare riferimento al manuale completo in Inglese sul CD per ulteriori dettagli) 1. Contenuto della
USB 2,0 SERVER DI STAMPA ETHERNET
 USB 2,0 SERVER DI STAMPA ETHERNET DN-13014-3 DN-13003-1 Guida rapida all'installazione DN-13014-3 e DN-13003-1 Prima di iniziare, dovrete preparare i seguenti articoli: I computer Windows 2000/XP/2003/Vista/7
SIP PHONE Perfectone IP301 Manuale Operativo PHONE IP301 GUIDA ALL INSTALLAZIONE
 pag.1 PHONE IP301 GUIDA ALL INSTALLAZIONE pag.2 INDICE SERVIZIO VOIP SKYPHO...3 COMPONENTI PRESENTI NELLA SCATOLA DELL IP301...3 COLLEGAMENTO FISICO APPARATO...4 ACCESSO ALL APPARATO...8 Accesso all IP
Guida all installazione del prodotto 4600 in configurazione plip
 Guida all installazione del prodotto 4600 in configurazione plip Premessa Questo prodotto è stato pensato e progettato, per poter essere installato, sia sulle vetture provviste di piattaforma CAN che su
BIPAC 7100SV Modem/Router ADSL VoIP
 BIPAC 7100SV Modem/Router ADSL VoIP Guida rapida all avvio Modem/RouterADSL VoIP Billion BIPAC 7100SV Per istruzioni più dettagliate sul come configurare e usare il Modem/Router ADSL VoIP, vedere il manuale
3G HSPA USB MULTIMODEM High Speed Wireless Connectivity MT4211
 3G HSPA USB MULTIMODEM High Speed Wireless Connectivity MT4211 Instructions Manual Introduction Thank you for your purchasing our HSUPA USB modem with TF fl ash card socket. Device is backward compatible
Hosting Applicativo Upgrade Web Client
 Hosting Applicativo Upgrade Web Client guida all upgrade dei client di connessione Marzo 2012 Hosting Applicativo Installazione Web Client Introduzione Il personale Cineca effettua regolarmente dei controlli
Manuale utente. Quinx Box serie 200/300/400. Ethernet RS232 - TCP/IP converter
 Manuale utente Quinx Box serie 200/300/400 Ethernet RS232 - TCP/IP converter A cura di: ICG Holding srl Div. Time & Access Via Leonardo da Vinci 45/47 20020 Lainate (MI) Nr. rif. Q 200 001 Versione 1.10.97
MANUALE D USO MA-PMX-U-SFW-101 10-10
 GESTIONE DEL SISTEMA EASYMIX CONNECT E RELATIVO AGGIORNAMENTO MANUALE D USO MA-PMX-U-SFW-101 10-10 Sommario LAUNCH MANAGEMENT TOOL...3 APPLICATION UPDATE...4 MODULO SYSTEM MANAGEMENT...5 LINGUA... 6 DATE
Guida Google Cloud Print
 Guida Google Cloud Print Versione 0 ITA Definizioni delle note Nella presente Guida dell utente viene utilizzato lo stile che segue per contrassegnare le note: Le note forniscono istruzioni da seguire
Programma di configurazione di reti NetWare
 Novell NetWare Questo argomento include le seguenti sezioni: "Programma di configurazione di reti NetWare" a pagina 3-44 "Configurazione rapida" a pagina 3-44 "Impostazione avanzata" a pagina 3-44 "Impostazione
Abilitazione e uso del protocollo EtherTalk
 Macintosh Questo argomento include le seguenti sezioni: "Requisiti" a pagina 3-35 "Abilitazione e uso del protocollo EtherTalk" a pagina 3-35 "Abilitazione e uso del protocollo TCP/IP" a pagina 3-36 "Procedura
Guida Google Cloud Print
 Guida Google Cloud Print Versione A ITA Definizioni delle note Nella presente Guida dell utente viene utilizzato lo stile che segue per contrassegnare le note: Le note forniscono istruzioni da seguire
Guida rapida all installazione
 Guida rapida all installazione Wireless Network Broadband Router 140g+ WL-143 La presente guida illustra solo le situazioni più comuni. Fare riferimento al manuale utente contenuto nel CD-ROM in dotazione
Quick Guide imagic. ATTENZIONE Prima di collegare l alimentazione inserire la SD CARD che si trova dentro alla scatola (vedi istruzioni all interno)
") ATTENZIONE Prima di collegare l alimentazione inserire la SD CARD che si trova dentro alla scatola (vedi istruzioni all interno) Importante Per una corretta installazione del prodotto è necessario seguire
ATTENZIONE Prima di collegare l alimentazione inserire la SD CARD che si trova dentro alla scatola (vedi istruzioni all interno) Importante Per una corretta installazione del prodotto è necessario seguire
Guida rapida all installazione
 www.dmail.it Idee Utili e Introvabili Cod. 314471 DMedia Commerce S.p.A. Via Aretina 25 50065 Sieci (FI) ITALY Tel. +39 055 8363040 Fax +39 055 8363057 Assist. Tecnica: assistenza.dmail@dmc.it VIdeoCAMera
Installazione di GFI Network Server Monitor
 Installazione di GFI Network Server Monitor Requisiti di Sistema Le macchine che eseguono GFI Network Server Monitor richiedono: I sistemi operativi Windows 2000 (SP4 o superiore), 2003 o XP Pro. Windows
BIPAC-5100 / 5100W. Router ADSL (senza fili) Guida rapida all avvio
 Guida rapida all avvio") BIPAC-5100 / 5100W Router ADSL (senza fili) Guida rapida all avvio Billion BIPAC-5100 / 5100W ADSL Router Per istruzioni più dettagliate sulla configurazione e l uso del router firewall ADSL (senza fili),
BIPAC-5100 / 5100W Router ADSL (senza fili) Guida rapida all avvio Billion BIPAC-5100 / 5100W ADSL Router Per istruzioni più dettagliate sulla configurazione e l uso del router firewall ADSL (senza fili),
Procedura aggiornamento firmware H02
 Procedura aggiornamento firmware H02 Sommario Introduzione... 3 Caratteristiche versione firmware... 3 Strumentazione necessaria e requisiti di base... 3 Procedura aggiornamento... 4 Appendice... 11 Risoluzione
GE Fanuc Automation. Page 1/12
 GE FANUC Data Server FTP Server - Configurazione - Page 1/12 Revision History Version Date Author Notes 1.00 05-Jun-2002 M. Bianchi First release Summary 1 Introduzione... 3 1.1 Riferimenti... 3 2 Configurazione
IMPORTANTE : La XM200LAN non può essere utilizzata contemporaneamente da più computer. Tasto RESET
 XM200LN Made in Italy EMC/2006/95/CE zienda con Sistema di gestione per la Qualità UNI EN ISO 9001:2000 Lead free Pb RoHS compliant REE Modulo connessione LN per centrali Serie XM Tensione nominale di
Aggiornamento dispositivo di firma digitale
 Aggiornamento dispositivo di firma digitale Updating digital signature device Questo documento ha il compito di descrivere, passo per passo, il processo di aggiornamento manuale del dispositivo di firma
Stampante DIN BEGHELLI ISTRUZIONI PER L USOL. Stampante per Sistemi Centralizzati e Logica Beghelli
 Stampante DIN BEGHELLI Stampante per Sistemi Centralizzati e Logica Beghelli ISTRUZIONI PER L USOL Vista esterna anteriore 1 LED segnalazione Stato 2 Leve apertura coperchio 3Vano rotolo carta 4 Pannello
Gui Gu d i a d ra r p a i p d i a V d o a d f a one Int fone In e t r e net rnet Box Key Mini
 Guida rapida Vodafone Internet Key Box Mini Ideato per Vodafone QSG_VMCLite_v31_10-2007_e172_IT.1 1 10/10/07 14:39:10 QSG_VMCLite_v31_10-2007_e172_IT.2 2 10/10/07 14:39:11 Benvenuti nel mondo della connessione
Per trovare un IP address (indirizzo IP) di un router Linksys, controllare le impostazioni del computer. Per istruzioni, cliccare qui.
 di un router Linksys, controllare le impostazioni del computer. Per istruzioni, cliccare qui.") Assegnazione di un IP Address statico ad un computer cablato Prodotto Domande Come imposto un IP address statico di un computer cablato? Parole chiavi Risposta L assegnazione ad un computer un IP Address
Assegnazione di un IP Address statico ad un computer cablato Prodotto Domande Come imposto un IP address statico di un computer cablato? Parole chiavi Risposta L assegnazione ad un computer un IP Address
Sistema Operativo di un Router (IOS Software)
") - Laboratorio di Servizi di Telecomunicazione Sistema Operativo di un Router (IOS Software) Slide tratte da Cisco Press CCNA Instructor s Manual ed elaborate dall Ing. Francesco Immè IOS Un router o uno
- Laboratorio di Servizi di Telecomunicazione Sistema Operativo di un Router (IOS Software) Slide tratte da Cisco Press CCNA Instructor s Manual ed elaborate dall Ing. Francesco Immè IOS Un router o uno
Installazione di GFI Network Server Monitor
 Installazione di GFI Network Server Monitor Requisiti di sistema I computer che eseguono GFI Network Server Monitor richiedono: i sistemi operativi Windows 2000 (SP4 o superiore), 2003 o XP Pro Windows
IRSplit. Istruzioni d uso 07/10-01 PC
 3456 IRSplit Istruzioni d uso 07/10-01 PC 2 IRSplit Istruzioni d uso Indice 1. Requisiti Hardware e Software 4 1.1 Requisiti Hardware 4 1.2 Requisiti Software 4 2. Installazione 4 3. Concetti fondamentali
Aethra Stargate AS2111
 Aethra Stargate AS2111 Predisposizione del router e del PC Configurazione per utenti con singolo IP pubblico Configurazione per utenti con subnet di IP pubblici Modifica della password di default Reset
Utilizzo del modem DC-213/214 con i router wireless Guida all installazione
 Utilizzo del modem DC-213/214 con i router wireless Guida all installazione La presente guida illustra le situazioni più comuni per l installazione del modem ethernet sui router wireless Sitecom. Configurazione
VS-TV. Manuale per l utente. Matrice video virtuale ITALIANO
 ITALIANO VS-TV Manuale per l utente Matrice video virtuale ÍNDICE 1 INTRODUZIONE... 2 1.1 CARATTERISTICHE.... 2 2 INSTALLAZIONE ED AVVIO... 3 2.1 CONTENUTO DELL IMBALLAGGIO... 3 2.2 INSTALLAZIONE... 3
Guida rapida Vodafone Internet Box
 Guida rapida Vodafone Internet Box Benvenuti nel mondo della connessione dati in mobilità di Vodafone Internet Box. In questa guida spieghiamo come installare e cominciare a utilizzare Vodafone Internet
Guida Google Cloud Print
 Guida Google Cloud Print Versione B ITA Definizioni delle note Nella presente Guida dell utente viene utilizzato lo stile che segue per contrassegnare le note: Le note forniscono istruzioni da seguire
BiGuard 2. Gateway di protezione per casa e ufficio ibusiness. Guida di avvio rapido
 BiGuard 2 Gateway di protezione per casa e ufficio ibusiness Guida di avvio rapido Gateway di protezione per casa e ufficio BiGuard 2 ibusiness Introduzione BiGuard 2 è un dispositivo di commutazione
WELCOME. Go to the link of the official University of Palermo web site www.unipa.it; Click on the box on the right side Login unico
 WELCOME This is a Step by Step Guide that will help you to register as an Exchange for study student to the University of Palermo. Please, read carefully this guide and prepare all required data and documents.
Posta elettronica per gli studenti Email for the students
 http://www.uninettunouniverstiy.net Posta elettronica per gli studenti Email for the students Ver. 1.0 Ultimo aggiornamento (last update): 10/09/2008 13.47 Informazioni sul Documento / Information on the